Physical Address
304 North Cardinal St.
Dorchester Center, MA 02124
Physical Address
304 North Cardinal St.
Dorchester Center, MA 02124
The “angle grinder” is often called the king of the workshop, and for good reason. Whether you are a weekend DIYer or a seasoned pro, this versatile tool can cut, grind, polish and sharpen almost anything you throw at it. But let’s be honest—the first time you pull the trigger and see those sparks fly it can be a little intimidating. Learning how to use an angle grinder isn’t just about making the cut; it’s about mastering a powerful piece of machinery while keeping your fingers (and your workspace) intact.
In this comprehensive guide, we are going to break down everything you need to know. We will cover the basics of setting up your grinder, the nuances of cutting different materials and the vital safety steps that keep “how to operate an angle grinder” a productive experience rather than a dangerous one. If you’re learning how to use an angle grinder for the first time safety should always be your top priority.
Before we dive into how do you use an angle grinder, it helps to understand what it actually is. An angle grinder is a handheld power tool that uses a rotating disc to perform various tasks. The grinder operates at incredibly high speeds—often over 10,000 RPM—which is why it handles tough materials like steel and stone so easily.
Historically, these tools were massive industrial machines, but modern technology has shrunk them down into a package you can hold with two hands. They are defined by their right-angle gear head, which allows the disc to spin perpendicular to the motor. This unique design is what gives the tool its incredible versatility, allowing you to get into corners and work on flat surfaces with the same machine.
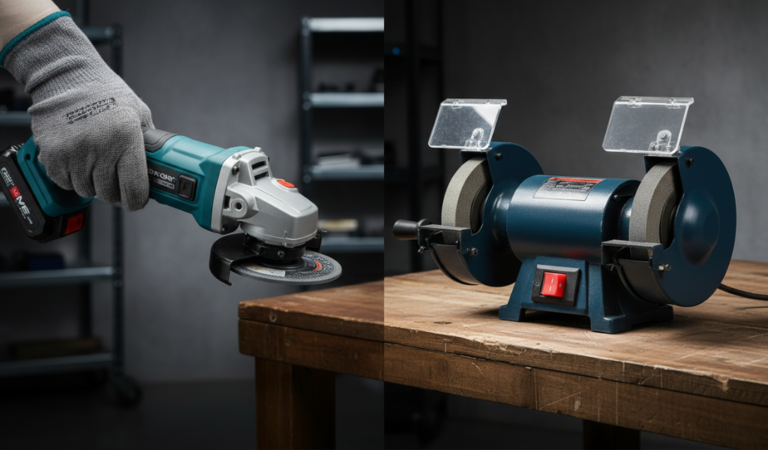
Not all grinders are built the same. Depending on your project you might need a specific “style” of tool to get the job done right. Understanding these variations is the first step in learning how to operate an angle grinder effectively.
These are the workhorses of the shop. They plug directly into a wall outlet providing “unlimited run time” and consistent power. They are perfect for heavy-duty tasks like grinding down thick weld beads or spending hours polishing a concrete floor. You never have to worry about a battery dying in the middle of a crucial cut.
Powered by high-capacity lithium-ion batteries, these offer amazing mobility. If you need to cut a pipe under a sink work on a remote fence line, or climb a ladder to trim a roof bolt the cordless version is your best friend. While they used to be underpowered, modern 18V and 20V brushless motors have made them almost as strong as their corded cousins.
These run on compressed air rather than electricity. You’ll mostly see these in automotive shops or industrial settings. Because they don’t have a bulky electric motor, they are incredibly lightweight and “maneuverable”. They are also safer to use in wet environments where electricity might pose a shock hazard.
A standard grinder is either “on” or “off” at max speed. However, a variable speed model allows you to dial the RPM down. This is crucial for delicate tasks like polishing stone, sanding wood or working on stainless steel where high heat can cause discoloration.
If you are looking to buy your first tool, the options can be overwhelming. Here is what you should look for to ensure you know how to operate an angle grinder comfortably and safely:
The most common sizes are 4.5 inches and 5 inches. For most home users and DIY enthusiasts, a 4.5-inch (115mm) grinder is the “sweet spot.” It’s large enough to handle rebar and bolts but small enough to control easily with two hands. Professionals might opt for a 7-inch or 9-inch model for massive demolition work but these are much heavier and harder to manage.
For corded models look for a motor between 6 and 10 amps. If you plan on doing a lot of heavy grinding go for the higher amp rating. For cordless ensure you have at least a 4.0Ah battery; anything smaller will drain too quickly under the high load of a “grinder”.
Changing the disc is a fundamental part of how to use an angle grinder. If the disc isn’t seated correctly it can vibrate, fly off or even shatter at 11,000 RPM.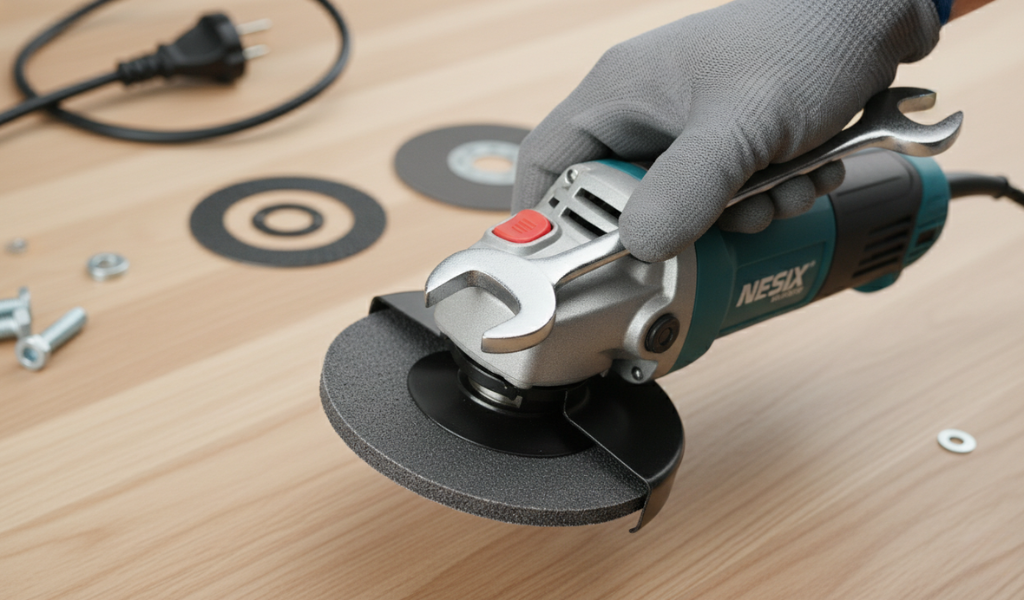
This is the most important step. Always unplug the cord or remove the battery first. You do not want the tool accidentally turning on while your fingers are near the spindle.
Most modern grinders have a button on the top of the gear housing. Press and hold this to lock the spindle in place so it cannot spin.
Use the spanner wrench that came with your tool. Insert the pins into the holes of the nut and turn it counter-clockwise. If the nut is too tight a quick tap on the wrench usually loosens it.
Before putting a new disc on, give it a quick “visual check”. Look for any chips, cracks or signs of moisture damage. Check the “expiration date” printed on the metal center ring of the disc—yes, grinding discs do expire as the resins holding them together degrade over time!
Place the new disc on the spindle. Ensure the “depressed center” (if it has one) fits over the flange correctly. Screw the nut back on. For thin cutting discs, the nut usually goes on with the flat side down. For thicker grinding wheels, the recessed side of the nut usually faces down. Tighten it firmly with the wrench.
Before you start take five minutes to prep your area. A “phenomenal” setup leads to a phenomenal result.
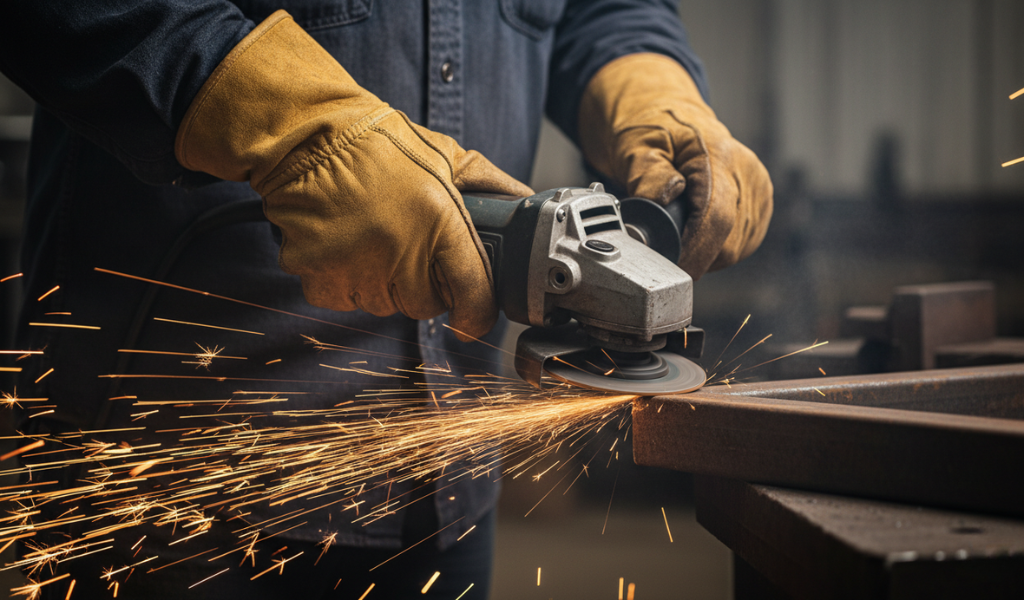
Cutting steel is the most common reason people reach for this tool. Whether you are shortening a rusted bolt or cutting sheet metal for a patch the technique is key.
Use a thin “cut-off wheel” (usually about 1/16 inch thick) for slicing through metal. Use a thicker grinding disc (1/4 inch thick) for smoothing down welds or shaping metal.
Hold the grinder with both hands. Position yourself to the side of the tool’s path. If the disc shatters, the pieces usually fly in the plane of the disc’s rotation. By standing to the side you stay out of the “line of fire”.
Start the grinder and let it reach full speed. Gently lower it onto the metal. How do you use an angle grinder without burning the metal? The secret is to keep it moving. Don’t sit in one spot. Use a “sawing motion” to move back and forth through the cut. Let the tool do the work; if you see the RPMs dropping, you are pushing too hard.
Once the cut is finished, the metal will have “burrs”—sharp, jagged edges. Switch to a “flap disc” (which looks like overlapping pieces of sandpaper) to smooth these edges down until they are safe to touch.
Concrete is incredibly hard and abrasive. If you try to use a metal-cutting disc on concrete, it will wear down to nothing in seconds. For masonry, you need “diamond-edged” blades.
When cutting paving stones or bricks, dust is your biggest enemy. If possible, use a “wet-cutting” technique by having a helper trickle a small amount of water onto the cut. This keeps the blade cool and kills the dust. If working dry, make sure your respirator is tight and take frequent breaks. Always keep the blade perfectly straight; if you tilt the “grinder”, the blade will grab the concrete and jerk the tool out of your hands.
If you have a high spot on a concrete floor, use a “diamond cup wheel”. This is a heavy, metal-bodied disc with diamond segments. Hold the grinder almost flat to the surface and move in a constant, circular motion. It will eat through concrete like butter, so check your progress frequently to avoid grinding a hole in your floor!
An angle grinder can save you a lot of money on professional sharpening. You can restore the edge of lawnmower blades, shovels, hoes, and even axes.
Kickback is the primary cause of angle grinder injuries. It happens when the spinning disc gets pinched in the material or hits a hard spot, causing the tool to physically “jump” or kick back toward the operator.
How to stay safe:
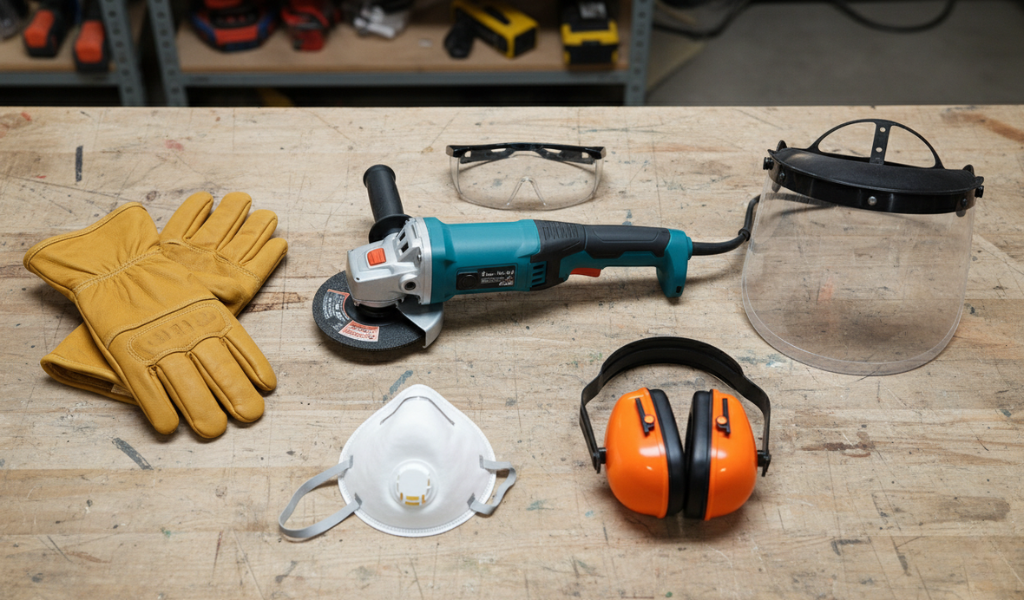 If you take away only one thing from this guide, let it be this: never skip your safety gear. When you learn how to operate an angle grinder you quickly realize that sparks and debris are part of the deal. The material you are removing doesn’t just disappear; it turns into tiny, red-hot projectiles.
To stay protected, you should always wear:
Even pros get lazy, and that’s when accidents happen. Avoid these common pitfalls:
Mastering how to use an angle grinder is a rite of passage for any DIYer. It is a “phenomenal” tool that replaces a dozen hand tools, saving you hours of manual labor. Whether you are cleaning up old garden tools, cutting tile for a bathroom or fabricating a steel gate, the “grinder” is your most reliable ally.
However, its power must be respected. By choosing the right “grinder” for your needs, wearing your PPE religiously, and following the mechanical principles of how to operate an angle grinder, you can work safely and professionally. Take it slow, keep a firm grip and watch those sparks fly—in the right direction!
While “wood-carving” discs exist, they are extremely dangerous for beginners. The high speed of a grinder can cause the tool to kick back violently if it hits a knot in the wood. It is much safer to use a “jigsaw” or a “circular saw” for wood projects.
Check the edges. If a cutting disc has worn down so much that you can’t reach the center of your cut, replace it. If you see any “fraying” on the edges of a reinforced disc or any visible cracks, throw it away immediately.
When grinding ferrous metals (like steel or iron), the friction creates heat that literally melts tiny bits of the metal, turning them into sparks. This is normal. If the sparks are coming from the motor vents, however, your “carbon brushes” are likely worn out and need to be replaced.
A 4.5-inch model is for precision and light-to-medium work. A 9-inch grinder is a “beast” used for heavy demolition, like cutting through thick concrete walls or massive steel beams. Most homeowners will never need a 9-inch model.
You can, but you shouldn’t. The side handle gives you the leverage needed to control the tool if it kicks back. Using it without the handle increases the risk of the tool twisting out of your grip.