Looking to conquer those tile projects like a pro? Wondering how to use a handheld tile cutter without the hassle? You’re in the right place! In this quick guide, we’ll demystify the art of using a handheld tile cutter. Imagine clean lines, perfect edges – all at your fingertips.
Whether you’re a seasoned DIY enthusiast or just starting your tiling journey, we’ve got the tips and tricks to make your cuts clean and precise. So, grab your tile cutter and let’s dive right in. It’s easier than you think!
Key Summary: How to Use a Handheld Tile Cutter?
Master the effective use of a handheld tile cutter for your DIY tiling projects. From scoring to snapping, grasp the essential techniques for clean, accurate cuts. Elevate your skills and achieve a professional finish every time!
A handheld tile cutter is a versatile tool designed for precision and ease in cutting tiles during various home improvement projects. Understanding its components and features is crucial for efficient usage:
Cutting Wheel: The cutting wheel is the heart of a handheld tile cutter. Typically made of tungsten carbide, it scores the tile’s surface, enabling a clean break along the score line.
Base Plate: The base plate provides stability and support for the tile during cutting. It allows for precise positioning and smooth movement of the cutting wheel.
Handle: The handle provides a comfortable grip, allowing the user to exert controlled pressure while cutting. Ergonomic handles reduce fatigue during extended use.
Guide: The guide is an essential feature that helps maintain a straight cutting path, ensuring accurate and consistent cuts on the tile.
Adjustable Fence: Many handheld tile cutters come with an adjustable fence or guide that allows for angled cuts. This feature is particularly useful for creating bevels or mitered cuts.
Breaking Mechanism: Some handheld tile cutters are equipped with a breaking mechanism that assists in cleanly breaking the tile along the scored line, providing a smooth edge.
Measurement Scale: Incorporating a measurement scale on the base plate or guide helps in precise tile measurements and consistent cuts, vital for achieving the desired tile dimensions.
Water Reservoir: Some advanced handheld tile cutters have a water reservoir to minimize dust and keep the cutting area cool, ensuring the cutting wheel remains sharp and effective.
Tile Thickness Adjustment: Certain models allow for adjustment to accommodate various tile thicknesses, providing flexibility for cutting different types of tiles.
Carrying Case: Many handheld tile cutters come with a convenient carrying case, making it easy to transport and store the tool, ensuring its longevity.
Understanding these components and features allows users to select the appropriate handheld tile cutter based on the project requirements, enhancing efficiency and achieving precise, professional-quality tile cuts.
Essential Safety Measures Before Using a Handheld Tile Cutter
Before using a handheld tile cutter, prioritizing safety is paramount to prevent accidents and ensure a smooth and secure cutting process. Here are essential safety measures to follow:
Protective Gear: Always wear appropriate protective gear, including safety glasses to shield your eyes from tile fragments and debris, and gloves to protect your hands from potential cuts or injuries.
Well-Ventilated Area: Work in a well-ventilated space to avoid inhaling dust and fumes generated during the cutting process. Proper ventilation contributes to a healthier work environment.
Stable Work Surface: Ensure your work surface is stable and level to prevent slips or wobbling of the tile cutter during operation. A stable base provides a secure foundation for precise cutting.
Secure the Tile: Securely clamp the tile to the base plate of the cutter using the built-in clamping mechanism. This prevents the tile from moving during the cutting process, ensuring accuracy and safety.
Mind the Cutting Line: Clearly mark the cutting line on the tile using a pencil or marker. Pay close attention to this line while cutting to maintain accuracy and avoid deviations.
Proper Body Position: Position your body and hands in a way that ensures stability and control. Maintain a balanced stance and a firm grip on the cutter, distributing your weight evenly for better control.
Mindful Pressure: Apply even and controlled pressure on the tile cutter’s handle while scoring the tile. Avoid excessive force, as this may cause the tile to crack or shatter.
Follow Manufacturer Instructions: Familiarize yourself with the specific instructions and guidelines provided by the manufacturer for your particular handheld tile cutter model. Adhering to these instructions is crucial for safe and efficient usage.
Keep Hands Clear: Always keep your hands and fingers away from the cutting wheel and the area where the cut is being made. Exercise caution and maintain a safe distance to prevent injuries.
Regular Maintenance: Ensure that the handheld tile cutter is well-maintained and in good working condition. Regularly inspect the tool for any damages, and address any issues promptly to ensure safe usage.
By following these essential safety measures, you significantly reduce the risk of accidents and injuries, creating a safe environment for successful and precise tile cutting.
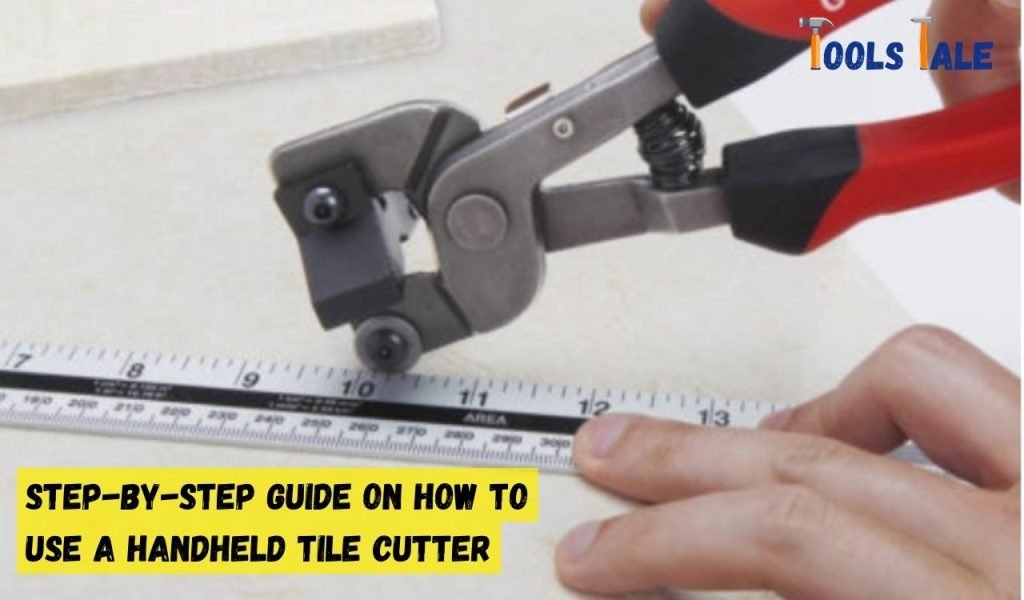
Step-By-Step Guide on How to Use a Handheld Tile Cutter
Mastering the use of a handheld tile cutter is crucial for achieving precise and clean cuts in your tile projects. Here’s a step-by-step guide to using this tool effectively:
Safety First: Put on safety glasses and gloves to protect your eyes and hands from tile fragments and sharp edges.
Mark the Tile: Place the tile on a stable and level surface. Measure and mark the tile along the cutting line using a pencil or marker. Ensure the line is straight and accurately placed.
Position the Tile Cutter: Align the marked cutting line with the scoring wheel of the tile cutter. Adjust the tile cutter guide to match the marked line, ensuring the blade will score along the intended path.
Secure the Tile: Place the tile securely on the base plate of the tile cutter. Use the built-in clamping mechanism to hold the tile in place, preventing movement during the cutting process.
Score the Tile: Firmly hold the handle of the tile cutter, ensuring a steady grip. Apply even pressure as you run the scoring wheel along the marked cutting line. The scoring wheel will create a groove or score on the tile’s surface.
Prepare for Breaking: If your handheld tile cutter has a breaking mechanism, raise the handle to the highest point to prepare for the breaking step.
Breaking the Tile: Place the tile on a sturdy surface, aligning the scored line with the edge of the surface. Gently press down on the tile to snap it along the scored line. The tile will break cleanly, leaving a smooth edge.
Finishing Touches: Use a rubbing stone or sandpaper to smooth any rough edges or corners left from the breaking process.
Inspect the Cut: Examine the cut edge to ensure it meets your desired specifications. Make adjustments as needed for future cuts.
Repeat the Process: For additional cuts, repeat the above steps, starting with marking the tile for the next cut.
Clean the Cutter: After completing your cuts, clean the handheld tile cutter to remove any tile residue, ensuring its longevity and optimal performance for future projects.
By following this step-by-step guide, you can effectively use a handheld tile cutter to achieve precise, professional-quality cuts for your tiling projects. Always prioritize safety and accuracy throughout the process.
Maintenance Tips to Keep Your Handheld Tile Cutter Sharp
Keeping your handheld tile cutter sharp is essential for achieving clean and precise tile cuts. Here are maintenance tips to ensure your tool remains sharp and effective:
Regular Cleaning: After each use, clean the cutting wheel and base plate to remove any tile residue or debris. A clean cutter ensures smooth operation.
Inspect the Cutting Wheel: Regularly inspect the cutting wheel for signs of wear or damage. If it appears dull or chipped, replace it to maintain optimal cutting performance.
Sharpen the Cutting Wheel: Use a specialized cutting wheel sharpener or a sharpening stone to maintain the sharpness of the cutting wheel. Follow the manufacturer’s instructions for proper sharpening.
Adjust the Cutting Wheel: Check the alignment of the cutting wheel regularly. Ensure it is properly aligned and tightened to achieve accurate cuts.
Oil the Cutter: Apply a few drops of lubricating oil to the cutting wheel and moving parts to reduce friction and ensure smooth movement during operation.
Store Properly: Store the handheld tile cutter in a dry and secure location to prevent any damage or exposure to moisture that could dull the cutting wheel.
Protect the Cutting Wheel: Cover the cutting wheel with a protective cap or sheath when not in use to prevent accidental damage or dulling.
Handle with Care: Avoid dropping or mishandling the handheld tile cutter, especially the cutting wheel, to prevent any chips or deformations that can affect its sharpness.
Sharpen When Necessary: Whenever you notice a decrease in cutting efficiency or jagged edges on the tiles, sharpen the cutting wheel promptly to maintain precise cuts.
By incorporating these maintenance tips into your routine, you’ll prolong the life of your handheld tile cutter and ensure it remains sharp, allowing for accurate and smooth tile cuts in your projects.
Troubleshooting Tips for Common Issues
Encountering issues with your handheld tile cutter during a project can be frustrating, but understanding how to troubleshoot common problems can save time and help you get back on track. Here are some troubleshooting tips:
Inaccurate Cuts: Check if the tile is securely clamped and aligned properly before cutting. Ensure the cutting wheel is sharp and properly aligned with the marked cutting line.
Difficulty in Breaking Tiles: Double-check that the tile is positioned correctly for breaking, aligning the scored line with the edge of the surface. Apply gentle, even pressure when breaking the tile to avoid uneven breaks.
Cracked or Chipped Tiles: Assess the quality and type of tile you’re working with. Brittle or low-quality tiles may crack easily. Slow down the scoring process to prevent excessive pressure that can lead to cracks.
Inconsistent Cuts: Verify if the tile cutter guide is set correctly and tightened securely to ensure a consistent cutting path. Inspect the tile for any irregularities that might affect the cutting process.
Difficulty in Scoring: Make sure the scoring wheel is sharp and not worn. Replace if necessary. Apply a steady and even pressure while scoring, ensuring the wheel smoothly glides along the marked line.
Tile Movement During Cutting: Confirm the tile is securely clamped to the base plate. Consider using adhesive or painter’s tape to stabilize the tile on the base plate.
Excessive Dust and Debris: Work in a well-ventilated area and consider using a wet tile saw to minimize dust. Clean the cutting wheel and base plate regularly to prevent dust buildup that may affect performance.
By following these troubleshooting tips and adapting them to your specific situation, you’ll be able to address common issues with your handheld tile cutter and maintain a smooth and efficient tile cutting process.
Advantages of Using a Handheld Tile Cutter Over Other Methods
Using a handheld tile cutter offers several advantages over other tile cutting methods, making it a popular choice for DIYers and professionals alike:
Portability and Convenience: Handheld tile cutters are compact and lightweight, allowing for easy transportation and use on the job site. They don’t require a dedicated workspace and can be used wherever needed.
Cost-Effective: Handheld tile cutters are often more affordable than other tile cutting tools like wet tile saws or tile nippers. This makes them a cost-effective choice for those on a budget or occasional DIY projects.
Quick Setup and Operation: Setting up a handheld tile cutter is fast and straightforward. There’s no need for complex adjustments or extensive preparation, enabling users to start cutting tiles quickly.
Minimal Waste: Handheld tile cutters produce minimal waste compared to other methods like wet saws, which generate slurry and can result in a higher percentage of unusable tile portions. Handheld cutters score the tile accurately, minimizing waste.
Versatility in Tile Types: Handheld tile cutters can effectively cut various types of tiles, including ceramic, porcelain, and even glass tiles. They offer the versatility to handle different tile materials, making them a versatile tool for various projects.
Precise and Straight Cuts: Handheld tile cutters provide precise, straight cuts, thanks to the scoring mechanism. Users can accurately score the tile along the desired cutting line, resulting in clean and professional-looking cuts.
Ease of Learning and Use: Handheld tile cutters are user-friendly and easy to learn, making them suitable for beginners. With minimal training, users can quickly grasp how to use the cutter effectively, enhancing productivity.
Reduced Water Usage: Unlike wet tile saws that require water for cooling and lubrication during cutting, handheld tile cutters operate without the need for water. This makes them more eco-friendly and reduces water consumption.
No Electricity or Power Source Needed: Handheld tile cutters are manual tools and don’t rely on electricity or a power source. This eliminates the need for power outlets and allows for uninterrupted work, especially in areas with limited or no power supply.
Less Noise and Clean Work Area: Handheld tile cutters operate quietly, creating a more comfortable working environment. Additionally, they generate less dust and mess, keeping the work area clean and tidy.
By considering these advantages, individuals can make an informed decision and choose a handheld tile cutter for their specific tiling needs, enjoying the benefits it offers in terms of efficiency, precision, and cost-effectiveness.
Final Word
Mastering a handheld tile cutter is simple with the right steps. First, secure the tile, align the cutter, and score along the marked line. Prepare for breaking and exert even pressure for a clean break. Smooth rough edges and adjust as needed.
Prioritize safety with protective gear. Regular maintenance keeps the cutter sharp. With practice, you’ll achieve precise cuts with this versatile, portable tool, perfect for various tile projects.
Frequently Asked Questions
How do you use a tile cutter?
Using a tile cutter involves a few simple steps. First, measure and mark the tile where you want to make the cut. Next, place the tile in the cutter, aligning the mark with the cutting wheel. Apply even pressure on the handle to run the cutting wheel along the mark, creating a scored line. Finally, use the breaking mechanism to snap the tile along the scored line for a clean break.
How do you use a tile cutter on small tiles?
For smaller tiles, precision is key. Align the tile accurately in the cutter, ensuring the marked line is precisely under the cutting wheel. Apply gentle and even pressure on the handle to score the tile. Carefully break the tile along the scored line to prevent any chipping or unintended cracks.
Should I use a manual tile cutter?
Yes, a manual tile cutter is a great choice, especially for DIYers. It’s user-friendly, allowing you to make accurate cuts easily. It’s also cost-effective, making it a practical choice for smaller projects or occasional tile cutting needs.
What is the function of a tile cutter?
A tile cutter’s primary function is to score the surface of a tile, creating a weak point or a groove along the desired cutting line. This weakens the tile, making it easier to snap or break cleanly along the scored line, resulting in precise cuts without the need for more complex tools.
How do I secure the tile on the handheld cutter?
To secure the tile, place it on the base plate of the handheld cutter. Use the built-in clamping mechanism, usually a handle or knob, to firmly hold the tile in place. This ensures that the tile remains stable and doesn’t move during the cutting process.
Can I cut different types of tiles with a handheld tile cutter?
Yes, a handheld tile cutter is versatile and can handle various tile materials. You can use it to cut ceramic, porcelain, glass, and even natural stone tiles. However, keep in mind that harder materials might require more pressure or multiple passes to achieve a clean cut. Adjust the pressure and speed accordingly for optimal results.
Share your love!
Tools Tale
Disclaimer: This site is owned and operated by Tools Tale. toolstale.com is a participant in the Amazon Services LLC Associates Program, an affiliate advertising program designed to provide a means for sites to earn advertising fees by advertising and linking to Amazon.com. This site also participates in other affiliate programs and is compensated for referring traffic and business to these companies.