How to Sand Plywood: A Step-by-Step Guide for a Smooth Finish

How to sand plywood and unveil its smooth potential? Sanding plywood is the secret handshake to woodworking finesse. Imagine transforming a rugged plywood sheet into a satin canvas for your creative endeavors. The process isn’t a tedious chore; it’s your plywood’s spa day.

Dive into this quick guide for tips and tricks, and soon you’ll be sanding plywood like a pro. Get ready to turn rough plywood into a polished canvas for your next project. Let’s get that wood singing with smoothness!

Key Summary: How to Sand Plywood?

Start by selecting the right grit sandpaper for sanding plywood. Use light, even pressure, and follow the wood grain. Finish with finer grits for a polished look. Finish by cleaning off dust and applying a sealant for a professional look.

Hand Tools Suggestion for Your Home

Understanding the Importance of Sanding Plywood

Sanding plywood is a crucial step in any woodworking or DIY project involving plywood. Plywood, a versatile engineered wood product made from thin layers of wood veneer glued together, offers strength and stability. However, it often requires finishing touches to achieve a polished and professional appearance. Sanding is a key component of this finishing process, and its importance cannot be overstated.

Smoothing the Surface

Plywood surfaces, though sturdy, can be uneven or rough due to the layering process during manufacturing. Sanding helps in smoothing out these irregularities, resulting in a level surface that is aesthetically pleasing. A smooth surface is not only visually appealing but also provides an ideal base for painting, staining, or sealing.

Enhancing Adhesive Bond

Plywood is often used in structural applications where adhesives are used to bond pieces together. Sanding the plywood surface ensures that the adhesive bonds securely, as it removes any rough spots or contaminants that may hinder proper adhesion. A well-sanded plywood surface enhances the structural integrity of the final project.

Facilitating Finishing

Plywood can have imperfections like knots, patches, or color variations. Sanding helps in minimizing these imperfections, making the surface uniform and suitable for finishes such as paint, varnish, or sealant. Finishes adhere better and look more consistent on a properly sanded plywood surface.

Preparing for Staining

For those seeking a stained finish on their plywood project, sanding is a critical preparatory step. Sanding opens up the wood pores, allowing the stain to penetrate evenly and deeply. This results in a more vibrant and attractive stained finish.

Improving Safety

Unsanded plywood can have splinters and rough edges, posing safety risks during handling and use. Sanding eliminates these hazards, creating a safer environment for both the workers during the project and the end-users of the finished product.

Sanding plywood is not just about achieving a refined appearance; it’s about ensuring structural integrity, improving safety, and enabling optimal finishing. It’s an investment of time and effort that pays off in the form of a visually pleasing, durable, and safe end product.

So, whether it’s a furniture piece or a home renovation, understanding and embracing the importance of sanding plywood is fundamental to a successful woodworking project.

Gathering the Necessary Tools and Materials for Sanding Plywood

Before embarking on the sanding process for plywood, gathering the right tools and materials is essential to ensure a smooth and effective sanding experience. Here’s a concise guide on the tools and materials needed:

Tools

  • Sandpaper: Choose sandpaper of various grits for a progressive sanding process. Coarse grits (around 60-80) for initial sanding and fine grits (above 120) for finishing.
  • Sanding Block or Electric Sander: Depending on the project size, opt for a sanding block for small areas or an electric sander for larger surfaces to achieve even and efficient sanding.
  • Handheld Sanders: Detail sanders or orbital sanders are useful for intricate or curved plywood areas that are hard to reach with larger sanders.
  • Dust Mask: Protect your lungs from dust particles generated during sanding by wearing a dust mask.
  • Safety Glasses: Shield your eyes from dust and debris with safety glasses.
  • Gloves: Wear gloves to protect your hands from splinters and to improve grip while sanding.

Materials

Plywood Sheets: The plywood pieces you intend to sand and finish.

  • Tack Cloth: Use a tack cloth to wipe down the plywood after sanding, removing any remaining dust for a cleaner surface.
  • Wood Filler: If the plywood has holes or gaps, use wood filler to fill them in before sanding.
  • Primer or Sealant: Choose a suitable primer or wood sealant for the type of finish you desire.
  • Paint or Stain: Depending on your project’s final look, gather appropriate paint, stain, or varnish.

Having these tools and materials ready before you start sanding ensures a smoother and more efficient sanding process. Additionally, it helps achieve the desired finish and prepares the plywood for subsequent finishing steps, ultimately resulting in a polished and professional final product.

Step-by-Step Guide on How to Sand Plywood

Step-by-Step Guide on How to Sand Plywood

Sanding plywood is an essential process to achieve a smooth, even surface that is ready for painting, staining, or sealing. Here’s a comprehensive step-by-step guide to effectively sand plywood and prepare it for your desired finish:

  • Prepare Your Workspace: Clear the workspace and ensure proper lighting. Work in a well-ventilated area, and cover surrounding surfaces to minimize cleanup.
  • Select the Right Grit of Sandpaper: Begin with a coarse grit (around 60-80) for the initial sanding to remove rough spots and level the surface. Progress to finer grits (above 120) for a smoother finish.
  • Attach Sandpaper to the Sander: If using an electric sander, secure the appropriate grit of sandpaper. For a sanding block, wrap the sandpaper around it, ensuring it’s taut and secure.
  • Sanding Motion: Hold the sander or sanding block firmly. Move in the direction of the wood grain, applying even pressure. Avoid pressing too hard, which may cause uneven sanding.
  • Start Sanding: Begin with the coarsest grit and move systematically to finer grits. Sand the entire plywood surface evenly, ensuring no area is missed.
  • Check Progress: Periodically stop to check your progress. Look for any uneven spots, rough areas, or imperfections that need more attention.
  • Detail Sanding: For intricate or curved areas, use handheld sanders or sandpaper folded into smaller sizes to reach challenging spots.
  • Clean and Inspect: After each sanding stage, clean off the dust using a tack cloth and inspect the surface for smoothness and uniformity.
  • Repeat if Necessary: If needed, repeat the sanding process with finer grits until you achieve the desired smoothness.
  • Finish with Fine Grit: Finish with the finest grit (e.g., 220) to achieve a polished surface, ready for priming, staining, or sealing.
  • Final Cleaning: Wipe down the plywood with a tack cloth to remove any remaining dust before applying finishes.

By following these steps and using the right sandpaper and techniques, you’ll prepare your plywood for a professional finish, ensuring a successful woodworking project

Safety Precautions during Plywood Sanding

Sanding plywood is an essential step in woodworking, but it involves potential health and safety risks due to dust and the use of power tools. To ensure your safety during the sanding process, follow these crucial precautions:

  • Wear Protective Gear: Always wear safety goggles to shield your eyes from flying debris. Use a dust mask or respirator to prevent inhaling wood dust, which can be harmful to your respiratory system. Protect your hands with gloves to avoid splinters and irritation.
  • Work in a Well-Ventilated Area: Sand in a space with good airflow, such as a workshop with open windows or doors. Consider using an exhaust fan or air filtration system to remove airborne dust.
  • Dust Collection: Use a dust collector or shop vacuum with a HEPA filter to capture dust at the source. This helps maintain a clean and safe work environment.
  • Keep the Workspace Clean: Regularly clean up accumulated dust to prevent slipping hazards and maintain clear visibility. Avoid clutter in your workspace to reduce the risk of accidents.
  • Secure the Workpiece: Ensure the plywood is firmly secured, either in a vice or clamped to a workbench. This prevents it from moving unexpectedly while sanding.
  • Avoid Loose Clothing and Jewelry: Wear close-fitting clothing to minimize the risk of it getting caught in the sanding equipment. Remove jewelry and accessories that could pose a safety hazard.
  • Power Tool Safety: If using power sanders, read and follow the manufacturer’s instructions carefully. Keep power cords away from the sanding area to prevent accidental entanglement. Turn off the sander when not in use or when changing sandpaper.
  • Hearing Protection: Depending on the type of sander and its noise level, consider wearing ear protection to prevent hearing damage.
  • First Aid and Emergency Measures: Have a well-stocked first aid kit nearby. Familiarize yourself with the location of emergency exits and fire extinguishers in your workspace.
  • Stay Alert: Avoid distractions while sanding. Stay focused on the task at hand to reduce the risk of accidents.

Prioritizing safety during plywood sanding ensures a more secure and enjoyable woodworking experience. By following these precautions, you can minimize health risks and create a safer work environment, allowing you to achieve the best results while protecting your well-being.

Common Mistakes to Avoid When Sanding Plywood

Sanding plywood is a critical step in achieving a polished finish, but certain mistakes can hinder the process. Avoid these errors for a successful sanding outcome:

  • Skipping Grits: Avoid jumping between grits during sanding. Progress gradually from coarse to fine grits for a smoother surface.
  • Inconsistent Sanding: Maintain a steady and consistent sanding pattern to prevent uneven surfaces caused by irregular movements or pressure.
  • Over-Sanding: Sanding too vigorously or using excessively fine grits initially can remove too much material, leading to an uneven plywood surface.
  • Neglecting Edges: Forgetting to sand the edges can result in an uneven appearance when applying finishes. Ensure edges are adequately sanded for a seamless finish.
  • Insufficient Dust Control: Failing to manage dust can lead to health hazards and compromised visibility. Use proper dust collection methods and protective gear.
  • Rushing the Process: Take your time and avoid rushing through the sanding process. Patience ensures a well-sanded and professionally finished plywood surface.

Other Effective Methods to Finish Plywood Edges

Other Effective Methods to Finish Plywood Edges

Creating a clean and polished look for plywood edges enhances the overall appearance of your woodworking project. Here are alternative methods to achieve a finished edge:

  • Edge Banding: Apply edge banding made of veneer, PVC, or solid wood to conceal the plywood edge. It provides a seamless finish and can be stained or painted to match the plywood.
  • Veneer Tape: Veneer tape is an easy-to-use option. Apply it to the plywood edge using heat, then trim and sand to achieve a smooth finish. Stain or finish the veneer tape as desired.
  • Wood Strips/Lipping: Attach thin strips of solid wood, often referred to as lipping, to the edges. Glue and nail or clamp the strips, then sand and finish them to match the plywood surface.
  • Mitered or Rounded Edges: Mitering the edges at a 45-degree angle or rounding them using a router or sanding creates a softer, more finished appearance.
  • Wood Filler and Paint: Fill the edges with wood filler, then sand and paint them. This method provides a smooth, consistent look that matches the painted plywood surface.
  • Bullnose or Chamfer Profiles: Use a router to create a bullnose or chamfer profile on the edges. This adds a decorative touch while eliminating sharp edges.
  • T-molding: Install T-molding, a plastic or wood strip shaped like a T, into a groove cut into the plywood edge. It offers protection and a finished look to the edges.

Consider the project requirements, desired aesthetics, and the level of durability needed to choose the most suitable edge finishing method for your plywood project. Each method has its unique advantages, allowing you to achieve a professional and refined result

Final Word

Sanding plywood is a fundamental skill in woodworking, crucial for achieving a smooth, refined surface. By following a systematic approach with the right grit progression, utilizing appropriate tools, and incorporating safety precautions, you can master the art of plywood sanding.

Whether for a DIY project or professional work, understanding how to sand plywood effectively will enhance the overall quality of your creations, ensuring a professional and polished finish.

Frequently Asked Questions

What is the easiest way to sand plywood?

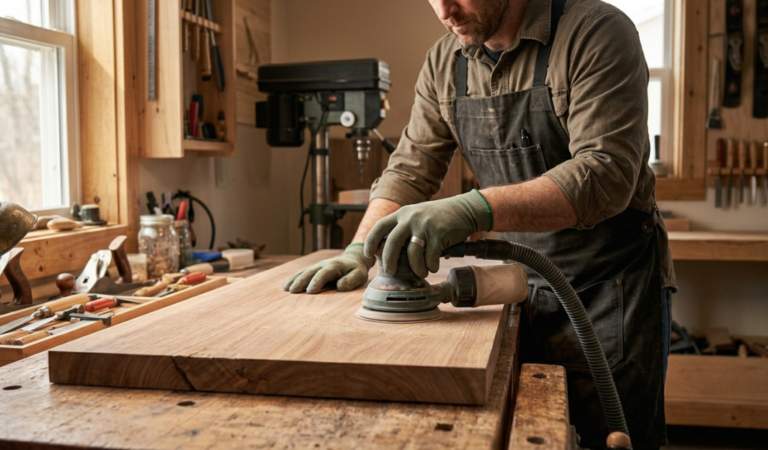
For plywood, the easiest way to sand is by using a random orbital sander. Start with a medium grit sandpaper, then gradually move to finer grits for a smooth finish.

How do I get a smooth finish on plywood?

To achieve a smooth finish, begin with a coarse grit sandpaper and progress to finer grits. Sand in the direction of the wood grain, maintaining consistent pressure and movements.

How to sand plywood with an orbital sander?

When using an orbital sander, affix the appropriate grit sandpaper. Move the sander in small, circular motions, ensuring even coverage. Gradually switch to finer grits for a polished result.

How to sand plywood for staining?

To prepare plywood for staining, start with a medium grit sandpaper (around 120-grit). Sand the surface evenly, following the wood grain, to open up the wood pores. Then, switch to finer grits (e.g., 180-grit, 220-grit) for a smoother finish. Wipe off any dust before applying the stain to ensure an even and well-absorbed stain finish.

What kind of sander do you use for plywood?

A random orbital sander is ideal for plywood due to its versatility. It provides efficient and even sanding, ensuring a polished finish suitable for various woodworking projects.

How to sand plywood without sanding?

Sanding is the most effective way to smooth plywood. However, alternative methods like using chemical strippers or a planer can be considered for specific situations, though less common and effective.

How to sand plywood by hand?

To sand plywood manually, start with a medium grit sandpaper (around 120-grit). Fold the sandpaper and sand in the direction of the wood grain, applying even pressure. Progress to finer grits (e.g., 180-grit, 220-grit) for a smooth finish. Ensure consistent sanding and wipe off any dust for a clean surface.

Share your love!
Tools Tale

Tools Tale

Disclaimer: This site is owned and operated by Tools Tale. toolstale.com is a participant in the Amazon Services LLC Associates Program, an affiliate advertising program designed to provide a means for sites to earn advertising fees by advertising and linking to Amazon.com. This site also participates in other affiliate programs and is compensated for referring traffic and business to these companies.

Articles: 179