304 North Cardinal St. Dorchester Center, MA 02124
To provide the best experiences, we use technologies like cookies to store and/or access device information. Consenting to these technologies will allow us to process data such as browsing behavior or unique IDs on this site. Not consenting or withdrawing consent, may adversely affect certain features and functions.
The Ultimate Guide: How to Wet Sand a Boat for Beginners
Got a boat needing a spruce-up? How to wet sand a boat’ is your ticket to revamping that surface to a showroom shine. Discover the ins and outs of this technique—from choosing the right sandpaper grits for different jobs to the art of applying just the perfect pressure.
We’ll cover everything from start to finish, ensuring you master the skill to give your boat that fresh-from-the-yard look. Get ready to dive into the world of wet sanding and watch your boat transform!
Key Summary: How to Wet Sand a Boat?
To wet sand a boat, gather safety gear like goggles and a respirator. Begin with a clean surface and soak sandpaper in water. Sand gently in circular motions with increasingly fine grits (800 to 1500). Keep the surface wet, rinse periodically, and spend 2-4 hours per section. Finish with a polishing compound for a glossy shine.
Hand Tools Suggestion for Your Home
[amazon_auto_links id=”11426″]
Understanding Wet Sanding
View Expert Video from Southwest Florida Marine Detail on How to Wet Sand a Boat.
Wet sanding is a crucial technique in achieving a smooth, flawless finish on surfaces like automotive paint, wood, or even drywall. Unlike traditional dry sanding, wet sanding involves using water or a lubricating liquid to minimize dust and friction, resulting in a cleaner and more refined outcome.
To start wet sanding, you’ll need wet/dry sandpaper specifically designed for this purpose. The sandpaper’s grit, ranging from coarse to fine, determines its abrasiveness and dictates the stage of the sanding process. Coarse grit removes imperfections, while finer grit smoothens surfaces progressively.
Before beginning, ensure the surface is clean and free of debris. Submerge the sandpaper in water for a few minutes to soften it, enhancing its effectiveness. Keep a water source nearby to periodically wet the surface during sanding, preventing clogging and overheating of the sandpaper.
When wet sanding, use gentle, circular or back-and-forth motions to avoid uneven wear on the surface. Constantly check the progress by wiping the surface clean to inspect for any remaining imperfections. It’s essential to maintain a consistent pressure to avoid creating uneven patches.
As you progress to finer grits, the surface will gradually smoothen. This step-by-step approach ensures a uniform finish and minimizes the risk of causing damage or removing too much material too quickly. Patience is key, especially when transitioning between grits to achieve a seamless result.
One crucial aspect of wet sanding is to be mindful of the amount of water used. Excessive water can cause issues such as paint or wood swelling, leading to further complications. Thus, moderate and controlled use of water is vital throughout the process.
Once satisfied with the smoothness, thoroughly rinse the surface to remove any remaining residue. Dry the area completely before applying any finishing products or paint to avoid trapping moisture beneath the new surface layer.
Understanding the nuances of wet sanding, including proper technique and appropriate grit selection, is fundamental to achieving professional-grade results. Practice, patience, and attention to detail are essential for mastering this technique, which, when done correctly, yields a polished, flawless surface.
Essential Tools and Materials for Wet Sanding
Achieving a smooth and flawless finish through wet sanding relies not only on technique but also on having the right tools and materials at hand. Here’s a breakdown of the essential items required for effective wet sanding:
Sandpaper: Select high-quality wet/dry sandpaper designed explicitly for wet sanding. Available in various grits, from coarse to fine, it’s crucial to have a progression of grits to suit your project’s needs. Coarser grits (around 600-800) are ideal for initial leveling and removing imperfections, while finer grits (1000-3000) refine the surface to a smooth finish.
Water Source: A consistent water supply is essential for wet sanding. This can be a spray bottle, sponge, or simply a bucket of water. It helps keep the sandpaper lubricated, prevents clogging, and reduces friction, leading to a smoother sanding process.
Sanding Block: A sanding block provides a flat, even surface for sandpaper, ensuring uniform pressure distribution while sanding. It improves control and prevents uneven spots that might occur with hand sanding alone.
Clean and Smooth Surface: Prepare the surface thoroughly before wet sanding by ensuring it’s clean and free from debris. Any leftover dirt or particles can damage the sandpaper and create imperfections in the finish.
Safety Gear: Protective equipment like goggles, a dust mask, and gloves are essential. They shield you from airborne particles and potential hazards associated with sanding materials.
Work Area Protection: Lay down protective sheets or use masking tape to safeguard surrounding areas from splashes and overspray. Wet sanding can be messy, and protecting adjacent surfaces is crucial, especially when working on automotive paint or delicate finishes.
Clean Water Rinse and Dry Cloth: Having clean water for rinsing off residue and a dry cloth for drying the surface post-sanding is crucial. Thoroughly rinsing away debris and allowing the surface to dry completely prevents contaminants from affecting the final finish.
Tips for Selection and Usage
Grit Selection: Begin with a coarser grit for initial sanding, progressing to finer grits for a smoother finish. Assess the surface condition to determine the appropriate starting grit.
Water Control: Use water sparingly. Excessive water can cause damage or swelling, especially on sensitive surfaces. Moderate, controlled application is key to successful wet sanding.
Technique: Employ consistent and gentle motions, applying even pressure while sanding. Avoid excessive force, as it can lead to uneven surfaces or material removal.
Inspection: Regularly wipe the surface clean to evaluate progress. This helps identify areas that need further sanding and ensures a uniform finish.
Mastering wet sanding requires not just the right tools but also a good understanding of proper technique and material handling. With the appropriate tools and mindful execution, wet sanding becomes an effective method for achieving flawless, professional-grade finishes on various surfaces.
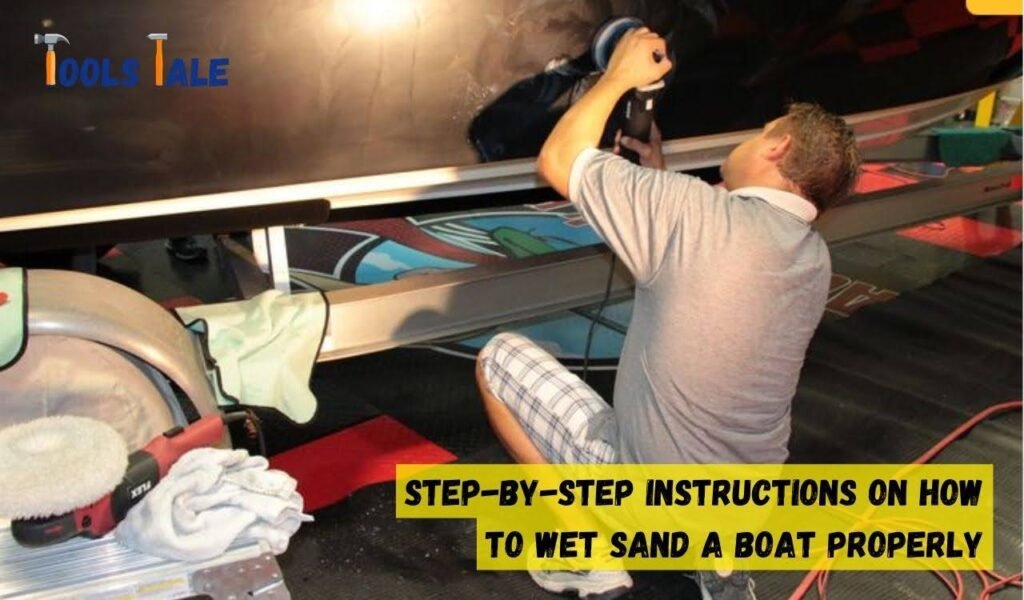
Step-by-Step Instructions on How to Wet Sand a Boat Properly
Wet sanding a boat is a crucial step in maintaining its appearance and ensuring a smooth, glossy finish. Here’s a comprehensive guide outlining the process:
Preparation
Gather Necessary Materials:
High-quality wet/dry sandpaper in various grits (600, 800, 1000, and 1500)
Clean the boat: Ensure the boat is clean, free from debris, and has been washed thoroughly. Remove any loose paint or contaminants before starting.
Initial Assessment
Evaluate the Surface:
Inspect the boat’s surface for imperfections, scratches, or rough spots. This assessment helps determine the appropriate starting grit for sanding.
Begin Wet Sanding
Start with Coarse Grit (600-800):
Submerge the coarsest grit sandpaper (around 600) in water for a few minutes to soften it.
Fold the sandpaper around the sanding block or attach it to a soft sanding pad.
Dip the sandpaper and the surface in water, ensuring both are adequately wet.
Use gentle, even pressure and make circular or back-and-forth motions while sanding. Focus on areas with imperfections or roughness.
Periodically rinse the surface and the sandpaper to prevent clogging and overheating. Wipe the surface clean to check progress.
Progress to Finer Grits
Gradually Smoothen the Surface:
As the surface becomes smoother with the coarse grit, progress to finer grits (800, 1000, and 1500).
Repeat the process for each grit level, ensuring the entire surface is uniformly sanded. Remember to keep the surface and sandpaper wet throughout.
Inspect and Touch-Up
Check for Uniformity:
After each grit, inspect the surface by wiping it clean with a cloth. Look for any remaining imperfections or areas that need further sanding.
Target those areas with the appropriate grit sandpaper until the surface is uniformly smooth.
Final Rinse and Dry
Thoroughly Clean the Surface:
Once satisfied with the smoothness and uniformity, thoroughly rinse the boat’s surface with clean water to remove any sanding residue.
Use clean, dry clothes to dry the surface completely. Ensure no moisture remains before proceeding to the next steps.
Apply Polishing Compound or Wax
Restore the Shine:
Following wet sanding, apply a polishing compound or boat wax to restore the boat’s shine and protect the newly sanded surface.
Follow the product instructions for application, using a clean cloth or applicator pad to evenly spread the compound or wax. Buff the surface to a glossy finish.
Tips and Considerations:
Grit Progression: Start with a coarser grit to remove imperfections, gradually moving to finer grits for a smoother finish.
Controlled Pressure: Apply even pressure while sanding, avoiding excessive force to prevent uneven surfaces.
Regular Inspection: Constantly check the surface cleanliness and progress by wiping it down. This helps identify areas needing further attention.
Protective Measures: Wear appropriate safety gear to shield yourself from dust, debris, and potential hazards associated with sanding materials.
Work in Sections: Divide the boat into manageable sections, focusing on one area at a time to ensure thorough and uniform sanding.
Follow Up with Protection: After wet sanding, protect the surface by applying a high-quality boat wax or sealant to maintain the finish and shield it from environmental elements.
Properly wet sanding a boat demands patience, attention to detail, and the use of appropriate tools and techniques. When executed diligently, this process results in a beautifully smooth and polished boat surface, preserving its appearance and ensuring long-term durability.
Common Mistakes to Avoid When Wet Sanding
Wet sanding, while an effective technique for achieving smooth surfaces, can lead to less-than-desirable outcomes if not executed correctly. Avoid these common pitfalls to ensure a successful wet sanding process:
Skipping Surface Preparation
Mistake: Neglecting proper surface preparation before wet sanding.
Solution: Always start with a clean surface. Remove dirt, contaminants, or old finishes before beginning the wet sanding process. Failing to do so can result in scratches, uneven sanding, or a compromised final finish.
Insufficient Grit Progression
Mistake: Using the wrong grit sequence or skipping grits during wet sanding.
Solution: Begin with a coarser grit to address imperfections and gradually move to finer grits for a smoother finish. Skipping grits can lead to incomplete smoothing or an uneven surface. Proper grit progression ensures a uniform and polished result.
Inadequate Lubrication
Mistake: Not keeping the sandpaper and surface adequately wet during wet sanding.
Solution: Use a consistent water source to keep both the sandpaper and surface lubricated. Dry sanding can cause excessive friction and damage the surface, while insufficient water during wet sanding can lead to clogging and uneven sanding.
Applying Excessive Pressure
Mistake: Using too much force while sanding.
Solution: Apply gentle, even pressure when wet sanding. Excessive pressure can create uneven surfaces, remove too much material, or cause grooves in the surface. A lighter touch allows for more control and prevents unintended damage.
Not Checking Progress Regularly
Mistake: Failing to inspect the surface frequently during wet sanding.
Solution: Wipe the surface clean periodically to assess the sanding progress. This helps identify areas that need more attention and ensures a consistent finish across the entire surface.
Overlooking Contamination Prevention
Mistake: Allowing contaminants to affect the wet sanding process.
Solution: Protect the work area and surface from debris, dust, or airborne particles that can compromise the finish. Use protective sheets, cover adjacent surfaces, and work in a clean environment to minimize the risk of contamination.
Not Allowing Surface Drying Time
Mistake: Rushing to apply finishes without allowing the surface to dry completely post-sanding.
Solution: After wet sanding, thoroughly rinse the surface to remove residue and ensure all moisture is removed before applying any coatings or finishes. Moisture trapped beneath new layers can lead to bubbling or peeling.
Ignoring Safety Precautions
Mistake: Neglecting to use proper safety gear during wet sanding.
Solution: Protect yourself with goggles, a dust mask, and gloves to shield against airborne particles, dust, and potential hazards associated with sanding materials. Safety gear minimizes the risk of injury and exposure to harmful elements.
Rushing the Process
Mistake: Attempting to finish wet sanding too quickly.
Solution: Wet sanding requires patience and attention to detail. Rushing through the process can lead to mistakes, uneven sanding, or an imperfect finish. Take your time, work methodically, and ensure each step is completed thoroughly.
Neglecting Proper Post-Sanding Care
Mistake: Failing to protect the sanded surface after completion.
Solution: Apply appropriate protective coatings, such as wax or sealant, to preserve the finish achieved through wet sanding. This shields the surface from environmental elements and helps maintain its smoothness and shine.
Avoiding these common mistakes is crucial for achieving a professional-grade finish through wet sanding. By adhering to proper techniques, using the right tools, and maintaining attention to detail throughout the process, you’ll ensure a smooth and flawless surface while minimizing the risk of errors or imperfections.
Tips for Achieving a Flawless Finish
Wet sanding can transform surfaces into polished, flawless finishes when executed with precision and care. Here are essential tips to achieve impeccable results:
Surface Inspection and Preparation
Thorough Examination: Before wet sanding, inspect the surface carefully for imperfections, scratches, or uneven areas. Address any necessary repairs or cleaning to ensure a smooth starting point.
Proper Cleaning: Remove all dirt, debris, and old finishes from the surface before commencing wet sanding. A clean surface prevents scratches and ensures uniform sanding.
Grit Selection and Progression
Gradual Grit Transition: Start with a coarser grit to address imperfections and progressively move to finer grits for smoother finishes. Proper grit progression is crucial to achieving a flawless surface.
Match Grit to Surface Needs: Adjust grit selection based on the surface material and the extent of imperfections. Use higher grits for delicate finishes and lower grits for more severe flaws.
Optimal Sanding Technique
Consistent Pressure: Apply even and consistent pressure while sanding to avoid creating uneven spots. Excessive pressure can damage the surface, while too little may not effectively smooth imperfections.
Gentle Motion: Use circular or back-and-forth motions with the sandpaper to prevent uneven wear and ensure a consistent finish across the surface.
Lubrication and Control of Water
Adequate Lubrication: Keep both the surface and sandpaper adequately wet during the wet sanding process. Proper lubrication reduces friction, prevents clogging, and yields smoother results.
Controlled Water Usage: Avoid excessive water as it can cause swelling or damage to certain surfaces. Use water moderately to maintain the right level of lubrication without saturating the area.
Regular Inspection and Assessment
Frequent Check-ups: Periodically wipe the surface clean to inspect progress. Regular assessments help identify areas needing further attention and ensure uniform sanding.
Adjustment as Needed: If imperfections persist, reevaluate and repeat sanding with the appropriate grit until the surface achieves the desired smoothness.
Safety Measures
Protective Gear: Wear goggles, a dust mask, and gloves to shield yourself from airborne particles and potential hazards associated with sanding materials. Safety gear minimizes the risk of injury or exposure to harmful elements.
Work in Sections
Divide the Surface: Break larger surfaces into manageable sections to focus on one area at a time. This approach ensures thorough and consistent sanding across the entire surface.
Methodical Approach: Work systematically through each section, applying the same techniques and grit progression to maintain uniformity.
Post-Sanding Care
Rinse and Dry Thoroughly: After wet sanding, rinse the surface thoroughly to remove residue, and dry it completely before applying any finishes. Moisture trapped beneath new layers can compromise the finish.
Protect the Finish: Apply suitable protective coatings like wax or sealant to preserve the smooth finish achieved through wet sanding. This helps shield the surface from environmental elements and maintains its luster.
Patience and Precision
Take Your Time: Wet sanding requires patience and attention to detail. Rushing through the process can lead to errors or an imperfect finish. Work methodically and ensure each step is completed thoroughly.
Precision and Care: Pay close attention to detail, maintaining a steady hand and consistent technique throughout the sanding process. Small, careful movements yield more refined results.
Practice and Experience
Practice Makes Perfect: Wet sanding improves with practice. Don’t be discouraged by initial results. Over time, you’ll develop a better understanding of techniques and nuances for achieving flawless finishes.
Learn from Experience: Each project offers insights and learning opportunities. Reflect on your experiences to refine your approach and improve your wet sanding skills.
By incorporating these tips into your wet sanding process, you’ll enhance your ability to achieve impeccably smooth and flawless finishes across a variety of surfaces. Attention to detail, proper technique, and a methodical approach are key to mastering the art of wet sanding.
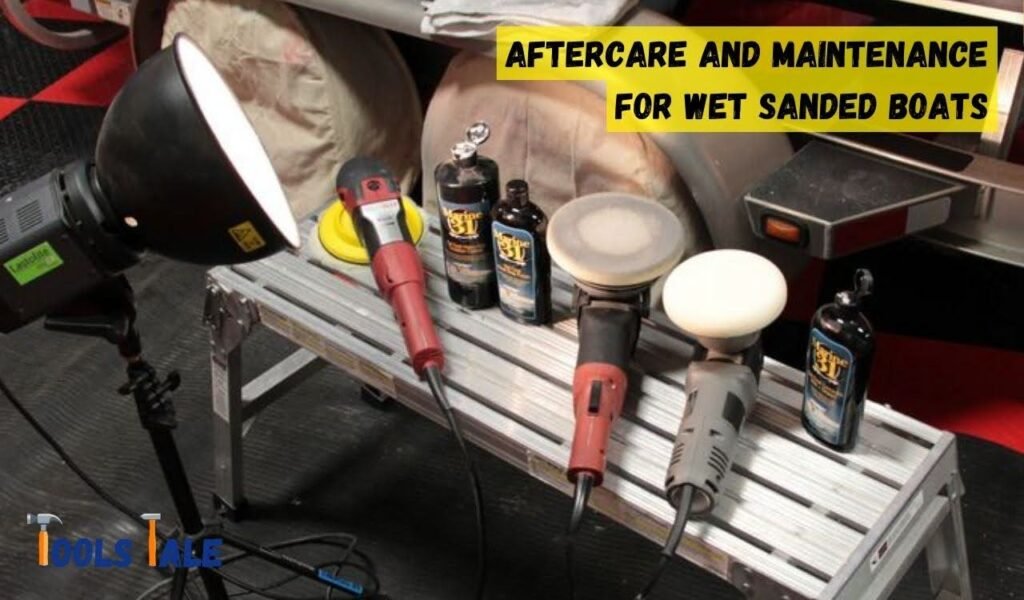
Aftercare and Maintenance for Wet Sanded Boats
Wet sanding revitalizes a boat’s appearance, but proper aftercare and maintenance are crucial for preserving the flawless finish achieved. Here’s a comprehensive guide:
Application of Protective Coatings
Post-Sanding Protection: Apply a high-quality boat wax or sealant to the newly wet-sanded surface. This protective layer safeguards the finish from UV rays, saltwater, and environmental elements.
Waxing Process: Follow the manufacturer’s instructions for applying the wax or sealant. Use a clean applicator pad or cloth to evenly distribute the product across the surface. Buff to a glossy finish.
Regular Washing and Cleaning
Routine Cleaning: Wash the boat regularly to remove salt, grime, and other contaminants that can degrade the finish. Use a mild boat soap and a soft sponge or cloth to prevent scratching.
Avoid Harsh Cleaners: Refrain from using abrasive or harsh cleaners, as they can strip away the protective wax or sealant and damage the finish.
Inspection for Damage or Wear
Periodic Checks: Routinely inspect the boat’s surface for signs of wear, scratches, or damage. Address any issues promptly to prevent further deterioration of the finish.
Touch-Up as Needed: If minor scratches or imperfections appear, touch them up with the appropriate polishing compound or wax to maintain the finish’s integrity.
Protecting the Boat from Elements
Storage Considerations: When not in use, store the boat in a covered area or under a boat cover to shield it from UV exposure, rain, and other weather conditions. This helps preserve the finish for an extended period.
Regular Maintenance: Keep up with routine maintenance tasks such as repainting or reapplying coatings as needed. Over time, the protective layer may wear off and require reapplication.
Proper Handling and Care
Caution during Docking: Be cautious when docking or mooring the boat. Avoid hitting abrasive surfaces or sharp objects that can scratch or damage the finish.
Mindful Usage: During activities like fishing or water sports, take care to prevent unnecessary scratches or impacts that could compromise the surface.
Professional Care and Expert Advice
Professional Inspection: Periodically seek professional inspections or detailing services. Experts can identify and address any underlying issues or provide specialized treatments to maintain the finish.
Consultation: If uncertain about specific cleaning products or techniques, consult with professionals or refer to manufacturer recommendations for optimal care.
Seasonal Maintenance
Seasonal Checks: Before each boating season, perform a thorough inspection and touch-up any areas showing signs of wear or damage. Ensure the protective coatings are intact and reapply if necessary.
Off-Season Storage Prep: If storing the boat for an extended period, perform a detailed cleaning and reapply protective coatings. Properly cover the boat to shield it from environmental elements.
Prevention of Oxidation
Preventive Measures: Oxidation is a common issue for boat surfaces. Regular waxing and proper maintenance create a barrier that minimizes oxidation, preserving the finish’s shine.
Prompt Removal of Stains: Address any stains, bird droppings, or fuel spills promptly. These can cause damage and staining if left untreated for extended periods.
Documentation and Records
Maintenance Logs: Maintain records of cleaning schedules, inspections, and maintenance performed. This log aids in tracking the boat’s upkeep and helps schedule timely care.
Record Product Usage: Keep a record of the cleaning products, waxes, or sealants used. This ensures consistency and helps identify the most effective products for your boat’s finish.
Consistent Care and Attention
Commitment to Care: Consistency in aftercare and maintenance is key to preserving the wet-sanded finish. Regular attention ensures the longevity of the flawless surface achieved through wet sanding.
By adhering to these aftercare and maintenance practices, boat owners can prolong the lifespan of the flawless finish achieved through wet sanding. Diligent care, regular inspections, and timely interventions are essential for maintaining the boat’s appearance and ensuring long-term durability.
Final Word
Wet sanding a boat demands patience, attention to detail, and the right tools. Begin by inspecting the surface, progressing through grits gradually for a smooth finish. Keep the surface and sandpaper wet, apply consistent pressure, and inspect regularly. Post-sanding, protect with coatings and maintain with regular cleaning.
By following these steps meticulously and employing proper aftercare, you’ll achieve a flawlessly smooth surface, revitalizing your boat’s appearance and ensuring its longevity.
Frequently Asked Questions
What can I use to wet sand my boat?
Wet/dry sandpaper specifically designed for wet sanding is essential. Choose grits ranging from 600 to 1500 for different stages. Additionally, a sanding block or a soft sanding pad ensures even pressure distribution.
What liquid do you wet sand with?
Utilize clean water or a water-based lubricant to facilitate wet sanding. This lubrication prevents clogging, reduces friction, and ensures smoother sanding. Maintain a steady supply to keep both the surface and sandpaper adequately wet.
How to wet sand a boat by hand?
Commence by thoroughly cleaning the surface to eliminate impurities. Employ wet/dry sandpaper of varying grits, alongside a sanding block or pad. Keep the surface moist and apply gentle pressure in circular motions for uniform results.
How to wet sand a boat with heavy oxidation?
When dealing with heavy oxidation, start with a coarser grit sandpaper to effectively eliminate the oxidation layer. Progress gradually to finer grits while ensuring both the surface and sandpaper remain adequately wet. Consistent pressure and frequent inspections are crucial.
How much does it cost to wet sand a boat?
The cost varies widely based on factors such as boat size, condition, materials used, and whether it’s a DIY project or professional service. DIY expenses revolve around materials, while professional services range from a few hundred to several thousand dollars, depending on the boat’s size and the extent of work required.
What is the best way to wet sand a boat?
Begin with a meticulous cleaning of the surface to remove dirt and debris. Use a progressive grit sequence from coarse to fine, maintaining a consistently wet surface with water or a lubricating liquid. Apply gentle, consistent pressure and inspect regularly for a flawless outcome.
Share your love!
Tools Tale
Disclaimer: This site is owned and operated by Tools Tale. toolstale.com is a participant in the Amazon Services LLC Associates Program, an affiliate advertising program designed to provide a means for sites to earn advertising fees by advertising and linking to Amazon.com. This site also participates in other affiliate programs and is compensated for referring traffic and business to these companies.