304 North Cardinal St. Dorchester Center, MA 02124
To provide the best experiences, we use technologies like cookies to store and/or access device information. Consenting to these technologies will allow us to process data such as browsing behavior or unique IDs on this site. Not consenting or withdrawing consent, may adversely affect certain features and functions.
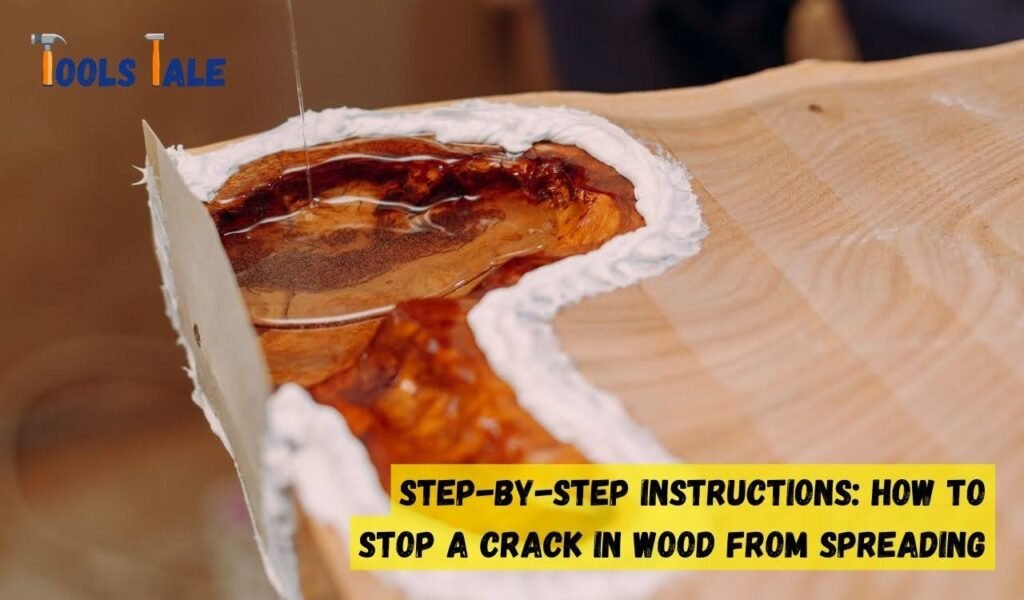
How to Stop a Crack in Wood from Spreading: Effective Techniques and Tips
How to stop a crack in wood from spreading? We’ve all been there – that frustrating moment when a tiny crack threatens to ruin your wooden masterpiece. But fear not, because I’ve got the hacks to save your woodwork from further despair.
In this quick guide, I’ll spill the beans on preventing those pesky cracks from wreaking havoc. No need for woodworking wizardry; just a few savvy tricks up your sleeve. So, grab your tools and let’s dive into the secrets of keeping those wood cracks at bay. Your next project will thank you!
Key Summary: How to Stop a Crack in Wood from Spreading?
To halt a wood crack from spreading, first, clean and assess the crack. Apply wood filler, epoxy, or a mixture of glue and sawdust into the crack. Allow it to dry completely. Sand the repaired area to smooth out any imperfections. Finish by applying a sealant or paint to protect the wood and prevent further spreading. Regular maintenance can ensure the longevity of the repair.
Understanding Wood Cracks: Insights for Prevention and Repair
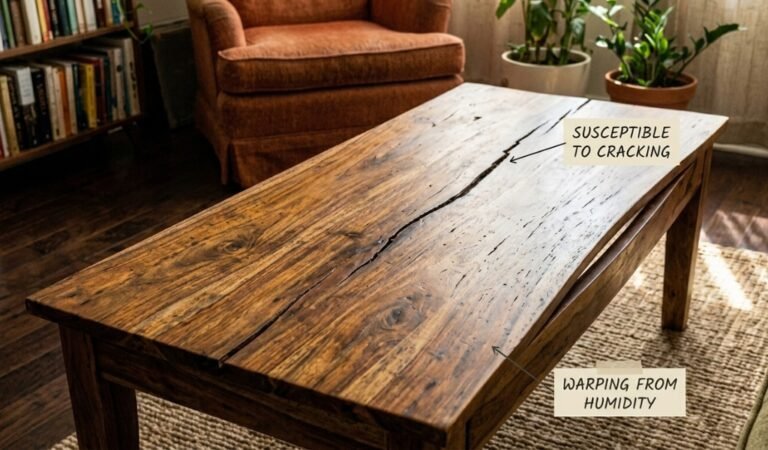
Wood cracks can pose challenges for woodworking projects, but a clear understanding of their origins is key to effective prevention and repair. These cracks, categorized as radial, tangential, or checks, often result from moisture content, wood species, and drying conditions. To thwart crack development, choose well-seasoned wood, control moisture exchange by sealing ends, and ensure proper acclimatization.
In cases where cracks emerge, swift action is vital to prevent further damage. Utilize epoxy resin or wood filler for repairs, employing clamps to stabilize and hinder spreading. DIY enthusiasts can follow step-by-step guides, using recommended products suitable for their wood type.
Remember, early intervention is crucial, and professionals should be consulted for extensive or structural cracks. With this knowledge, woodworking enthusiasts can navigate wood cracks, preserving the beauty and durability of their creations.
Cracking the Code: Unveiling the Causes Behind Wood Cracks
Wood cracks, whether subtle checks or more prominent splits, can be a frustrating challenge for woodworkers and DIY enthusiasts. Understanding the root causes of these cracks is essential for crafting durable and visually appealing projects.
Moisture Content Dynamics: The primary culprit behind wood cracks is fluctuating moisture content. Wood is highly responsive to changes in its environment. Rapid drying or prolonged exposure to high humidity levels can cause uneven moisture distribution within the wood, leading to stress and eventual cracking. Choosing well-seasoned wood with an optimal moisture content is a crucial preventative measure.
Wood Species Variability: Different wood species exhibit varying degrees of susceptibility to cracking. Species with higher density and lower moisture absorption rates are generally less prone to cracks. Knowledge of the characteristics of the chosen wood species is crucial for anticipating and managing the risk of cracking.
Challenges in the Drying Process: The method used to dry wood, whether through air-drying or kiln-drying, requires careful consideration. Inadequate drying methods or overly rapid drying can induce stress within the wood fibers, leading to cracks. Optimal drying conditions and a gradual reduction in moisture levels are key to minimizing the risk of cracking.
Temperature Fluctuations: Fluctuations in temperature can impact the expansion and contraction of wood fibers. Extreme temperature variations, especially when coupled with changes in humidity, contribute to the development of checks and splits. Acclimating wood to its intended environment before use is a crucial preventive measure.
Internal Stress and Tension: Internal stresses within the wood, often a result of growth patterns and knots, can create tension that leads to cracks. Choosing wood with fewer imperfections and considering the orientation of the grain during construction can help alleviate this issue.
Improper Handling and Storage Practices: Incorrect handling and storage practices can exacerbate the risk of wood cracking. Rough handling, insufficient support during storage, or exposure to direct sunlight can all contribute to stress on the wood, eventually leading to cracks over time.
Understanding these causes empowers craftsmen to proactively address potential issues in their projects. By selecting the right wood, implementing proper drying techniques, and maintaining stable environmental conditions, woodworkers can significantly reduce the risk of wood cracks, ensuring their creations stand the test of time.
Step-by-Step Instructions: How to Stop a Crack in Wood from Spreading
Wood cracks, once detected, require swift intervention to prevent further damage and maintain the integrity of your woodworking projects. Follow these step-by-step instructions to effectively stop a crack in wood from spreading.
Evaluate the Crack: Begin by assessing the crack’s size, depth, and location. Understanding the extent of the damage will guide your repair strategy.
Clean and Prepare the Crack: Remove any loose wood fibers or debris from the crack. Clean the area thoroughly to ensure proper adhesion for the repair material. Use a fine-grit sandpaper to create a smooth surface.
Choose the Right Filler: Select an appropriate wood filler or epoxy resin based on the type of wood and the crack’s dimensions. Opt for a filler with structural capabilities for larger cracks.
Apply Filler or Epoxy Resin: Generously apply the chosen filler or epoxy resin into the crack. Use a putty knife to press the material deep into the crevice, ensuring complete coverage. Follow the specific application instructions provided by the product.
Utilize Clamps for Stabilization: If dealing with a larger crack or split, employ clamps to hold the wood together firmly. This prevents further separation and allows the filler to bond effectively. Gradually tighten the clamps to avoid additional stress on the wood.
Allow Adequate Drying Time: Respect the recommended drying time for the filler or epoxy resin. Avoid any manipulation or stress on the wood during this crucial phase to ensure a strong and durable bond.
Sand and Finish: Once the filler has fully dried, use fine-grit sandpaper to smooth the repaired area. Blend the repaired section with the surrounding wood for a seamless finish. Apply a finish or sealant to protect the wood and enhance its aesthetic appeal.
Implement Preventive Measures: Take proactive steps to prevent future cracks. Ensure proper wood acclimatization before use, control moisture content, and apply suitable sealing methods. These preventative measures contribute to the long-term health of your wood projects.
By diligently following these step-by-step instructions, you can effectively stop a crack in wood from spreading, restoring the structural and visual integrity of your woodworking creations. Timely intervention and preventive measures are key to preserving the beauty and longevity of your finished projects.
Preserving Perfection: Various Methods to Halt Wood Cracks from Spreading
Wood cracks can compromise the structural integrity and aesthetics of your projects, but employing effective methods to stop their spread is essential. Explore different techniques to address and prevent the propagation of cracks in wood.
Wood Fillers and Epoxy Resins: One of the most common methods involves using wood fillers or epoxy resins specially formulated for crack repair. Apply the filler generously into the crack, ensuring it reaches the depth. Epoxy resins, in particular, provide a durable and adhesive solution, creating a strong bond that prevents further separation.
Clamping for Stabilization: For larger cracks or splits, utilizing clamps is a reliable technique. Apply pressure using clamps to bring the separated sections of wood back together tightly. This not only prevents the crack from spreading but also facilitates better adhesion of the filler or resin.
Wood Glues and Adhesives: High-quality wood glues or adhesives designed for structural applications can effectively halt crack propagation. Apply the glue into the crack and use clamps to ensure a secure bond. Allow sufficient drying time for the adhesive to set and strengthen the wood.
Wood Splines or Biscuits: Introducing wood splines or biscuits into the crack is a method that adds both strength and visual appeal. Cut a groove along the crack, insert the spline or biscuit, and secure it with glue. This technique not only stops the crack but also reinforces the wood.
Butterfly or Bowtie Key Inlays: Aesthetic and functional, butterfly or bowtie key inlays involve creating a decorative wooden patch in the shape of a butterfly or bowtie. This inlay is placed over the crack, effectively stopping its spread while adding a unique touch to the woodwork.
Wood Veneer Patching: For smaller cracks, consider using wood veneer patches. Cut a matching piece of veneer and glue it over the crack, blending it seamlessly with the surrounding wood. Sand the area for a smooth finish, preventing further cracking.
Preventative Measures: Implement preventive measures to safeguard against future cracks. Proper wood acclimatization, controlling moisture content, and sealing techniques contribute to the overall health of the wood, reducing the likelihood of cracks
Steering Clear of Pitfalls: Common Mistakes to Avoid in Wood Crack Repairs
Wood crack repairs demand careful attention and precision. However, certain common mistakes can undermine the effectiveness of your efforts. Familiarize yourself with these pitfalls to ensure successful and lasting outcomes in your wood crack repair endeavors.
Incomplete Assessment: Failing to thoroughly assess the crack’s size, depth, and location is a common misstep. Incomplete evaluations may lead to inadequate repair solutions, allowing cracks to resurface.
Neglecting Proper Cleaning: Overlooking the importance of cleaning the crack thoroughly before applying a filler or resin can compromise adhesion. Ensure the area is free from debris, loose wood fibers, and contaminants for optimal repair results.
Choosing Inappropriate Filler: Selecting the wrong wood filler or epoxy resin for the specific wood type and crack size is a frequent mistake. Using an incompatible filler may result in poor adhesion, color mismatch, or insufficient strength.
Insufficient Clamping Pressure: When utilizing clamps to stabilize the wood, applying insufficient pressure is a critical error. Inadequate clamping allows for movement, hindering the proper bonding of the repair material and potentially causing the crack to widen.
Ignoring Drying Time: Rushing through the drying phase after applying a filler or epoxy resin is a prevalent mistake. Ignoring recommended drying times compromises the material’s strength and may lead to an ineffective repair.
Overlooking Sanding and Finishing: Neglecting the sanding and finishing steps post-repair can result in a visibly uneven surface. Proper sanding ensures a smooth transition between the repaired area and the surrounding wood, enhancing the project’s overall aesthetics.
Not Addressing Underlying Issues: Failing to identify and address the root cause of the wood crack, such as improper wood acclimatization or excessive moisture, is a significant oversight. Ignoring these underlying issues increases the likelihood of future cracks.
Excessive Use of Wood Glue: Over-applying wood glue during crack repairs may lead to squeeze-out, creating unsightly residues. Moderation is key to achieving a clean and professional finish.
Ignoring Preventative Measures: Neglecting preventative measures to avoid future cracks is a common error. Proper wood acclimatization, moisture control, and sealing techniques contribute to the overall health of the wood, reducing the need for recurring repairs.
By steering clear of these common mistakes, you can enhance the effectiveness and longevity of your wood crack repairs. Attention to detail, proper material selection, and a thorough understanding of the wood’s characteristics are essential for achieving successful and durable outcomes.
Crack-Free Crafting: Essential Tips for Preventing Future Wood Cracks
Preserving the longevity and beauty of your wood projects involves not only addressing existing cracks but also implementing proactive measures to prevent future occurrences. Follow these essential tips to ensure your woodworking endeavors stand the test of time without succumbing to unsightly cracks.
Proper Wood Selection: Begin by choosing well-seasoned wood with optimal moisture content. Different wood species have varying levels of susceptibility to cracking, so understanding the characteristics of your chosen wood is crucial. Select wood that aligns with the specific needs of your project.
Gradual Acclimatization: Allow wood to acclimate to its intended environment before beginning your project. Gradual acclimatization minimizes the impact of temperature and humidity variations, reducing the risk of stress-induced cracks.
Controlled Drying Processes: When drying wood, whether through air-drying or kiln-drying, prioritize a controlled and gradual process. Rapid drying can lead to internal stresses, making the wood more prone to cracking. Optimal drying conditions contribute to a stable and resilient end product.
Sealing Wood Ends: Sealing the ends of your wood pieces with an appropriate end grain sealer helps control moisture exchange. This simple yet effective step prevents uneven drying, a common cause of cracks in wood.
Avoiding Direct Sunlight Exposure: Minimize prolonged exposure to direct sunlight, especially during the initial stages of a project. Direct sunlight can accelerate moisture loss, leading to uneven drying and increased susceptibility to cracking.
Applying Protective Finishes: Use appropriate finishes or sealants to protect your wood projects from environmental factors. These protective coatings shield the wood from changes in humidity and temperature, reducing the likelihood of cracks.
Regular Moisture Monitoring: Invest in a reliable moisture meter to regularly check and monitor the moisture content of your wood. This proactive approach allows you to identify and address potential issues before cracks develop.
Preventative Techniques for Joinery: Employ proper joinery techniques, ensuring that joints are well-fitted and constructed to withstand natural wood movements. Well-executed joinery minimizes stress points and reduces the risk of cracks.
Humidity Control in Storage: Store your wood in a controlled environment with stable humidity levels. Avoid damp or excessively dry conditions, as fluctuations can contribute to stress on the wood fibers and eventual cracking.
Regular Inspection and Maintenance: Conduct regular inspections of your finished projects and address any signs of stress or wood movement promptly. Routine maintenance and repairs can prevent minor issues from escalating into significant cracks.
By incorporating these tips into your woodworking practices, you can create projects that not only address existing cracks but also stand resilient against future challenges. A combination of proper wood selection, thoughtful drying processes, and vigilant maintenance will contribute to the longevity and beauty of your wood creations.
Final Word
To halt the spread of a wood crack, start by cleaning the crack thoroughly. Choose an appropriate filler or epoxy resin for the wood type. Apply the filler generously, ensuring it reaches the depth of the crack. For larger cracks, use clamps to stabilize the wood. Allow sufficient drying time, then sand and finish the repaired area.
Implement preventative measures like proper wood acclimatization to curb future cracks. These steps ensure a successful repair, preserving the integrity and aesthetics of your wood projects.
Frequently Asked Questions
How do you close cracks in wood?
Close cracks in wood by using wood fillers or epoxy resins. Clean the crack, apply the filler, and use clamps for stabilization. After drying, sand and finish for a seamless repair.
How do you make cracks in wood disappear?
To make cracks in wood disappear, apply matching wood fillers or use wood veneer patches. Sand the area for a smooth finish, blending it seamlessly with the surrounding wood.
How to prevent wood from cracking while drying?
Prevent wood from cracking during drying by choosing a controlled and gradual drying process. Avoid rapid drying, which can induce internal stresses in the wood fibers, leading to cracks.
How to stop wood splitting when screwing?
To prevent wood splitting when screwing, drill pilot holes slightly smaller than the screw diameter. Additionally, lubricate screws with soap or wax before insertion to reduce friction and stress on the wood.
How to fix cracked wood furniture?
Fix cracked wood furniture by cleaning the crack, applying wood fillers or epoxy resins, and using clamps for stabilization. Once dried, sand and finish the repaired area for a polished look.
Share your love!
Tools Tale
Disclaimer: This site is owned and operated by Tools Tale. toolstale.com is a participant in the Amazon Services LLC Associates Program, an affiliate advertising program designed to provide a means for sites to earn advertising fees by advertising and linking to Amazon.com. This site also participates in other affiliate programs and is compensated for referring traffic and business to these companies.