Physical Address
304 North Cardinal St.
Dorchester Center, MA 02124
Physical Address
304 North Cardinal St.
Dorchester Center, MA 02124

What is a plunge saw? Curious about this versatile cutting tool that promises precise and effortless cuts? Look no further! In this guide, we’ll dive into the world of plunge saws, uncovering their unique features and benefits. Whether you’re a seasoned woodworker or a DIY enthusiast, understanding the ins and outs of plunge saws can elevate your projects to a whole new level.
Get ready to unravel the secrets behind the plunge mechanism, explore its main components, and discover the range of materials it can conquer. Let’s embark on a journey of plunge saw mastery and unlock the secrets to achieving flawless cuts like a pro!
Key Summary: What Is a Plunge Saw?
A plunge saw, or a track saw is a woodworking tool. It features a circular blade on a guide rail, enabling accurate straight cuts in various materials. Its unique design allows for mid-panel starting cuts, ensuring precise and clean results.
[amazon_auto_links id=”11426″]
A plunge saw, also known as a track saw, is a versatile power tool that has become a game-changer in the world of woodworking and construction. Unlike traditional circular saws, which require starting the cut from the edge of the material, a plunge saw allows craftsmen to lower the blade directly into the material at any desired point, offering precise and clean cuts without the risk of splintering or damaging the workpiece.
The magic of a plunge saw lies in its unique plunging mechanism. The conventional circular saws rotate the blade continuously, necessitating an edge-based start to the cut. In contrast, a plunge saw boasts an innovative design that allows the blade to be lowered or “plunged” into the material at any chosen point.
This means that the blade remains hidden within the saw’s housing until it is ready to make the cut. To achieve this, a plunge saw is typically used in conjunction with a guide rail or track. The guide rail acts as a guide for the saw, ensuring a straight and accurate cut.
When the user is ready to make the cut, they position the saw at the desired starting point on the guide rail, hold down the plunge release lever, and then lower the spinning blade into the material with a smooth and controlled motion. This plunging action ensures that the cut is initiated precisely where needed, avoiding any potential damage to the workpiece.
To fully comprehend the capabilities of a plunge saw, it’s essential to understand its key components. Let’s take a closer look at the main elements that make up this powerful tool:

One of the most significant advantages of a plunge saw is its exceptional versatility in handling a wide range of materials. Whether you’re working with hardwood, softwood, laminate, or even plastics, a plunge saw can effortlessly handle the task with precision and efficiency.
Craftsmen appreciate plunge saws for their unparalleled precision and accuracy in cutting. The unique plunging mechanism allows for starting the cut precisely where needed, eliminating the risk of splintering or chipping the material.

Before diving into the exciting world of plunge saw cutting, it’s essential to prioritize safety. Adhering to safety precautions ensures a safe and enjoyable woodworking experience. Here’s what you need to keep in mind:
Begin by selecting a suitable work area with ample space to accommodate the workpiece and the guide rail. Clear the area of any debris or obstacles that might interfere with the cutting process.
Select a blade suitable for the material you intend to cut. For wood, opt for a blade with fine teeth, while plastics may require a blade with fewer, coarser teeth. Ensure the blade is sharp and in good condition for optimal cutting performance.
Before starting the cut, adjust the cutting depth according to the thickness of the material. Most plunge saws have a depth adjustment feature that allows you to set the desired cutting depth. Align the depth indicator with the appropriate measurement on the scale.
Position the guide rail accurately along the intended cutting line. Use clamps or other suitable methods to secure the guide rail in place, ensuring it remains stable during the cutting process. The guide rail ensures a straight and accurate cut, enhancing the precision of the plunge saw.
Place the plunge saw on the guide rail, aligning the blade with the starting point of the cut. Hold down the plunge release lever while lowering the blade until it touches the material’s surface.
With a firm grip on the plunge saw’s handles, switch it on and allow the blade to reach full speed. Gently and smoothly plunge the saw into the material along the guide rail. The blade will engage with the material, initiating the cut with precision.
Continue pushing the plunge saw forward along the guide rail, maintaining a steady and controlled motion. Avoid forcing the saw through the material; instead, let the sharp blade do the cutting work.
As you reach the end of the cut, release the plunge release lever to raise the blade from the material. Switch off the saw and allow the blade to come to a complete stop before removing it from the workpiece.
Inspect the cut to ensure it meets your desired specifications. If necessary, use sandpaper or other tools to refine the edges for a flawless finish.

Regular maintenance is crucial to keep your plunge saw in top-notch condition and ensure optimal performance throughout its lifespan. Two essential aspects of maintenance are cleaning and lubrication:
After each use, take the time to clean your plunge saw thoroughly. Sawdust, debris, and residue from cutting materials can accumulate on the blade, guide rail, and other components, affecting the saw’s performance and accuracy. Follow these steps for effective cleaning:
Proper lubrication is essential to ensure smooth operation and prevent premature wear of moving parts. Follow these guidelines for lubricating your plunge saw:
By incorporating regular cleaning and lubrication into your plunge saw’s maintenance routine, you can ensure its continued performance and extend its lifespan, making it a reliable tool for all your cutting tasks.
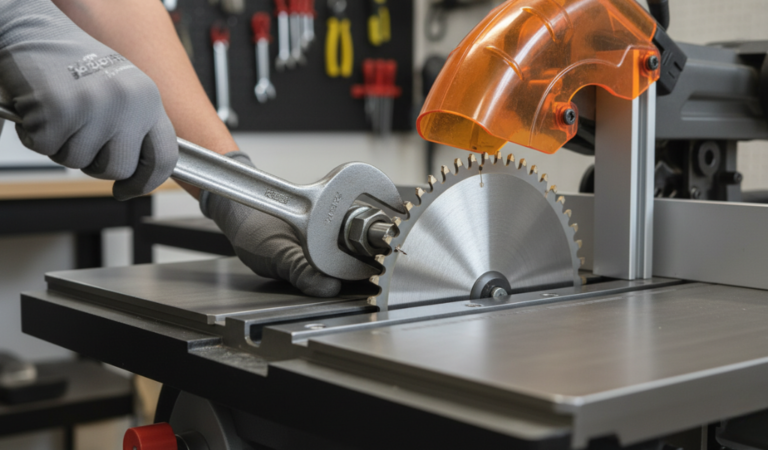
The saw blade is a critical component of the plunge saw, and its condition directly impacts the quality of your cuts. Knowing when and how to replace the blade is essential for achieving clean and efficient cuts:
In conclusion, plunge saws are invaluable tools that elevate woodworking precision and efficiency to new heights. With their unique plunging mechanism and compatibility with guide rails, they provide unmatched control and accuracy, resulting in cleaner, splinter-free cuts. Whether it’s cutting large panels, creating straight edges, or achieving precise angles, plunge saws excel in delivering professional-quality results.
Carpenters, woodworkers, and DIY enthusiasts can rely on these versatile tools to elevate their craftsmanship and tackle various materials with ease. From starting cuts in the middle of workpieces to achieving straight lines, plunge saws have become a must-have in the world of woodworking, revolutionising the way projects are undertaken and raising the bar for excellence in the field.
Plunge saws consist of essential components, including a powerful motor, a sharp circular blade, and a depth adjustment mechanism. The motor drives the blade’s rotation, while the depth adjustment allows precise control over cutting depths. This design enables plunge saws to make accurate plunge cuts into various materials.
Yes, plunge saws are versatile tools capable of cutting through a range of materials. With the right blade selection, they can effortlessly handle wood, laminate, plastics, and even certain metals. This adaptability makes plunge saws ideal for various applications, from woodworking to construction projects.
Absolutely, plunge saws cater to both DIY enthusiasts and professionals alike. For beginners, they offer user-friendly features and safety mechanisms, allowing them to achieve precise cuts with ease. Professional woodworkers appreciate plunge saws for their accuracy and efficiency in demanding projects.
A plunge saw is a specialized circular saw designed for making plunge cuts directly into the material. Unlike regular circular saws, plunge saws have a unique mechanism that allows the blade to be lowered onto the workpiece, facilitating precise and controlled cuts without the need for a pre-cut starter hole. This feature sets them apart from traditional circular saws.
Plunge saws offer several advantages over other saw types. Their ability to make accurate plunge cuts eliminates the need for drilling starter holes, saving time and effort. The enclosed blade design enhances safety and minimizes dust during cutting. Additionally, their versatility in handling various materials makes them a preferred choice for many woodworking and construction tasks.
Yes, many plunge saws are designed to be used with a guide rail. The guide rail is a straight edge that the saw runs along, ensuring precise and straight cuts. It enhances accuracy by eliminating the risk of veering off the desired cutting line, resulting in cleaner and more professional-looking cuts.
Regular maintenance is key to ensuring your plunge saw’s optimal performance. Clean the saw after each use to remove sawdust and debris that can affect its functionality. Lubricate moving parts, such as the depth adjustment mechanism and blade guard, periodically with manufacturer-recommended lubricants to keep them operating smoothly.