Physical Address
304 North Cardinal St.
Dorchester Center, MA 02124
Physical Address
304 North Cardinal St.
Dorchester Center, MA 02124

What size trowel for Ditra? It’s the unsung hero of your tile project. The right trowel size can mean the difference between tile triumph and tribulation. We won’t keep you in suspense. In just a few scrolls, you’ll have the insider’s guide to nailing your Ditra installation.
Think of it as your shortcut to trowel mastery. No more guessing games or sticky situations- just clear, straightforward advice to make your tiling journey a breeze. Stay with us, and we’ll unravel the mysteries of trowel sizing, ensuring your Ditra project is a smooth ride from start to finish.
Key Summary: What Size Trowel for Ditra?
Choosing the right trowel size for Ditra guarantees a smooth installation, ensuring optimal adhesive coverage. After installation, regular maintenance is essential for its longevity- cleaning and periodic inspections maintain its efficiency and durability.
[amazon_auto_links id=”11426″]
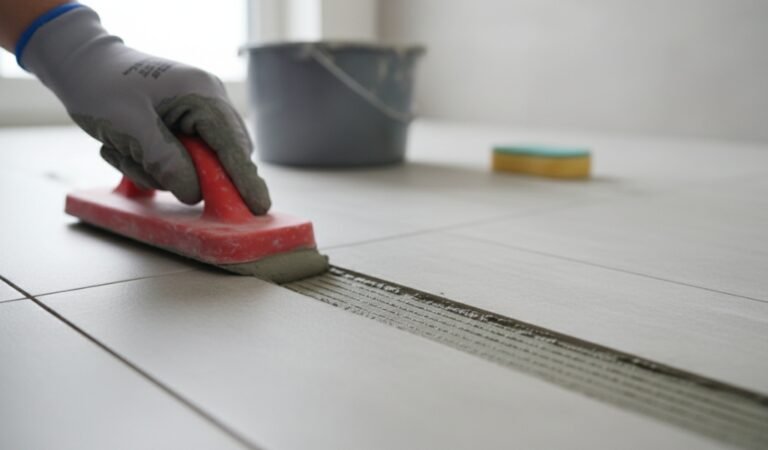
The question of the right trowel size is central to a successful tile installation, especially when dealing with products like Ditra—an uncoupling membrane that acts as a safeguard against substrate cracks affecting your tile project.
The trowel’s importance lies in its role in adhesive application, directly impacting the tile-to-substrate bond. Choosing an appropriate trowel size ensures an even, sturdy bond, averting potential problems like uneven tiles, cracks, or loose tiles over time.
Selecting the correct trowel size involves considering factors such as the tile type, size, and the specific product being used, like Ditra. Larger tiles generally require a larger trowel to guarantee adequate adhesive coverage. Ditra’s unique design often calls for a specific trowel size to match its distinctive waffle-like pattern.
DITRA use a 1/4″ x 3/16″ (6 mm x 5 mm) V-notched trowel, 5/16″ x 5/16″ (8 mm x 8 mm) V-notched trowel, or the DITRA trowel, which features an 11/64″ x 11/64″ (4.5 mm x 4.5 mm) square-notched design.
For a standard Ditra installation, a 1/4″ x 3/16″ V-notch trowel is a commonly recommended choice. Nonetheless, it’s crucial to consult the manufacturer’s guidelines for the precise Ditra product you’re working with, as they may have their own prescribed trowel sizes for optimal performance.
Here’s a succinct guide on utilizing the right trowel size for Ditra:
Choosing the right trowel size is a pivotal step in a successful tile installation, particularly when working with products like Ditra. Understanding the influence of trowel sizes on adhesion is fundamental to ensuring a durable, aesthetically pleasing tiled surface.
Choosing the right trowel size is a pivotal decision in any tiling project. The trowel is not merely a tool; it’s a crucial determinant of how well the tiles adhere to the substrate. A well-considered trowel size ensures an even distribution of adhesive, preventing issues like uneven tiles, cracks, or loose tiles in the future. Let’s delve into the factors that influence the selection of the optimal trowel size for your tiling venture.
The size and type of tile you are working with are primary considerations when choosing a trowel. Larger tiles require a larger trowel to ensure sufficient adhesive spread. Thin tiles might necessitate a smaller trowel to avoid adhesive squeezing through the gaps.
The thickness of the tile is also crucial. Thicker tiles demand a larger trowel to create a substantial adhesive bed to support the weight of the tile. Conversely, for thinner tiles, a smaller notch trowel will suffice.
Tiles come with varying backings such as mesh, paper, or direct adhesive. The backing type can impact the trowel size. Some backings might require more adhesive to penetrate and form a secure bond.
The smoothness and condition of the substrate are critical. Rough or uneven substrates may require a larger trowel to accommodate irregularities and ensure proper adhesive coverage.
Always refer to the manufacturer’s guidelines for the specific tile and adhesive you are using. Different products might recommend different trowel sizes based on their composition and intended applications.
The type of adhesive being used, whether it’s thin-set mortar, mastic, or another type, can dictate the trowel size needed for proper coverage and adhesion. Some adhesives might require a larger trowel to ensure a strong bond.
Environmental factors such as temperature and humidity can influence adhesive drying times. Adjust the trowel size to accommodate these conditions and ensure sufficient working time.
The pattern or layout of your tiles can also affect trowel size selection. Intricate patterns or layouts might necessitate a smaller trowel to ensure proper alignment and spacing.
Certain products, like uncoupling membranes such as Ditra, may have specific requirements due to their unique design. For instance, Ditra often requires a particular trowel size to properly fill the cavities and establish a robust bond.
The size and scope of the project can influence trowel size selection. For a larger project, efficiency might be a priority, leading to the use of a larger trowel. However, for intricate projects, a smaller trowel might be necessary for precise application.
Experienced tilers often develop preferences based on their expertise and past successful installations. They may adjust the trowel size based on their knowledge of the project requirements and their past experiences with similar projects.
Selecting the appropriate trowel size is a nuanced decision that requires consideration of multiple factors. It’s about finding the right balance between the tile type, substrate condition, adhesive properties, and the project’s unique demands. Adhering to manufacturer guidelines and leveraging your experience as a tiler will ultimately ensure a successful and durable tile installation.
So, take the time to assess the specifics of your project and choose the trowel size that guarantees a seamless and long-lasting tile application.

In the realm of tile installations, the adage “size matters” holds true when it comes to trowel selection. The trowel size plays a pivotal role in achieving a successful and long-lasting tile installation, particularly when using products like Ditra, an uncoupling membrane that acts as a shield against cracks in the substrate. This article delves into the profound importance of choosing the correct trowel size specifically for Ditra applications.
The trowel’s primary function is to evenly distribute adhesive on both the substrate and the tile to facilitate a strong bond. Choosing an appropriate trowel size ensures that the right amount of adhesive is applied, promoting full contact and adhesion between the tile and the substrate. This uniform adhesive spread prevents air gaps, reducing the likelihood of hollow or loose tiles.
Ditra, with its unique waffle-like structure, demands a specific trowel size to effectively fill the cavities. The right trowel size guarantees that the tile sits securely within this structure, providing necessary support. Moreover, it aids in aligning the tiles accurately, ensuring a level surface and a professional finish to the tiled area.
Lippage, the unevenness or height differences between adjacent tiles, is a common problem in tile installations. Using the appropriate trowel size can significantly reduce lippage by ensuring a consistent adhesive bed beneath each tile. This consistency is vital for achieving a smooth and visually appealing surface.
Applying the correct trowel size ensures that the tiles are well-supported and evenly adhered to the substrate. This support minimizes structural stress on the tiles, preventing potential breakage or cracking over time. It’s a proactive approach to enhancing the longevity of the tiled area.
Ditra also offers waterproofing properties, critical in areas prone to moisture. The right trowel size ensures proper application, enhancing Ditra’s waterproofing capabilities. With a watertight installation, the tiles and the substrate remain protected, ultimately enhancing the floor or wall’s durability.
A precise trowel selection streamlines the installation process. It eliminates the need for adjustments or corrections during or after the installation, saving both time and effort. Additionally, it reduces the likelihood of errors or redoing portions of the installation.
Every product, including Ditra, comes with specific manufacturer guidelines, which often include recommendations for trowel sizes. Adhering to these guidelines ensures that the product functions optimally and maintains its warranty validity.
Using the right trowel size optimizes adhesive usage. Applying an excessive amount of adhesive, as a larger trowel might result in, is not only unnecessary but also wasteful. By employing the correct trowel size, you save on adhesive costs while ensuring a secure and effective bond.
A properly installed tiled surface looks visually appealing and professional. The right trowel size ensures uniformity in adhesive application and tile alignment, contributing to a polished, aesthetically pleasing outcome that meets the standards of a professional tile installation.
The importance of selecting the right trowel size for Ditra applications cannot be overstated. It impacts the adhesive coverage, tile support, prevention of lippage, waterproofing, and the overall durability and aesthetics of the installation.
A small tool, the trowel, wields a significant influence on the success of a tile project, underscoring the necessity of careful consideration and adherence to manufacturer guidelines. So, next time you embark on a tiling project, remember, getting the trowel size right is a substantial step towards achieving a flawless and enduring tile installation.
Ditra, an uncoupling membrane developed by Schluter-Systems, has revolutionized tile installations by providing a reliable solution to combat cracks in substrates. Its unique design ensures tile longevity and structural integrity. However, a successful Ditra installation requires adherence to specific guidelines and techniques. Here are essential tips to ensure a seamless and durable Ditra installation:
Before applying Ditra, the substrate must be clean, even, and free of any dust, debris, or contaminants that could hinder adhesion. Repair any cracks, holes, or irregularities in the substrate to ensure a smooth base for the Ditra membrane.
Select the appropriate trowel size to ensure even adhesive coverage. For Ditra applications, a 1/4″ x 3/16″ V-notch trowel is commonly recommended. Always follow the trowel size recommendations provided by Schluter-Systems.
Cut the Ditra membrane accurately to fit the installation area, ensuring a proper fit without overlaps or gaps. Use a sharp utility knife or scissors to achieve clean cuts and precise fittings around corners and edges.
After applying the thin-set mortar and placing the Ditra membrane, use a float or roller to embed the membrane fully into the mortar. This process ensures proper contact, removes air pockets, and enhances adhesion.
Overlap adjacent sheets of Ditra by at least 2 inches, ensuring a secure seam. Use Schluter-KERDI-BAND, a waterproofing strip, to seal and reinforce the seams. Apply thin-set mortar beneath the KERDI-BAND to enhance adhesion.
Once the Ditra is securely in place, apply a second layer of thin-set mortar over the membrane using the recommended trowel size. Lay your tiles, firmly pressing them into the mortar to ensure a strong bond.
Allow the mortar to cure before grouting. Select a suitable grout that complements your tiles and apply it following the manufacturer’s instructions. Properly sealed grout lines prevent moisture penetration and maintain a polished appearance.
Install movement joints in the tile assembly, particularly in large tiled areas. These joints accommodate tile movement due to temperature changes and prevent potential cracks.
Adhere strictly to Schluter-Systems’ installation guidelines for Ditra. The manufacturer’s recommendations are based on extensive research and testing to ensure optimal performance and longevity of the installation.
After laying the tiles, conduct the “back-buttering” test to verify full coverage of the mortar beneath the tiles. This involves lifting a tile to ensure it has adhesive spread evenly across its back.
Choose an adhesive suitable for Ditra applications. Opt for a high-quality thin-set mortar compatible with both the substrate and Ditra membrane.
Once the installation is complete, perform regular maintenance to ensure its longevity. Regularly inspect for any issues, and promptly address any concerns that may arise.
If you are unsure about any aspect of the installation process, it’s advisable to seek guidance from a professional tile installer or consult Schluter-Systems for expert advice. A successful Ditra installation involves careful planning, precise execution, and adherence to the manufacturer’s guidelines.
From surface preparation to tile placement and grouting, each step plays a crucial role in ensuring a durable, long-lasting, and visually appealing tile installation. By following these tips and guidelines, you can achieve a flawless Ditra application that stands the test of time and elevates the aesthetics of your space.
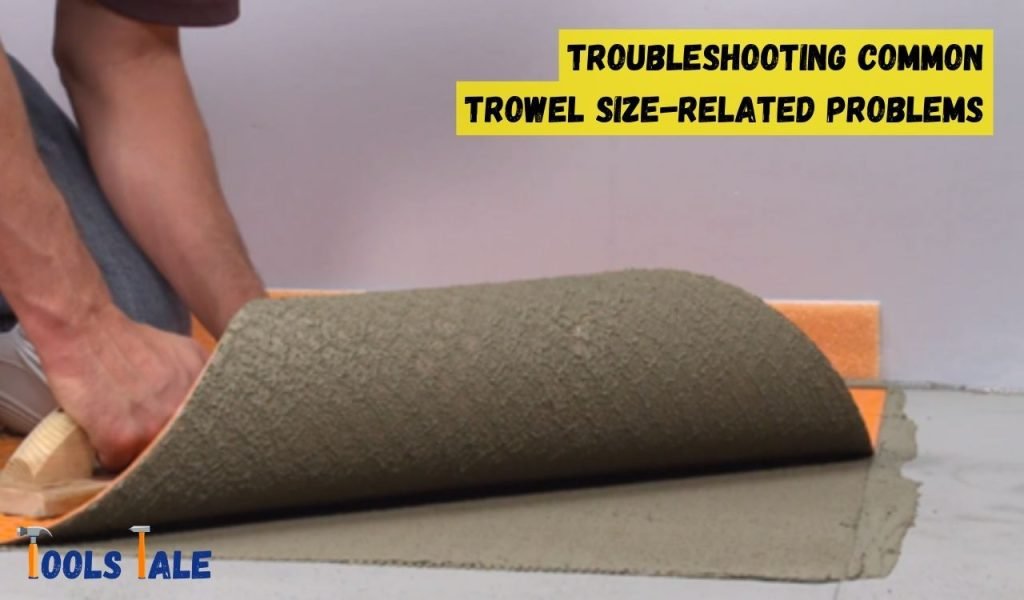
Trowel selection is a critical aspect of tile installation. The trowel size determines the amount of adhesive applied and affects the tile-to-substrate bond. Choosing the wrong trowel size can lead to a range of problems that can compromise the integrity and aesthetics of the tiled surface. Here, we’ll explore common trowel size-related issues encountered during tile installations and how to troubleshoot them effectively.
Choosing the right trowel size is paramount to a successful tile installation. Tailoring the trowel size to match the tile type, size, and substrate condition can prevent a host of problems, ensuring a flawless tile project.
Troubleshooting any trowel size-related issues promptly and effectively is crucial to maintaining the integrity and aesthetics of the installation. Always refer to manufacturer guidelines and seek professional advice if encountering persistent problems during the tile installation process.
Choosing the right trowel size for Ditra isn’t just a technicality; it’s an art of precision. From adhesion to aesthetics, it wields immense influence. Refer to manufacturer guidelines, match trowel to tile, and consider techniques like back-buttering.
It’s about achieving harmony in your installation, where mortar and membrane unite flawlessly. So, let your trowel be your brush, and let your tiles tell the story of a well-mastered craft.
For optimal DITRA installation, it’s advised to use a trowel with a 1/4 inch x 3/16 inch V-notch. This size allows for the right amount of mortar to be applied, ensuring proper bonding of the tile to the DITRA membrane.
It’s essential to use the trowel size specified by the manufacturer for Ditra installation. The recommended trowel size is carefully calculated to ensure adequate adhesive coverage, promoting a strong and lasting bond between the tile and DITRA membrane.
Choosing the correct trowel size for Ditra involves considering factors such as tile size, type, and thickness. Always consult the manufacturer’s guidelines to determine the appropriate trowel size. Using the right trowel ensures an even and secure installation.
Yes, the trowel size can be adjusted based on the type of tile being used. Larger and heavier tiles require a larger trowel to accommodate their weight and ensure proper mortar coverage. It’s important to adapt the trowel size to the specific requirements of the tile to achieve an optimal installation.
Trowel size refers to the dimensions and shape of the notches on a trowel. Different trowel sizes result in varying amounts of mortar being applied to the substrate. The trowel size directly impacts the bonding and stability of the tile installation.
DITRA is available in various thicknesses, commonly 1/8 inch or 3/16 inch. The choice of thickness depends on factors such as the subfloor condition, the tile type being used, and the overall project requirements. Select the appropriate thickness to ensure a successful and durable tile installation.
For Schluter products like DITRA, a 1/4 inch x 3/16 inch V-notch trowel is a commonly recommended size. However, it’s crucial to always refer to the specific guidelines provided by Schluter Systems for their products to ensure the right trowel size is used for a successful installation.