Grouting Tiles: The Ultimate Guide to a Professional, Durable, and Neat Result
The difference between a mediocre tiling job and a masterpiece often lies in the narrow gaps between the tiles. Grouting is the final, transformative stage of any tiling project. It is the process that turns a collection of individual ceramic, porcelain, or stone pieces into a unified, waterproof, and structurally sound surface. Whether you are focused on floor grout for a heavy-traffic hallway or delicate wall tile grout for a kitchen backsplash, understanding the “how” and “why” of the process is essential.
In this exhaustive guide, we will explore every facet of grouting, from selecting high-performance products like the Bostik Ardacolor range to mastering the technical nuances of tile work and long-term tile and grout cleaning.
The Science of Grout: More Than Just a Filler
When we talk about grout, we are talking about a specialized mortar designed to fill joints. While its aesthetic role is undeniable—framing your tiles and providing color contrast—its engineering role is even more vital.
- Compression and Movement: No building is perfectly static. Temperature changes and structural settling cause minute movements. A flexible floor grout acts as a shock absorber, preventing tiles from pressing against each other and cracking.
- Hygienic Seal: Without grouting, the gaps between tiles would become havens for bacteria, mold, and debris. By filling these voids, you create a flush surface that is easy to sanitize.
- Waterproofing Support: While grout itself is often water-resistant rather than waterproof, it works in tandem with the waterproof membrane beneath the tiles to shed water and protect the substrate.
Types of Grout: Which One Suits Your Project?
Choosing the right tile grout is the first decision that will dictate the longevity of your tile work.
 Cementitious Grout
The industry standard. These are made of Portland cement, filler particles, and pigments.
- Sanded Grout: Contains fine sand. It is used for joints wider than 3mm. The sand provides a “bridge” that prevents the grout from shrinking and cracking as it cures.
- Unsanded Grout: Used for joints smaller than 3mm. It is smoother and stickier, making it ideal for vertical wall applications where gravity might pull heavier mixtures down.
Epoxy Grout
Unlike cement grout, epoxy is made from two parts: resin and a hardener.
- Pros: It is virtually waterproof, stain-proof, and chemically resistant. It never needs sealing.
- Cons: It is significantly more expensive and sets very quickly, making it difficult for beginners to apply without leaving a permanent haze on the tiles.
Pre-Mixed Grout
These come in buckets, ready to use. While convenient for small repairs, they often lack the structural strength of professional-grade cement or epoxy for large-scale floor grout projects.
The Bostik Advantage: Professional Solutions
To achieve a neat result, the quality of the material is non-negotiable. The Bostik Ardacolor line is engineered for specific environments:
- Bostik Ardacolor Flex: This is the “all-rounder.” Its flexibility makes it the go-to choice for underfloor heating systems and wooden subfloors where movement is expected. It is highly resistant to moisture, making it perfect for bathrooms.
- Bostik Ardacolor Maxi: Designed for the modern trend of large-format tiles. It handles wider joints with ease and provides a high-strength finish that won’t slump or sag.
- Bostik Ardacolor Classic: A reliable cement-based grout for standard internal applications where extreme flexibility isn’t the primary requirement.
Tools of the Trade: What You Need Before You Start
Success in grouting is 50% technique and 50% having the right equipment.
- Rubber Grout Float: A firm rubber pad with a handle. This is the only tool you should use to apply grout.
- Grout Sponge: Not a kitchen sponge. These are high-density, rounded-edge sponges designed to smooth joints without pulling material out of them.
- Mixing Paddle & Drill: For achieving a lump-free consistency.
- Two Clean Buckets: One for mixing the grout, one for clean rinse water.
- Microfiber Cloths: For the final “buffing” stage.
- Margin Trowel: For scooping grout out of the bucket onto the float.
Preparation: The Foundation of Good Grouting
Never rush into grouting. If your tile work isn’t prepared, the grout will fail.
- Check the Adhesive: Ensure the tile adhesive is 100% dry. Trapped moisture trying to escape through the grout can cause “efflorescence”—unsightly white salt deposits on the surface.
- Clean the Joints: Use a plastic spacer tool or a utility knife to scrape out any adhesive that occupies more than 1/3 of the joint depth.
- Tape Off Sensitive Surfaces: If you are working with porous natural stone or unglazed tiles, apply a pre-sealer or use painter’s tape on adjacent surfaces (like bathtubs or cabinets) to prevent staining.
How to Grout Tiles: The Comprehensive Step-by-Step Plan
The Importance of the Mixing Ratio
Following the “washing in” ratio on the Bostik packaging is the most critical step.
- The Science: Cement requires a specific amount of water for a chemical reaction called “hydration.”
- The Error: If you add too much water, the grout becomes porous and weak. As the excess water evaporates, it leaves behind tiny air pockets that make the grout crumble later.
- The Fix: Always add powder to water, not water to powder. This prevents dry clumps at the bottom of the bucket. Mix at low speed to avoid whipping air bubbles into the paste.
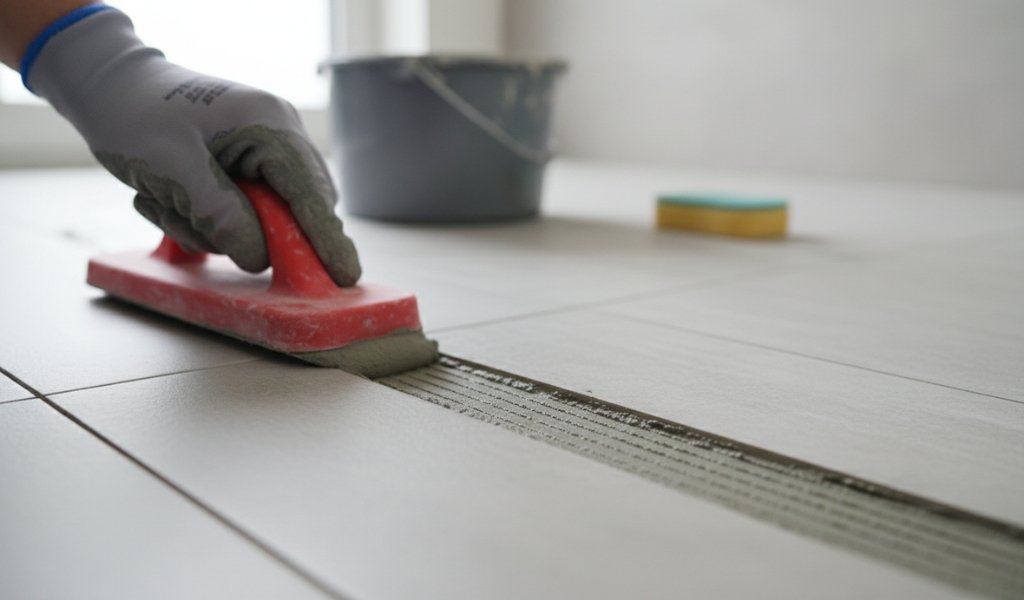
Application Techniques and Angles
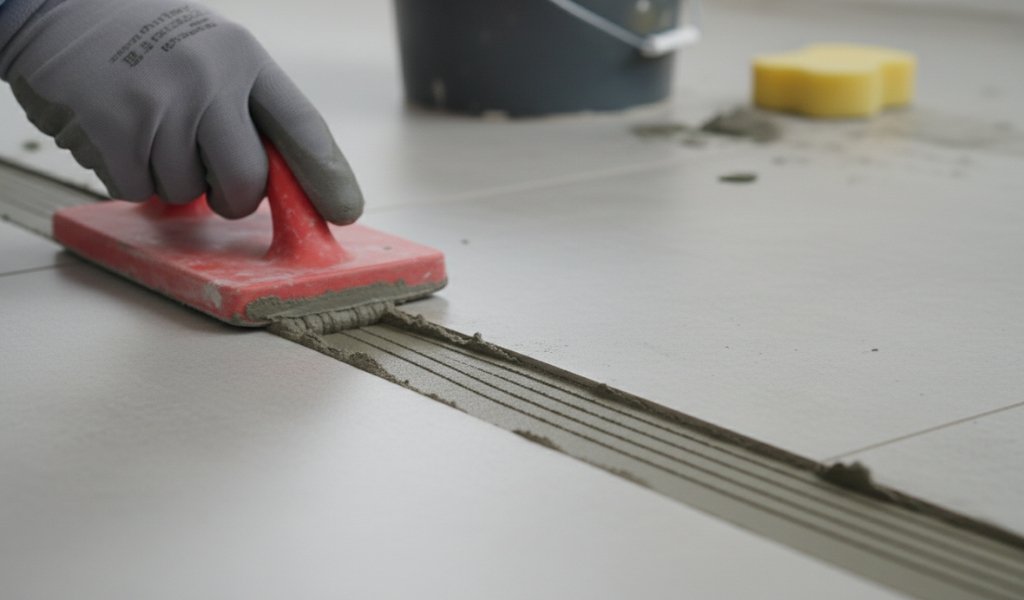
- Loading the Float: Scoop a manageable amount of grout onto the float.
- The 45-Degree Rule: Hold the float at a 45-degree angle to the tile surface. Spread the grout diagonally across the joints. By moving diagonally, the float won’t “dip” into the joint and scoop out the material you just put in.
- The “Pack”: Don’t just wipe the grout over the top. Press down firmly. You want to feel the resistance of the grout filling the entire cavity.
- Clean as You Go: After filling a small section (about 1-2 square meters), use the float at a nearly 90-degree angle to scrape off the excess. The cleaner you leave the tile now, the easier the sponging will be later.
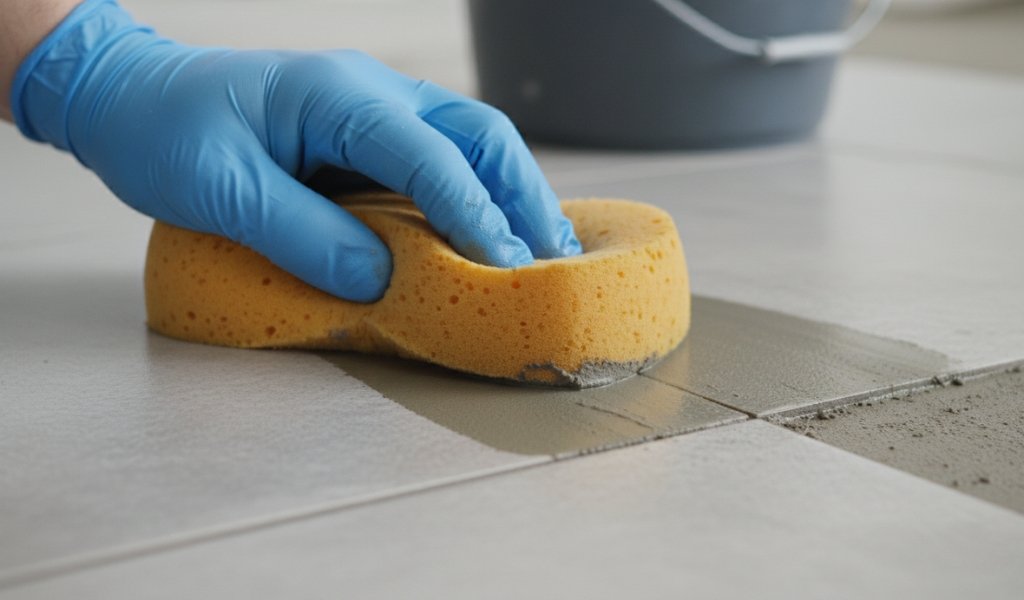
The Critical Cleaning Phase: Timing the Sponge
This is where many DIY projects go wrong. When to sponge the grout depends on your room’s temperature and humidity.
- The “Thumb” Test: Touch the grout joint. It should be firm and not stick to your finger, but it shouldn’t be hard like a rock.
- The First Wash: Use a damp—not dripping—sponge. Move in light, circular motions. This “dresses” the joint, leveling it and making it look uniform.
- Rinse Constantly: Your water bucket will get dirty quickly. Change the water the moment it looks cloudy. Using dirty water just spreads a “cement film” back onto the tiles.
- The Final Swipe: Once the joints look perfect, take a clean, damp sponge and do one long, continuous stroke across the tile to remove the remaining haze. Do not go back over it until it is dry.
Grouting Wall Tiles vs. Grouting Floor Tiles
The application of floor grout versus wall grout requires different physical approaches.
- Wall Tiles: Start at the top. This prevents dirty water from your cleaning phase from running down into un-grouted joints below. Precision is key here, especially around eye-level features like shower niches.
- Floor Tiles: You have the benefit of gravity, but the challenge of surface area. Work in segments, ensuring you don’t “trap” yourself in a corner. Always check that the grout is compatible with foot traffic—Bostik Ardacolor Flex is highly recommended for floors due to its durability.
Advanced Troubleshooting: Avoiding Cracks and Discoloration
If you notice your grout cracking or changing color, it’s usually due to one of three things:
- Substrate Movement: If the floor underneath flexes, the grout will crack. Always use a flexible additive or a product like Ardacolor Flex.
- Pinholes: Small holes in the grout are caused by air bubbles. This happens if the grout was mixed too fast or if the joints were damp when you started.
- Uneven Drying: If one part of the room is in the sun and the other in the shade, the grout will dry at different speeds, leading to different shades of color. Try to keep the environment consistent.
Post-Grouting Care: Tile and Grout Cleaning & Maintenance
Once the grouting is done, your job isn’t quite over.
- Curing: Let the grout cure for at least 48 to 72 hours before exposing it to heavy water or cleaning chemicals.
- Sealing: Unless you used epoxy, you should apply a grout sealer. This creates an invisible barrier that prevents oils, soaps, and dirt from penetrating the cement.
- Routine Cleaning: Use a pH-neutral cleaner. Avoid “homemade” remedies like vinegar or lemon juice; the acid in these liquids will slowly eat away at the cement in your tile grout, leading to erosion.
- Professional Tile and Grout Cleaning: Once a year, consider a deep clean using a specialized grout brush and an alkaline cleaner to restore the original color.
Conclusion
Grouting tiles is as much an art as it is a construction task. It requires the right chemistry and the right technique. By paying attention to the mixing ratio, mastering the diagonal application, and timing your cleaning perfectly, you ensure a result that isn’t just “neat” but is professional-grade and built to last. A well-grouted floor is the hallmark of quality tile work, providing a clean, hygienic, and beautiful surface for years to come.
F.A.Q. (Frequently Asked Questions)
1. How long does grout take to dry?
While grout may feel hard within 4 hours, the full “curing” process (a chemical bond) takes about 24 to 72 hours. Avoid walking on floor tiles or using a shower until this window has passed.
2. Can I use a regular kitchen sponge for cleaning?
No. Kitchen sponges have large pores that can “pluck” the grout out of the joint, leaving it uneven. They also hold too much water. Always use a dedicated, high-density tile grout sponge.
3. Why is my grout cracking only a few months later?
This is usually caused by structural movement or “slumping.” If the floor moves and the grout isn’t flexible, it will crack. It can also happen if the joint was too wide for the type of grout used (e.g., using unsanded grout for a 10mm gap).
4. How do I match the grout color if I need to do a repair?
Grout color can vary by “dye lot,” much like wallpaper. If you are doing a repair, try to find the original bag. If that’s not possible, use a color chart from a professional range like Bostik, but be aware that old grout may have faded or darkened over time due to dirt.
5. Is “washing in” the same as grouting?
Yes. “Washing in” is a common industry term for the process of spreading wet grout over the tiles and “washing” the excess away with a sponge.
6. Do I need to wet the tiles before grouting?
Generally, no. However, if you are working with highly porous natural stone (like terracotta), lightly dampening the tiles can prevent them from “sucking” the moisture out of the grout too quickly, which can make application difficult.
7. What happens if I wait too long to sponge?
If the grout hardens on the surface of the tile, it creates a “grout haze” that is very difficult to remove. You may need to use an acidic haze remover, which can be risky if not used carefully. It is always better to sponge while the grout is still “workable.”
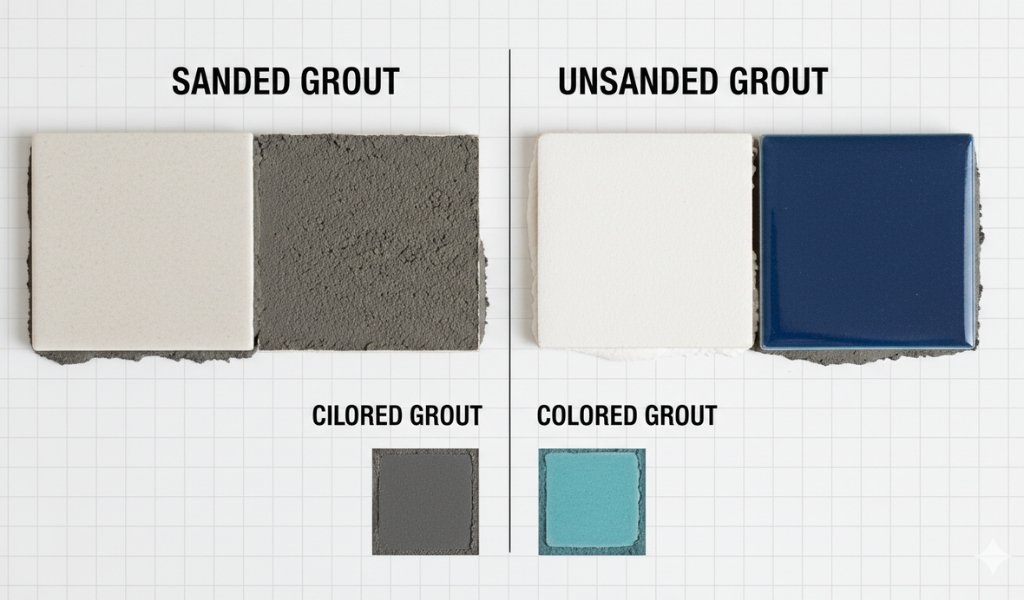 Cementitious Grout