Physical Address
304 North Cardinal St.
Dorchester Center, MA 02124
Physical Address
304 North Cardinal St.
Dorchester Center, MA 02124

When it comes to home garage heroics, few tools carry a reputation as “intimidating” as the spring compressor. If you ask a veteran mechanic about their most hair-raising DIY moments, there is a high probability the story involves a coil spring compressor and a sudden, loud “bang.”
However, despite the campfire stories of “metal missiles” flying through garage walls, the spring compression tool is a fundamental piece of equipment that every aspiring tuner needs to master. Whether you are installing a set of lowering springs to give your ride that perfect stance or replacing a blown strut to restore your factory ride quality, knowing how to handle a car spring compressor safely is the difference between a successful Saturday afternoon and a trip to the emergency room.
In this comprehensive guide, we will break down the mechanics, the safety protocols, and the step-by-step procedures for using coil compressors like a seasoned professional.
To respect the tool, you must first respect the energy it contains. The springs in your vehicle are designed to support several thousand pounds of steel, glass, and engine components while absorbing the violent impacts of potholes and high-speed cornering.
When you use a spring compressor, you are manually fighting against hundreds of pounds of potential energy. If that energy is released instantly because of a slipped clamp or a snapped bolt, the spring becomes a projectile. Our goal today is to ensure that energy remains controlled and “caged” throughout your entire repair process.
Not every suspension job requires a spring compression tool. Understanding your vehicle’s layout can save you unnecessary work.
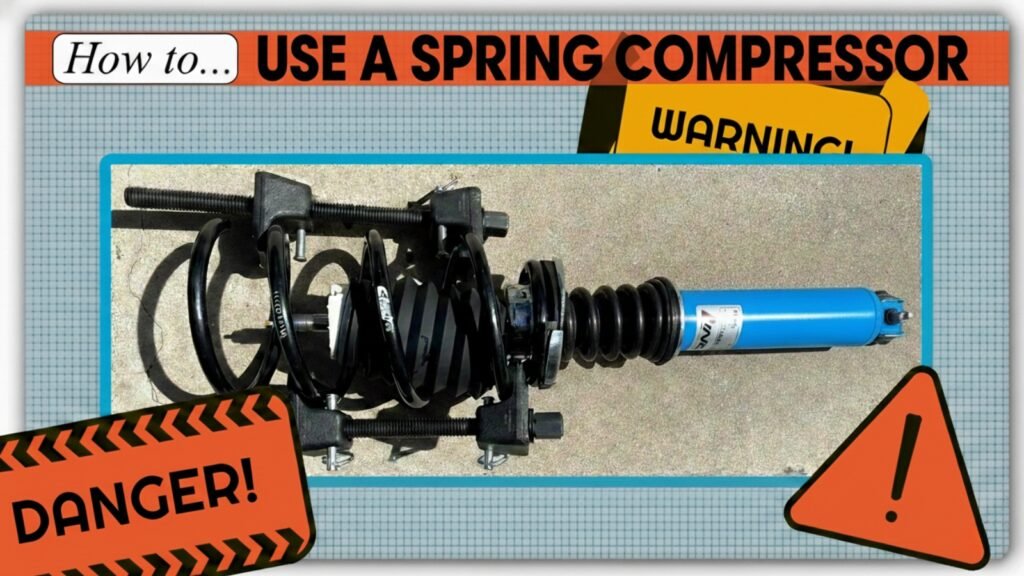
On most modern front-wheel-drive and many rear-wheel-drive cars, the front suspension uses a MacPherson strut. This is a “coil-over” design where the spring is physically wrapped around the shock absorber.
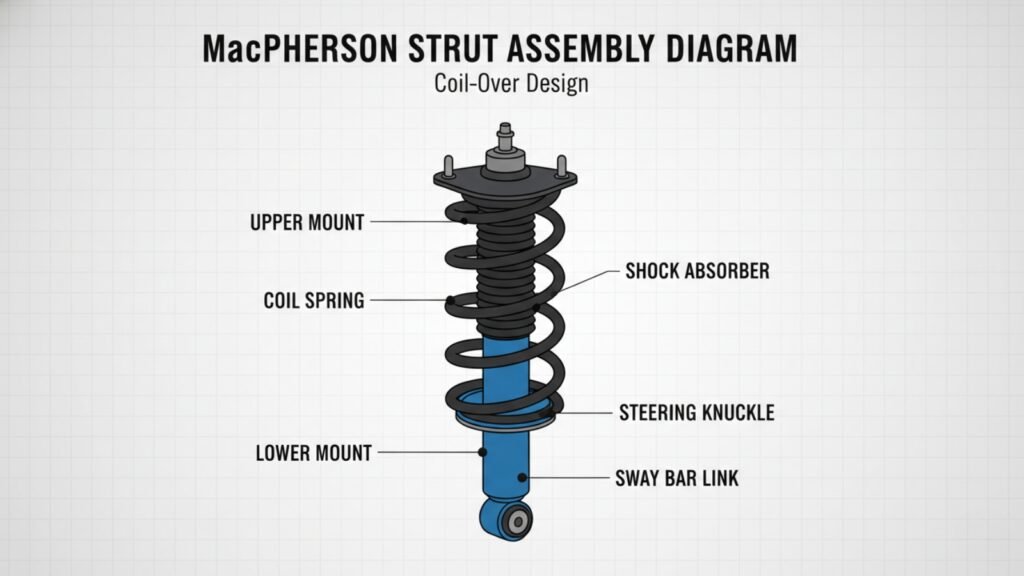
To take this assembly apart, the spring must be squeezed down until it no longer puts pressure on the “top hat” (the upper mounting plate). Without a car spring compressor, removing the top nut would result in the top hat being shot off with enough force to cause fatal injuries
In many rear suspension setups, the spring sits in a “bucket” on the control arm, and the shock is bolted nearby but not through the centre of the spring. In these cases, you can often avoid the coil spring compressor entirely by safely supporting the control arm with a jack, unbolting the shock, and slowly lowering the jack until the spring reaches its natural, uncompressed length.
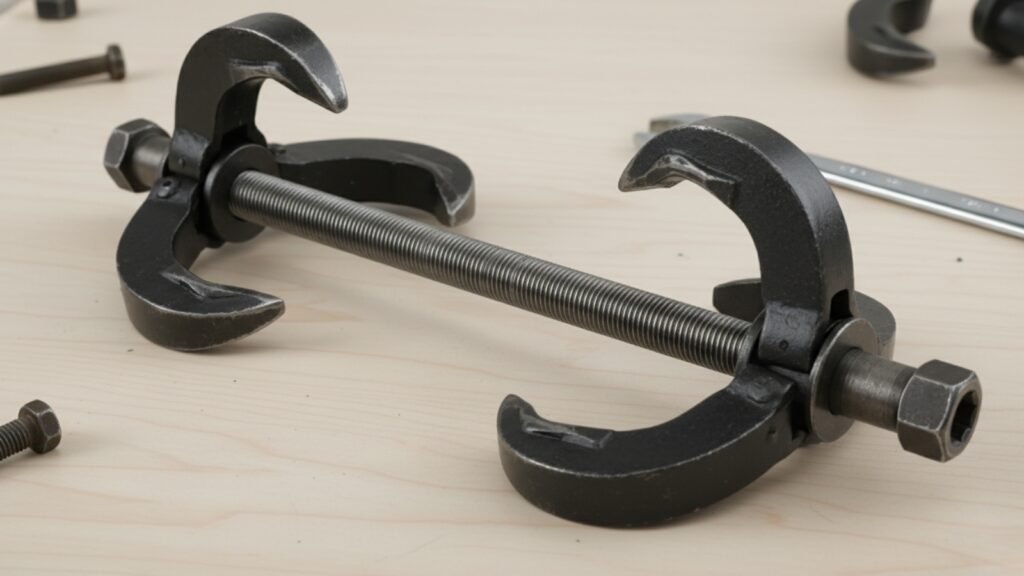
While there are expensive floor-mounted units found in professional shops, the most common DIY version is the “External Dual-Claw” compressor. This kit usually consists of:
You aren’t just working on a car; you are managing a high-pressure mechanical system.
Before you begin, clear your workspace and ensure you have the following:
| Item | Purpose |
| Spring Compressor Kit | The primary tool for the job. |
| Lithium Grease/Oil | To lubricate the threads of the compressor (Crucial for safety). |
| Ratchet & Socket Set | To turn the compressor bolts manually. |
| Torque Wrench | To ensure the top hat nut is tightened to spec later. |
| Bench Vise | (Optional but recommended) To hold the strut assembly steady. |
| Hex/Allen Keys | To hold the shock shaft still while tightening the nut. |
This process requires patience. Speed is your enemy here.
Before the tool ever touches the spring, apply a generous amount of oil or grease to the threads of the spring compression tool. This reduces friction heat and prevents the threads from “galling” or seizing under the immense pressure.
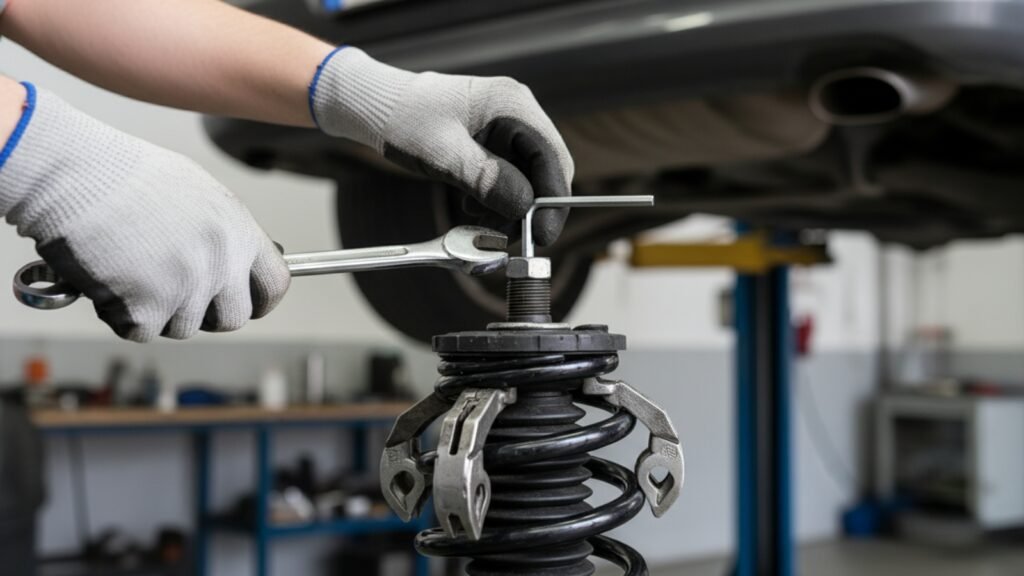
Place the two compressor bolts on exactly opposite sides of the spring (180 degrees apart).
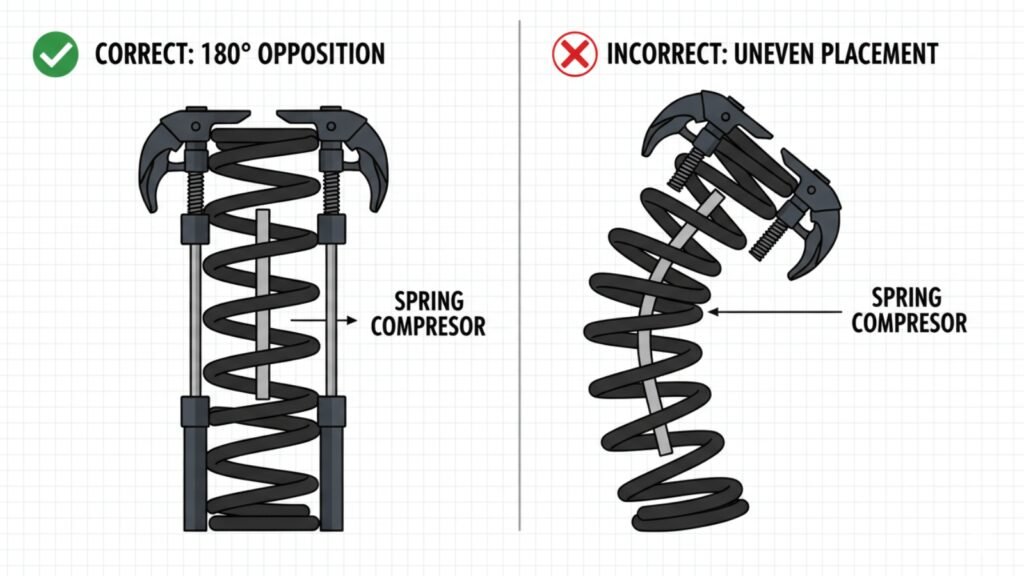
If they are too close to each other, the spring will “bow” or bend like a banana, which can cause the tool to slip off. Reach as far up and as far down the spring as possible to capture the maximum number of coils.
If your car spring compressor has safety pins, slide them into place and ensure they are clicked shut. This prevents the spring from “walking” out of the hooks.
Using a hand ratchet (never an impact gun for this part!), tighten the first bolt three or four turns. Then, move to the opposite bolt and do the same. Switching back and forth ensures even pressure.
Warning:
Using an impact wrench on a DIY coil spring compressor can cause the threads to overheat or the tool to vibrate off the spring. Stick to hand tools for the compression phase.
Continue the alternating tightening process until you see the spring pull away from the top mount or bottom seat. Once the spring can be “jiggled” or rotated by hand, it is fully compressed
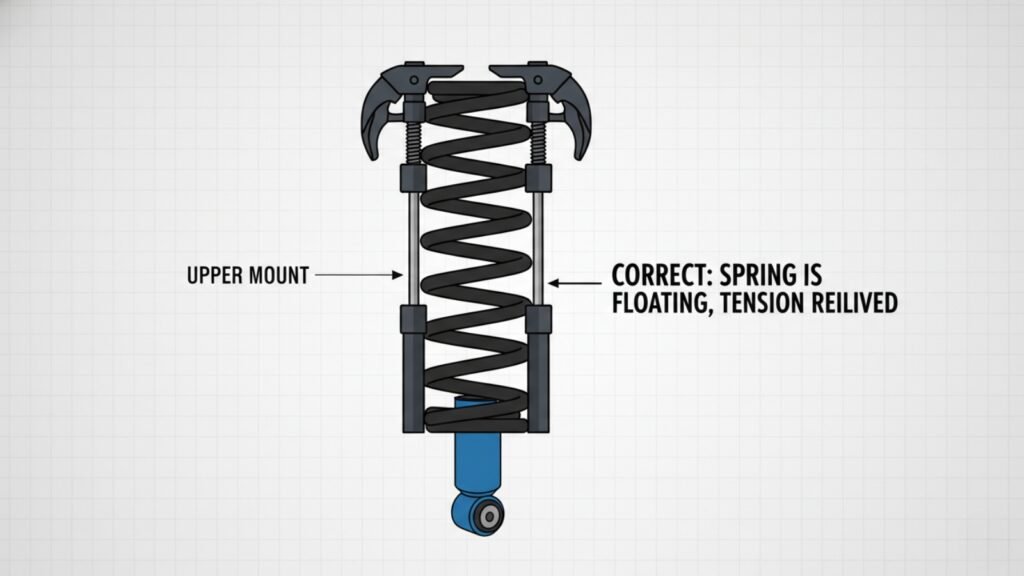
and no longer exerting force on the strut mounts.
If you are replacing an old spring:
One of the most common complaints after a suspension job is a “clunking” or “popping” sound when turning the steering wheel. Here is how to avoid that:
Using a spring compressor is a rite of passage for any DIY mechanic. It requires a blend of mechanical sympathy and strict adherence to safety protocols. By taking your time, lubricating your tools, and keeping the “missile” aimed away from your body, you can transform your car’s handling and ride quality with confidence.
Ready to get started? Just remember: if the tool feels like it’s struggling or the spring is bowing significantly, stop, back off, and reposition. Your safety is worth more than a set of shiny new springs!
Q: Can I use an impact wrench to speed up the process?
A: It is highly discouraged for DIY-style coil compressors. The high-speed vibration and torque of an impact wrench can cause the claws to slip or the threads to strip under load. Always use a hand ratchet for the safest results.
Q: Are all spring compressors the same size?
A: No. While most “universal” kits work for passenger cars, heavy-duty trucks or vehicles with very large diameter coils may require a specialized, heavy-duty car spring compressor. Always check the weight rating of your tool.
Q: What happens if the spring starts to bend in the middle?
A: This is called “bowing.” It usually happens because the two bolts aren’t perfectly opposite each other. If this happens, carefully loosen the tool, reposition the claws so they are 180 degrees apart, and start again.
Q: How do I know if my spring compressor is worn out?
A: Inspect the threads for “flattening” or shiny metal flakes (shavings). If the claws have visible cracks or the bolts are bent, discard the tool immediately. A failing spring compression tool is a catastrophe waiting to happen.
Q: Do lowering springs require a compressor for installation?
A: Often, lowering springs are shorter than the factory springs. While you will definitely need a coil spring compressor to get the old, long springs off, you might find that the new lowering springs are short enough to be installed by hand without compression. However, always have the tool ready just in case.