Physical Address
304 North Cardinal St.
Dorchester Center, MA 02124
Physical Address
304 North Cardinal St.
Dorchester Center, MA 02124
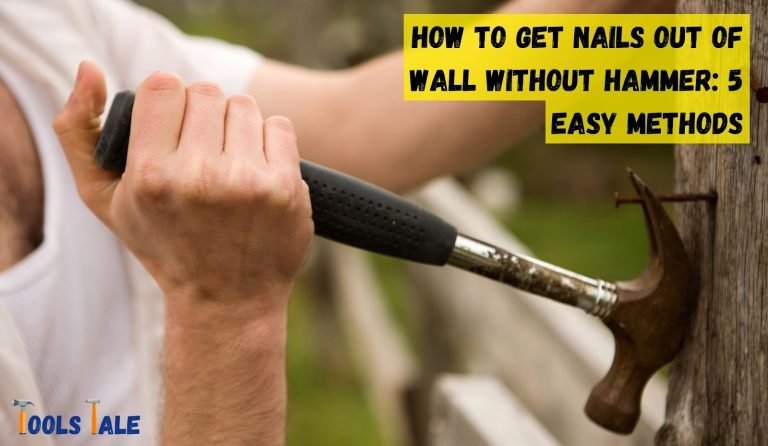
Are you facing starting problems with your vehicle? Curious about the precise spot to hit the starter with a hammer? Look no further! In this concise guide, we’ll unveil the secrets of “Where to hit starter with hammer” that can bring your engine back to life. Discover the targeted areas that can potentially resolve your starting issues.
Get ready to wield that hammer with confidence and precision as we delve into the art of starter maintenance. Say goodbye to frustration and welcome the satisfaction of a successful strike. Let’s unlock the potential of your vehicle’s starter together by uncovering the answer to the question: Where to hit starter with hammer?
Key Summary: Where to Hit Starter with Hammer?
When dealing with a starter, it’s crucial to follow safety guidelines. Place the hammer on the starter’s housing, near the solenoid. Apply controlled force to loosen any stuck components. Avoid hitting directly on electrical connections. Consult an automotive professional for assistance if unsure. Stay safe!

When it comes to knowing where to hit a starter with a hammer, it’s crucial to have a solid understanding of the basics. The starter, an integral component of a vehicle’s electrical system, is responsible for initiating the engine’s combustion process. By striking the starter at the right spot, you can potentially alleviate starting problems and ensure smoother engine operation.
In this section, we will delve deeper into the key aspects of hitting a starter with a hammer. To begin, it’s important to note that the starter is typically located near the engine, usually attached to the transmission housing or engine block. Its exact position may vary depending on the make and model of the vehicle.
Before proceeding, consult the vehicle’s manual or conduct research to precisely identify the starter’s location. Once you have located the starter, your next step is to identify the correct impact point. Starters can differ in design, and each model may have a specific area that is most receptive to hammer strikes. Some starters have designated markings or indicators to guide you to the optimal impact point.
Take your time to inspect the starter thoroughly, looking for any visible signs or instructions that point to the correct spot. Before delivering any strikes, it’s essential to prepare the starter and its surroundings. Check for any loose connections, wiring issues, or corrosion that may affect the starter’s performance.
Address any visible problems before proceeding. Additionally, ensure that the vehicle is in neutral or park and that the ignition is turned off to prevent any accidental starting. Now, armed with a suitable hammer, position yourself in a way that allows for a clear view and easy access to the starter. Hold the hammer firmly, align yourself with the identified impact point, and deliver controlled strikes.
The objective is to provide a solid hit without applying excessive force. It’s crucial to strike precisely at the designated spot to maximize the effectiveness of each blow. After delivering a few strikes, it’s time to assess the results. Attempt to start the vehicle and listen carefully for any changes in sound or behavior.
If the engine starts more smoothly, the starter engages more consistently, or any grinding noise diminishes, it is a positive indication that your hammer strikes have had a positive impact. These improvements suggest that hitting the starter has helped realign internal components or resolve minor issues. However, it’s important to remember that hitting the starter with a hammer is not a universal fix for all starting problems.
While it may provide temporary relief or aid in troubleshooting, it’s crucial to address any underlying issues causing persistent starting difficulties. If you find yourself relying on this method frequently, it is advisable to consult a qualified mechanic who can perform a comprehensive diagnosis and implement appropriate repairs.
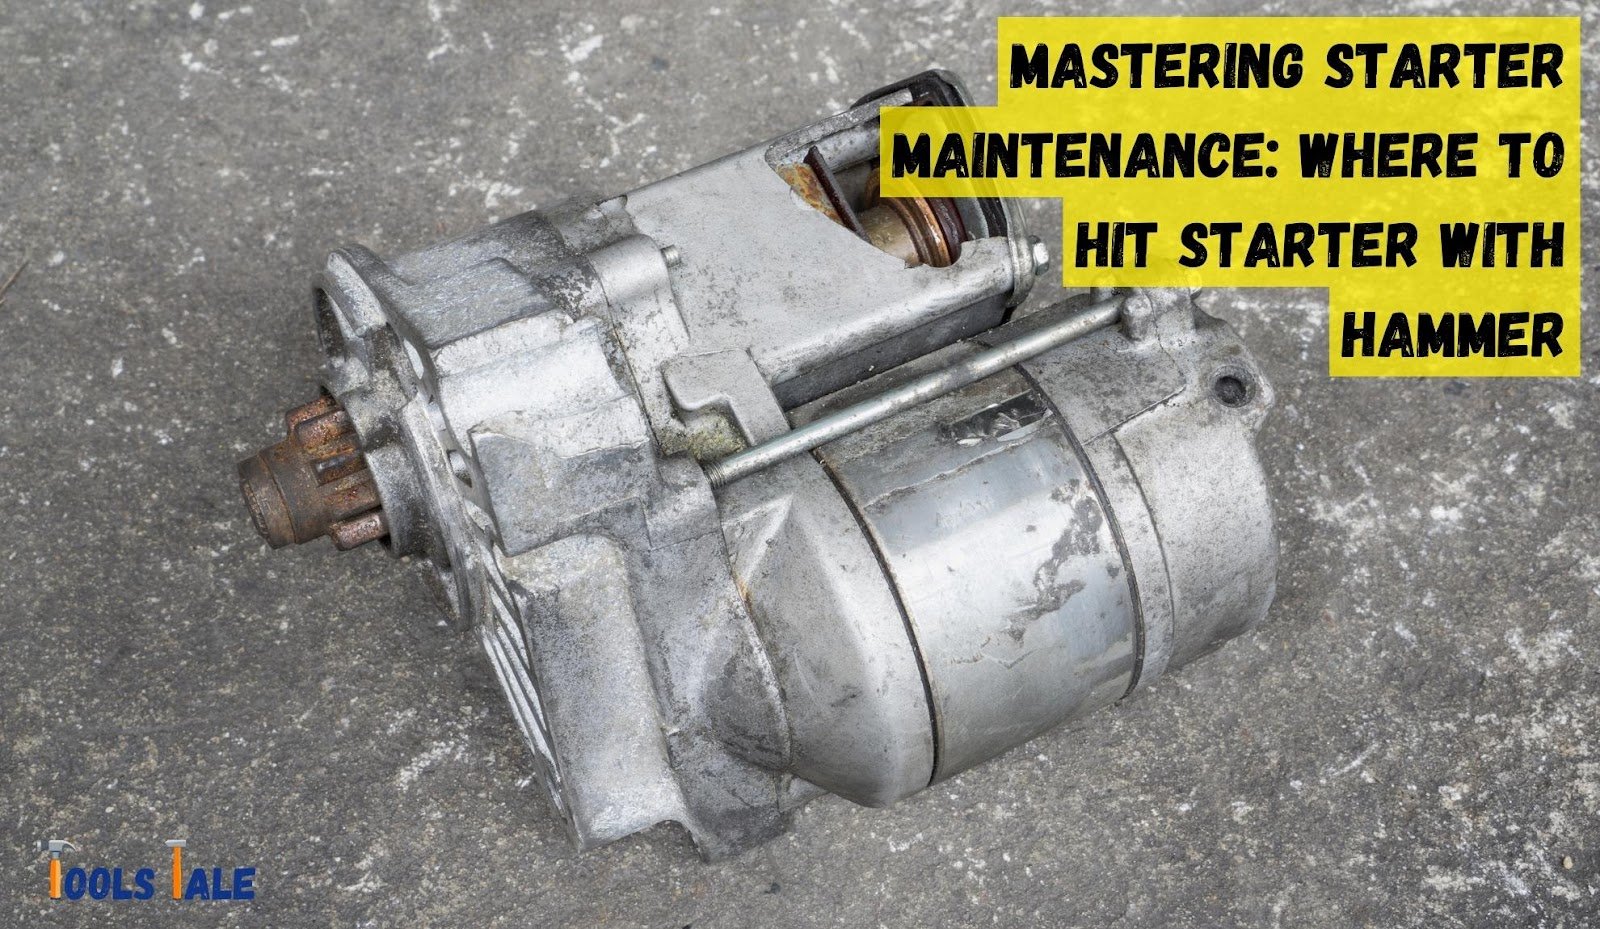
The starter is a critical component of an internal combustion engine that initiates the engine’s operation. It works in conjunction with the ignition system to provide the necessary mechanical force to start the engine. Here’s a detailed explanation of how a starter works:
To ensure the effectiveness of hitting a starter with a hammer, it’s crucial to accurately identify the specific areas that may be causing the problem. By focusing on the following key components, you can increase the chances of resolving the issue successfully:
The solenoid consists of two contacts that engage when the ignition key is turned, allowing electrical current to flow to the starter motor. Over time, these contacts can become corroded or worn out, resulting in poor electrical connectivity. By gently striking the solenoid contacts with a hammer, you can sometimes dislodge any debris or corrosion, allowing for better contact and improved functionality.
The Bendix drive is a gear mechanism that connects the starter motor to the engine’s flywheel. It is responsible for engaging and disengaging the starter from the flywheel. If the Bendix drive becomes stuck or fails to engage properly, hitting it with a hammer can help free it up and restore normal operation. Focus your strikes on the gear portion of the Bendix drive, applying controlled force to encourage it to disengage if it is jammed.
The starter motor itself can sometimes suffer from internal mechanical issues or a seized armature. Striking the body of the starter motor with a hammer can create vibrations that may loosen any stuck components or free up the armature if it’s seized. Be cautious when hitting the motor body to avoid damaging delicate internal parts.
Loose or corroded mounting bolts and electrical connections can disrupt the proper functioning of the starter. Before resorting to hitting the starter, inspect these bolts and connections for any signs of looseness or corrosion. If necessary, tighten or clean them to ensure a secure and reliable electrical connection.
The entire housing of the starter, which encases the internal components, can sometimes suffer from rust, debris, or accumulated grime. In cases where the issue might be related to a stuck gear or solenoid, hitting the housing with a hammer can create enough vibration to dislodge any obstacles and restore smooth operation. Exercise caution to avoid striking any sensitive wiring or other nearby components.
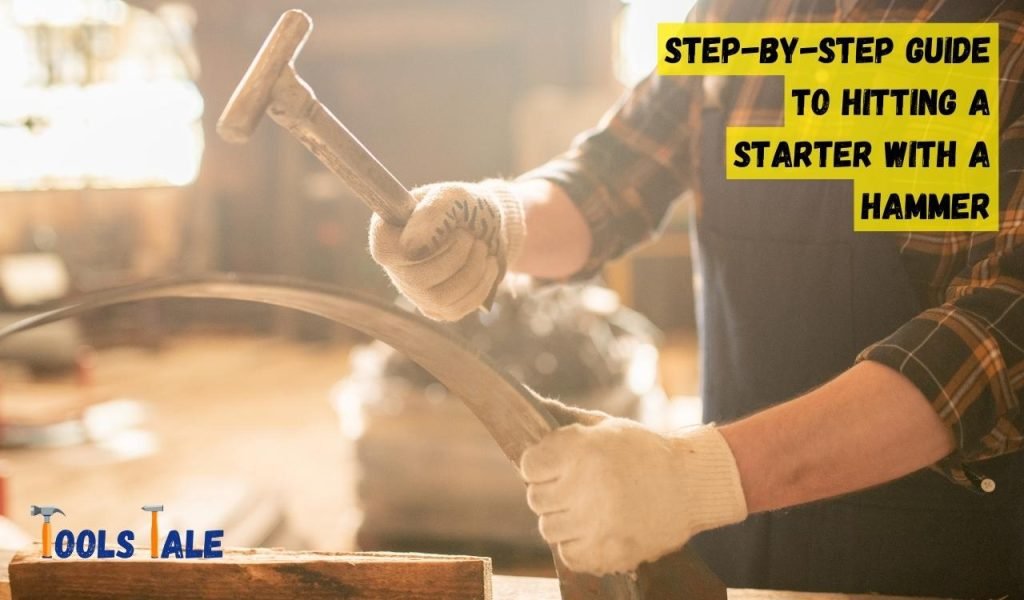
Hitting a starter with a hammer may seem like a straightforward process, but it’s essential to follow a precise step-by-step approach to ensure optimal results. In this detailed guide, we will walk you through each stage of hitting a starter with a hammer, providing you with the necessary information to execute the task effectively.
Start by ensuring your vehicle is parked on a flat surface with the engine turned off. Engage the parking brake and use wheel chocks if available to prevent any unintended movement. Always prioritize safety when working on your vehicle.
Consult your vehicle’s manual or online resources to identify the exact location of the starter. Typically, it is situated near the bottom of the engine and can be accessed from underneath the vehicle.
Before proceeding, gather the required tools for this task. You will need a hammer with a medium-sized, flat face, and a sturdy object like a wooden block or a piece of metal to act as a buffer between the hammer and the starter.
Place the buffer object against the starter to protect it from direct hammer blows. This step is essential as it prevents any direct damage to the starter housing, which could lead to further complications.
Inspect the solenoid contacts, which are responsible for electrical connectivity. Look for signs of corrosion or wear. If necessary, use a small wire brush to clean the contacts before proceeding.
With the buffer in place, start applying controlled strikes to the buffer object using the hammer. Focus your strikes on the identified areas—the solenoid contacts, the Bendix drive, or the starter motor body—while avoiding sensitive wiring or nearby components. Begin with light to moderate force and gradually increase if needed.
After delivering a few strikes, attempt to start the vehicle. Observe if the starter engages and the engine cranks. If the starting issues persist, proceed to the next steps.
If hitting the starter once did not yield the desired results, reposition the buffer object to strike a different area. For example, if you initially targeted the solenoid contacts, you can now aim for the Bendix drive or the starter motor body. Remember to strike with controlled force and monitor the starter’s operation after each attempt.
If hitting the starter multiple times does not resolve the problem, it is advisable to seek professional assistance. A qualified mechanic will have the expertise to diagnose any underlying issues and recommend appropriate solutions.
Proper hammering techniques can play a crucial role in maintaining and troubleshooting starting issues with a vehicle’s starter. While hammering should be considered a temporary solution, understanding the following detailed techniques can help increase the chances of success:
When hitting the starter with a hammer, it is vital to apply controlled force. Begin with gentle strikes and gradually increase the force if necessary. Avoid using excessive force, as it may lead to damage to the starter or other components. A measured and controlled approach ensures that the impact is directed to the specific areas of the starter that require attention.
Direct your hammer strikes to the specific areas of the starter that are likely causing the problem. These areas typically include the solenoid contacts, the Bendix drive, or the starter motor body. By focusing your strikes on these specific locations, you maximize the chances of dislodging stuck components or improving electrical connectivity.
Rather than randomly striking the starter, adopt a strategic approach by delivering well-aimed blows. Focus on hitting the areas of concern precisely, aiming to dislodge stuck components or enhance electrical connections. Take your time and assess the impact of each strike before proceeding to the next one. Strategic strikes increase the effectiveness of the hammering technique.
To protect the starter from direct hammer blows and potential damage, it is recommended to use a buffer object. Place a wooden block or a piece of metal against the starter, ensuring it covers the areas where you intend to strike. The buffer absorbs the force of the hammer blows, reducing the risk of causing harm to the starter housing or delicate internal components.
Rather than relying on a single strike, it is often beneficial to deliver multiple strikes while closely observing the starter’s response. Assess the impact of each strike on the starting issue. Observe any changes in functionality, such as improved engagement or smoother operation. This iterative process allows you to gauge the effectiveness of the hammering technique and make adjustments as necessary.
While hammering the starter can provide temporary relief, it is essential to employ diagnostic skills to identify the underlying cause of the starting problem. Perform a visual inspection to check for loose connections, signs of corrosion, or visible damage. Proper diagnosis helps ensure that hammering is used as a troubleshooting measure rather than a long-term solution.
If hammering the starter does not resolve the starting issues or if the problem persists, it is recommended to seek professional assistance. A qualified mechanic possesses the expertise to accurately diagnose the root cause of the problem and provide appropriate solutions. They can help avoid further damage and ensure the long-term reliability of the vehicle’s starting system.
To achieve optimal results when using the hammering technique for starter maintenance, consider the following expert tips and recommendations:
Before resorting to hammering the starter, conduct a thorough visual inspection of the entire starting system. Look for loose connections, signs of corrosion, or visible damage. Pay attention to the wiring, terminals, and other components related to the starter. Addressing any underlying issues found during the inspection may eliminate the need for hammering altogether.
If you notice signs of corrosion or buildup on the starter or its components, it is recommended to clean them. Use a wire brush and a suitable cleaner to remove any corrosion or debris that may hinder proper functionality. After cleaning, apply a small amount of electrical contact lubricant to protect against future corrosion and promote smooth operation.
A weak or failing battery can often contribute to starting issues. Before attempting any maintenance, ensure that the battery is in good condition. Check the battery’s voltage and perform a load test if necessary. If the battery is weak, consider charging or replacing it before proceeding with further troubleshooting.
The ignition switch plays a crucial role in the starting process. Check the ignition switch for any signs of wear or malfunction. Ensure that it is functioning properly and making a solid electrical connection. Faulty ignition switches can cause intermittent starting issues and may require replacement.
Faulty or loose ground connections can disrupt the flow of electricity to the starter. Inspect the grounding points within the starting system and ensure they are clean and tightly secured. Clean any corrosion or debris from the ground connections to ensure proper electrical conductivity.
Temperature extremes, particularly in cold weather, can affect the starting performance of the starter. If you are experiencing starting issues primarily during cold conditions, consider using a block heater or parking the vehicle in a garage to mitigate the effects of cold temperatures. Additionally, opting for a battery with a higher cold cranking amp (CCA) rating can improve starting performance in cold climates.
When using the hammering technique for starter maintenance, it’s important to be aware of common mistakes that can hinder your progress or potentially cause further damage. Avoiding these mistakes will help ensure a safe and effective troubleshooting process:
One of the most common mistakes is using excessive force when hitting the starter with a hammer. Applying too much force can lead to damage to the starter, the engine, or other related components.
It’s crucial to strike with controlled force and gradually increase it only if necessary. Remember, the goal is to dislodge stuck components or improve electrical connections, not to forcefully impact the starter.
Another mistake is delivering strikes without a specific target. Randomly hitting the starter without focusing on the identified areas of concern can be ineffective. Aim for the solenoid contacts, the Bendix drive, or the starter motor body—depending on the issue at hand. Concentrate your strikes on these specific areas to maximize the likelihood of resolving the problem.
Failing to use a buffer object is a common oversight that can lead to unintended damage. A buffer object, such as a wooden block or a piece of metal, helps protect the starter from direct hammer blows and minimizes the risk of causing harm to its housing or delicate internal components. Always position a buffer object between the hammer and the starter to absorb the impact.
Hammering the starter should be seen as a temporary troubleshooting measure, not a permanent solution. It’s important to identify and address the underlying cause of the starting problem. Ignoring the root issue may lead to recurring problems or even further damage to the starter or other components. Proper diagnosis and appropriate repairs are crucial for long-term reliability.
While hammering the starter may temporarily resolve starting issues, it’s essential to know when to seek professional assistance. If the problem persists or if you are uncertain about the root cause, it’s recommended to consult a qualified mechanic.
They have the expertise and diagnostic tools to accurately identify and address the underlying problem. Relying solely on temporary fixes can compromise the overall reliability and safety of your vehicle.
A common mistake is neglecting preventive maintenance. Regularly servicing and inspecting your vehicle’s starter system can help prevent issues from arising in the first place.
Keep the starter clean, ensure proper electrical connections, and address any signs of corrosion or wear promptly. By maintaining your vehicle’s starter system, you can minimize the need for troubleshooting techniques like hammering.
In conclusion, when it comes to addressing starting issues and maintaining your vehicle’s starter, the hammering technique can provide a temporary solution. By applying controlled force, targeting specific areas, using a buffer object, and following expert tips, you can increase the chances of success.
However, it’s important to remember that hammering should only be used as a temporary measure and not a long-term solution. Proper diagnosis, preventive maintenance, and seeking professional assistance when needed are essential for ensuring the reliability and safety of your vehicle’s starting system.
To effectively hit the starter with a hammer, focus your strikes on specific areas. The most common targets include the solenoid contacts, the Bendix drive, or the starter motor body. Directing your strikes to these areas increases the chances of resolving the issue successfully.
The correct areas to target when hitting the starter with a hammer are the solenoid contacts, the Bendix drive, or the starter motor body. These areas are crucial in the starting process and are often the source of common starting problems. By hitting these areas strategically, you can dislodge stuck components or improve electrical connectivity.
Hitting the starter with a hammer can sometimes provide a temporary fix for starting problems. The impact from the hammer can free up stuck components or improve electrical connections, allowing the starter to function properly. However, it is important to note that this is a temporary solution and addressing the underlying cause of the starting problem is necessary for a long-term fix.
When done correctly and with caution, hitting the starter with a hammer is generally safe. However, it is important to take certain precautions. Use controlled force, avoid excessive strikes, and protect the starter by placing a buffer object, such as a wooden block or a piece of metal, between the hammer and the starter. Following proper techniques and safety measures minimizes the risk of damage or injury.
To hit the starter with a hammer, you will need a hammer with a medium-sized, flat face. Additionally, it is advisable to use a buffer object, such as a wooden block or a piece of metal, to protect the starter from direct hammer blows. Having these tools on hand ensures a safer and more effective hammering process.
When hitting the starter with a hammer, it is important to apply controlled force. Start with light to moderate strikes and gradually increase the force if needed. Avoid using excessive force, as it can potentially cause damage to the starter or other components. A measured approach ensures that the impact is directed to the specific areas that require attention.
While hitting the starter with a hammer can be a helpful troubleshooting technique, there are some risks involved. Excessive force or improper strikes can potentially damage the starter, the engine, or other related components. It is important to follow proper hammering techniques, use controlled force, and protect the starter with a buffer object to minimize the risk of unintended damage.
While hitting the starter with a hammer can provide a temporary solution, it is recommended to explore alternative solutions for long-term fixes. Some alternatives include proper diagnosis of the starting problem, checking and addressing loose connections, inspecting the ignition switch, verifying ground connections, and seeking professional assistance. These alternatives focus on addressing the underlying cause of the starting problem rather than relying solely on temporary fixes.
Hitting the starter with a hammer should be considered as a troubleshooting method when you encounter starting issues and have ruled out other potential causes, such as a weak battery, loose connections, or faulty ignition switch.
It can be attempted as a temporary measure to dislodge stuck components or improve electrical connections. However, it is important to address the underlying cause and seek professional assistance if the problem persists.
While hitting the starter with a hammer can be effective for troubleshooting starting problems, there is a risk of damaging other parts of the engine if not done properly. It is crucial to strike with controlled force and target the specific areas of the starter. By using a buffer object and avoiding excessive force, you can minimize the risk of causing unintended damage to other engine components.