Physical Address
304 North Cardinal St.
Dorchester Center, MA 02124
Physical Address
304 North Cardinal St.
Dorchester Center, MA 02124

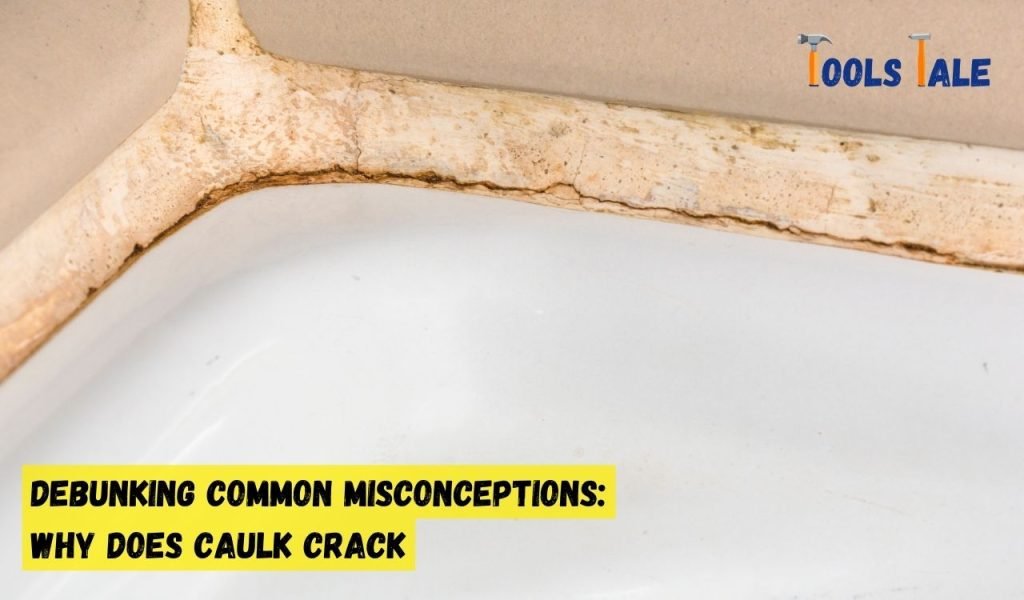
Why does caulk crack? If you’ve ever wondered about those frustrating gaps in your caulk lines, you’re not alone. Caulk cracking is a common issue that can leave your surfaces vulnerable to moisture, drafts, and even pests. But fear not! In this guide, we’ll dive deep into the reasons behind this common problem and, more importantly, how to prevent and fix it.
Whether you’re a seasoned DIY enthusiast or just looking to maintain your home, understanding why caulk cracks is your first step to achieving those perfect seals. Let’s get started!
Key Summary: Why Does Caulk Crack?
Caulk cracks due to aging, moisture, temperature fluctuations, or poor application. Prevent cracking by choosing the right caulk, ensuring proper surface preparation, applying it evenly, and maintaining a stable environment. Regular checks and re-caulking when needed can help prevent cracks.
[amazon_auto_links id=”11426″]
Caulk, a versatile material used for sealing gaps and joints, provides a watertight and airtight seal in various applications. However, despite its usefulness, caulk can develop cracks over time, compromising its effectiveness. Understanding the reasons behind caulk cracking is crucial for effective application and maintenance. Here are the ultimate reasons why caulk cracks:
Over time, caulk naturally ages and deteriorates due to exposure to environmental elements like sunlight, heat, cold, and moisture. This aging process causes the caulk to lose its flexibility and resilience, making it prone to cracking.
Buildings and structures experience settling and movement, especially during temperature fluctuations and foundation shifts. Caulk seals are not immune to these movements. If the structure shifts significantly, the caulk can crack as it is unable to accommodate such movement.
The quality of caulk used plays a vital role in its longevity. Inferior or low-quality caulk is more likely to crack and deteriorate quickly compared to high-quality caulks. Investing in a reputable caulk product ensures a longer-lasting seal.
Using the wrong type of caulk for a specific application can lead to premature cracking. Different caulks are designed for different purposes and surfaces. For instance, using an indoor caulk for an outdoor application can result in cracking due to exposure to weather elements.
Applying caulk incorrectly can cause it to crack. Factors such as uneven application, excessive caulk thickness, or not smoothing the caulk properly can create stress points, leading to cracks as the caulk dries and cures.
Caulk is intended to fill gaps and joints, providing a flexible barrier. However, in joints that experience excessive movement, such as expansion joints, the caulk can become stressed, eventually leading to cracking.
Properly preparing the surface before applying caulk is crucial for adhesion and longevity. If the surface is not adequately cleaned, dried, or primed, the caulk may not adhere properly, resulting in cracks.
Exposure to harsh chemicals and cleaning agents can weaken caulk, making it more susceptible to cracking. Avoid using abrasive chemicals near caulked areas to maintain its integrity.
In colder climates, caulk can crack due to freezing and thawing cycles. Water trapped within the caulk can expand and contract during temperature changes, causing stress on the caulk and leading to cracks.
Understanding these ultimate reasons for caulk cracking is essential for proactive maintenance and effective application. By choosing the right caulk, applying it correctly, and considering the environmental conditions, you can significantly reduce the likelihood of caulk cracking and ensure a longer-lasting, reliable seal.
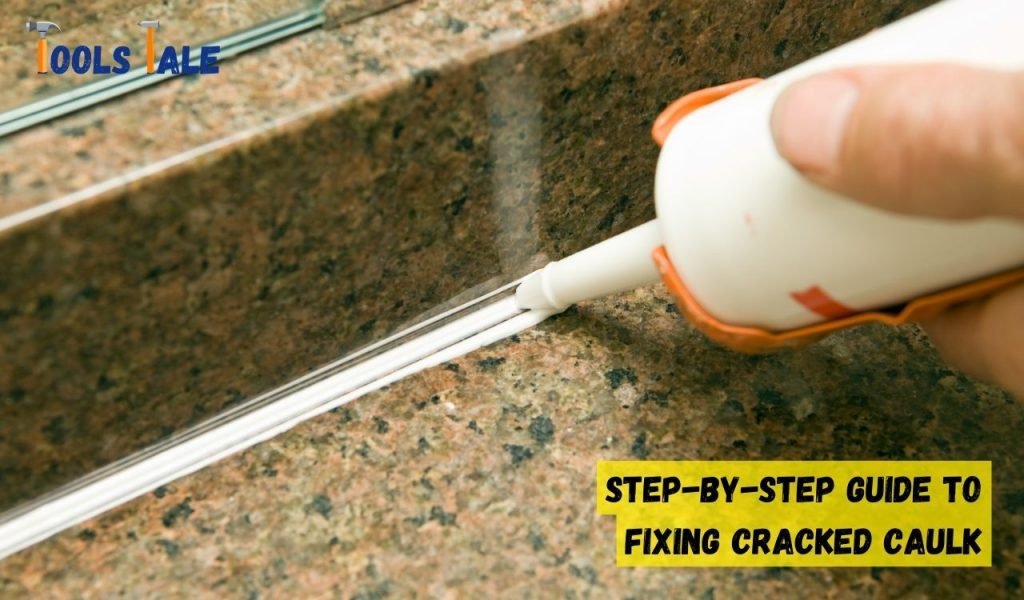
Caulk is a versatile sealing material used to fill gaps and joints, providing a protective barrier against moisture and drafts. Over time, caulk can develop cracks, diminishing its effectiveness. Repairing cracked caulk is crucial for maintaining a tight seal and preventing further damage. Here’s a step-by-step guide to help you fix cracked caulk effectively:
Begin by examining the cracked caulk carefully. Identify the length and severity of the crack. Is it a small surface crack or a larger, deeper one? Understanding the extent of the damage will help you decide on the best approach for repair.
Clean the area around the cracked caulk. Use a mild cleaning solution and a damp cloth to remove any dirt, debris, or residues. Make sure the surface is completely dry before proceeding to the next steps.
Use a caulk remover tool or a utility knife to carefully cut and remove the old, cracked caulk. Be cautious not to damage the adjacent surfaces. Ensure you remove all the loose or damaged caulk.
Clean the joint thoroughly to remove any remaining caulk and residues. Use a caulk smoother or a damp cloth to achieve a smooth, clean surface. Allow it to dry completely.
If you want a precise and neat application, consider using painter’s tape to mask the edges of the joint. This will create clean lines and prevent excess caulk from spreading onto unwanted areas.
Load the new caulk tube into the caulk gun. Cut the tip of the tube at a 45-degree angle to control the caulk flow. Start with a small opening, as you can always cut it larger if needed.
Hold the caulk gun at a consistent angle (usually 45 degrees) and gently squeeze the trigger to apply a smooth, even bead of caulk along the crack. Keep a steady hand and maintain a consistent speed to achieve a uniform application.
Use a caulk smoother or a wet fingertip to smooth the caulk bead, ensuring it fills the crack adequately and provides an even surface. Smooth out any uneven areas for a seamless finish.
Use a caulk smoother or a damp cloth to remove any excess caulk from the surrounding surfaces. Aim for a clean and tidy finish.
Allow the caulk to dry and cure according to the manufacturer’s instructions. Typically, it takes 24-48 hours for the caulk to cure fully.
Once the caulk has dried, carefully inspect the repaired area. Ensure the caulk is well-adhered and covers the crack completely. If needed, apply additional caulk to fill any gaps or uneven spots.
Wipe down the area with a damp cloth to clean off any remaining residues or smudges. Remove the painter’s tape, if used.
Fixing cracked caulk is a straightforward task that can be accomplished with the right tools and materials. Regular maintenance and timely repairs will help prolong the life of caulk seals, ensuring a watertight and airtight barrier in your home or workspace. By following this step-by-step guide, you’ll achieve a professional-looking caulk repair and maintain the integrity of your seals.
Caulk is a versatile material used for sealing gaps and joints in various surfaces, providing a watertight and airtight barrier. However, caulk can crack over time, compromising its effectiveness and leading to potential damage. Preventing caulk cracking is essential for maintaining a long-lasting seal and ensuring optimal performance. Here are effective preventive measures to reduce caulk cracking:
Begin by choosing the appropriate caulk type for the specific application. Different caulks cater to different needs. For example, silicone caulk is highly flexible and ideal for areas prone to moisture, while acrylic latex caulk is more versatile for general use. Using the right caulk ensures it can withstand the specific conditions of the area it is applied to.
Proper surface preparation is crucial for a successful caulking job. Thoroughly clean the area where the caulk will be applied, removing any old caulk, debris, dust, or grease. Use a caulk remover or a scraper to ensure the surface is smooth and clean. A clean and dry surface allows the caulk to adhere properly and minimizes the chances of cracking.
Invest in high-quality caulk from reputable manufacturers. Quality caulks are less likely to crack prematurely and provide a more durable, long-lasting seal. Always check the expiration date to ensure the caulk is fresh and effective.
When applying caulk, maintain a consistent and steady hand to achieve an even application. Use a caulk gun to control the flow and apply the caulk in a smooth, continuous bead. Uneven application can create stress points in the caulk, leading to cracks as it dries.
Adjust the size of the caulk bead based on the size of the joint or gap being sealed. A bead that is too large may crack as it dries, while a bead that is too small may not provide an adequate seal. Aim for a bead size that is proportional to the joint being caulked.
In areas where there is frequent movement or settling, choose a flexible caulk that can expand and contract without cracking. Flexible caulks are designed to accommodate structural shifts, providing a resilient seal that can withstand movement without compromising its integrity.
Shield caulked areas from extreme temperatures, direct sunlight, or excessive moisture. Extreme conditions can cause caulk to contract or expand, leading to cracks. Consider using weather-resistant caulk in outdoor applications to withstand varying weather conditions.
Implement a routine maintenance schedule to inspect caulked areas for signs of wear, cracking, or aging. Regularly check for cracks or gaps in the caulk, especially in high-moisture areas like bathrooms and kitchens. Promptly address any issues by reapplying caulk or performing necessary repairs to prevent further damage.
Refrain from using harsh or abrasive chemicals near caulked areas, as they can weaken the caulk and make it more prone to cracking. Opt for gentle cleaning solutions that won’t compromise the integrity of the caulk.
Follow the manufacturer’s instructions for application and drying times. Avoid disturbing the caulk during the curing process to ensure a strong and crack-resistant seal. Adequate curing time is essential for the caulk to reach its full strength and durability.
For critical areas or complex applications, consider seeking professional help. Professionals have the expertise to apply caulk effectively, ensuring a seamless and durable seal that minimizes the risk of cracking.
Regularly check caulked areas for signs of wear, damage, or cracking. If you notice any issues, promptly address them to prevent further damage. Regular monitoring and maintenance will help prolong the life of the caulk seal.
By implementing these preventive measures, you can significantly reduce the likelihood of caulk cracking and maintain a more durable, long-lasting seal. Well-maintained caulking not only enhances the aesthetic appeal of your space but also provides optimal insulation and protection against moisture and drafts. Preventing caulk cracking ensures a watertight and airtight seal, prolonging the life of your caulk and enhancing the overall integrity of the sealed areas.
Caulk is a go-to solution for sealing gaps and joints, but encountering cracks can lead to frustration and questions. Let’s debunk some common misconceptions surrounding caulk cracking:
Understanding these debunked misconceptions allows for more informed choices when selecting, applying, and maintaining caulk. By debunking these misconceptions, we can enjoy longer-lasting caulk seals that effectively keep moisture and drafts at bay, ensuring a well-maintained and energy-efficient living space.
Caulk cracks due to age, movement, poor quality, incorrect application, and environmental factors. Understanding these reasons helps in choosing the right caulk, proper application, and proactive maintenance. By addressing these factors, we can prolong the life of caulk seals and maintain effective barriers against moisture and air infiltration, ensuring a well-maintained and reliable space.
Regular maintenance is key. Remove the old caulk, prepare the surface, choose a high-quality caulk, and apply it evenly. Monitor for movement and re-caulk as needed to prevent future cracks.
Paint can restrict caulk flexibility, causing cracks. Ensure the caulk is fully cured before painting. Use a paintable caulk and allow adequate drying time to minimize cracking.
High-quality silicone caulks are less prone to cracking due to their inherent flexibility and durability. Look for caulks labeled as flexible and crack-resistant, typically silicone-based, for optimal results. It’s important to choose a caulk that suits the specific application and conditions to minimize the risk of cracking.
To fix cracking caulk, start by carefully removing the old caulk using appropriate tools. Thoroughly clean and dry the area, ensuring it’s free from any residues. Apply a high-quality caulk evenly into the crack, smoothing it out for a seamless finish. Match the caulk type to the surface and conditions, and allow it to fully cure as per the manufacturer’s instructions.
In cold temperatures, caulk can contract and become brittle, leading to cracks. Ensure you use a caulk suitable for cold weather and apply it during warmer periods for better adherence.
While it’s possible to paint over cracked caulk, it’s not the best solution. Painting over cracked caulk won’t fix the underlying issue and may even accentuate the cracks. It’s recommended to remove the cracked caulk, reapply a fresh coat, allow it to cure, and then proceed with painting for a more durable and aesthetically pleasing result.
Remove the old caulk using appropriate tools, clean and dry the area thoroughly, apply a shower-friendly caulk, and ensure it’s completely cured before exposing it to water to prevent future cracks.