Physical Address
304 North Cardinal St.
Dorchester Center, MA 02124
Physical Address
304 North Cardinal St.
Dorchester Center, MA 02124

Band saws are among the most versatile cutting tools used in woodworking, metalworking, and DIY fabrication projects. Unlike circular saws that rely on spinning blades, a band saw uses a continuous loop blade that allows smoother curved cuts, controlled resawing, and detailed shaping work. From cutting thick hardwood boards to shaping custom furniture parts, this machine handles tasks that many other saws struggle to perform accurately.
Learning how to use a band saw correctly is essential for both safety and cutting performance. Blade selection, guide adjustment, feed speed, and machine setup all affect the final result. In this guide, you will learn what a band saw is, how it works, the different blade types available, and the proper techniques for making clean and accurate cuts.
Whether you are looking to slice a thick log into thin, beautiful veneers—a process known as resawing—or you need to cut a perfect, sweeping curve for a custom chair leg, this tool is your best friend. But, like any specialized equipment, it requires a bit of respect and a solid understanding of the mechanics involved. In this guide, we will break down how to use a band saw, explore the different types of band saws, and ensure you have the skills to operate one safely and effectively.
A band saw is used by selecting the correct blade, adjusting blade tension and guides, marking the cut line clearly, and feeding the material smoothly through the blade. Band saws are commonly used for cutting curves, resawing wood, shaping materials, and making precise cuts in woodworking or metalworking projects while maintaining proper safety practices.
A band saw is a power cutting tool that uses a long continuous blade stretched between rotating wheels to cut wood, metal, plastic, and other materials. The narrow blade design allows the machine to make straight cuts, curved cuts, and detailed shapes with greater control than many traditional saws. Because the blade moves in a single downward direction, band saws are widely considered smoother and easier to control for precision cutting tasks.
The beauty of the band saw lies in its unique design. Because the blade is a thin, flexible ribbon of steel, it can make cuts that are simply impossible for other saws. It creates a very narrow ‘kerf’—which is the width of the actual cut—meaning you waste less wood and can maneuver the material with incredible precision. While it might look intimidating with its exposed blade, it is actually one of the most approachable power tools once you understand the basic setup.
Historically, the band saw was developed in the early 19th century, primarily for industrial use. However, modern engineering has brought this power down to a size that fits in a standard home garage. It allows woodworkers to cut smooth curves and detailed shapes through thick wood with impressive control.
The operation of a band saw is based on a motor-driven wheel system that continuously rotates the blade during cutting. An electric motor drives the bottom wheel, which acts as the “power source.” This wheel pulls the blade downward through the table. The top wheel is “freewheeling” and serves two purposes: keeping the blade under the correct amount of tension and ensuring it “tracks” or stays centered on the wheels.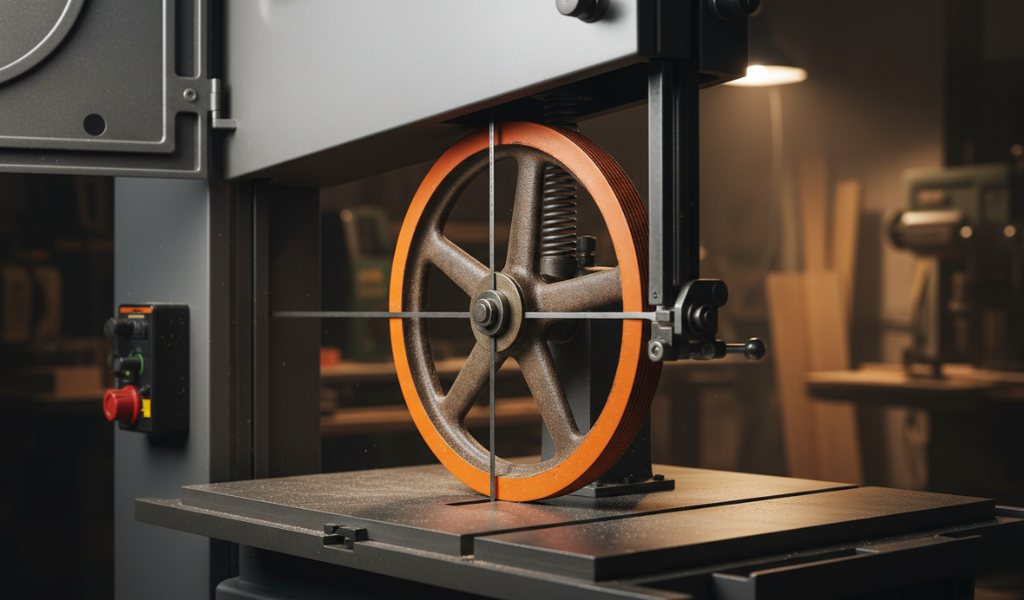
The downward motion of the blade is a huge advantage for safety. Because the blade is always moving toward the table, it naturally holds your workpiece down against the surface. This is the opposite of a table saw, where the blade spins toward you and can sometimes cause “kickback”—a dangerous situation where the wood is hurled back at the operator. On a band saw, the risk of kickback is virtually zero, making it a favorite for beginners.
Inside the housing, the wheels are covered with rubber “tires.” These tires provide the friction needed to keep the metal blade from slipping. If you hear a squealing noise or see the blade stopping while the motor is running, it usually means your tires are worn or the tension is too low.
Band saws are generally divided into two main categories based on their size, power, and intended use, and neither are the tools. Depending on your space and your specific goals, you will likely choose between these two primary designs:
These are the giants of the workshop. A floor-standing band saw is usually made of heavy cast iron or steel, which helps dampen vibrations. These machines are designed for “resawing” (cutting a thick board into two thinner ones) and can handle very large pieces of lumber.
Capacity: They often have a ‘throat capacity’ of 14 inches or more.
Power: Usually equipped with 1.5 to 3 horsepower motors.
Stability: Their weight ensures that the machine doesn’t “walk” across the floor during a heavy cut.
If you are working out of a small garage or a spare room, a benchtop model is a lifesaver. These are smaller, portable versions that sit right on your workbench.
Portability: You can tuck them away when not in use.
Limitations: They have a smaller ‘depth of cut’ (the maximum thickness of wood they can slice).
Hobbyist Focus: They are more than capable of handling typical DIY projects, hobbyist crafts, birdhouses, and light furniture repair.
One of the most common mistakes beginners make is using the same blade for every job. Different cutting tasks require different blade styles. Using the correct bandsaw blade improves cut quality, cutting speed, and overall control. You need to match your blade to your material. Understanding the types of bandsaw blades is the key to a clean finish.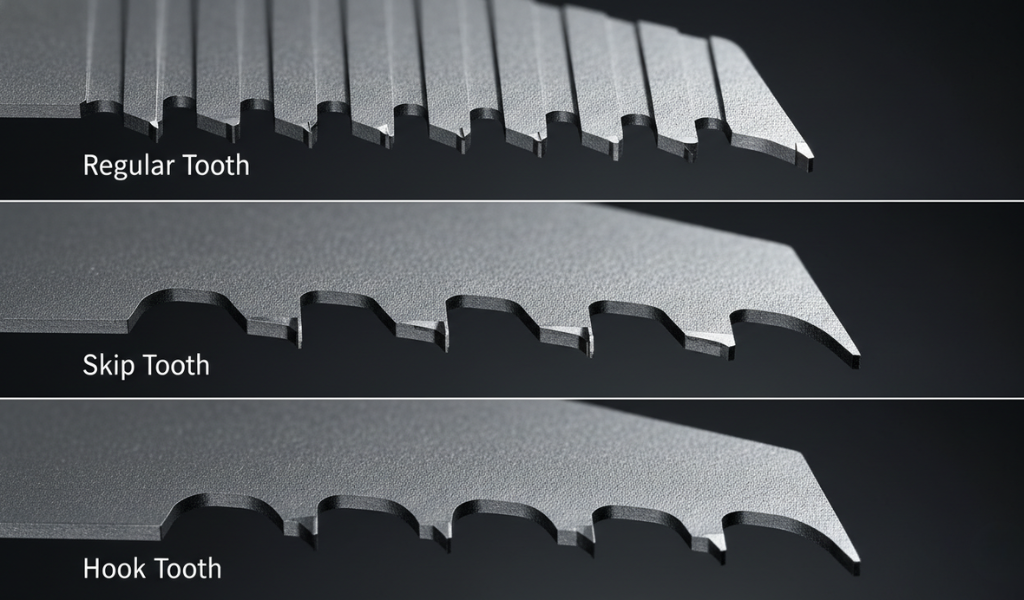
To truly act as an expert, you need to understand the technical specs of the blade. It isn’t just about the type; it’s about the geometry.
The Rule of Three: For smoother cutting performance, multiple teeth should remain engaged with the material during operation. Using extremely coarse blades on thin materials can create unstable cutting and increase the chance of blade damage.
A band saw is only as good as its alignment. Before you start learning how to use a band saw, you must perform this routine:
Tracking: Open the top cover and turn the wheel by hand. The blade should ride in the center of the tire. Adjust the tracking knob until it stays perfectly centered.
Tensioning: A floppy blade will “drift” and cut crookedly. Tighten the tension until the blade only deflects about 1/4 inch when you push it with your finger.
Guide Bearings: There are sets of bearings above and below the table. They should be close to the blade but not touching it while it’s idling. A good trick is to use a dollar bill as a “spacer” between the bearing and the blade.
Thrust Bearings: These sit behind the blade. They stop the blade from being pushed backward off the wheels when you apply pressure. Set them so they are about 1/32 of an inch behind the blade.
Table Squareness: Use a machinist’s square to ensure the table is exactly 90 degrees to the blade. If the table is tilted even one degree, your “straight” cuts will always be slanted.
Ready to make your first cut? Follow these steps to ensure you get a professional result every time.
Never “wing it” on a band saw. Use a bright pencil or a marking knife to trace your cut line. If you are cutting a curve, draw the line clearly on the top face of the wood.
This is a critical step for both accuracy and safety. Lower the blade guard until it is about 1/8 to 1/4 inch above your workpiece. If the guard is too high, the blade has more room to “flex” or “wander,” which leads to uneven cuts and exposes more of the dangerous blade to your fingers.
Turn the saw on and wait for it to reach full speed. Most band saws have one speed, but some metal-cutting models allow you to shift belts to slow it down. Listen to the machine—it should hum smoothly without any rhythmic banging.
Position your workpiece so the blade starts just on the “waste side” of your line. Push the material into the blade with light, consistent pressure. Avoid “forcing” the wood; let the teeth do the work. If you see smoke or smell burning, your blade is likely dull or you are pushing too fast.
As you reach the end of the cut, slow down your feed rate. This prevents the wood from “splintering” as the blade exits. Once the cut is complete, move the wood away and shut off the power. Wait for the blade to come to a complete stop before reaching in to grab your scrap pieces.
Even though the band saw is generally considered “safer” than a table saw because there is no kickback, it is still a power tool capable of serious injury. Practicing proper band saw safety should be your top priority.
Once you are comfortable with basic cuts, you can move on to the “expert” moves.
Resawing is the process of slicing a board through its thickness. This is how you make your own veneers or thin slats for a jewelry box. To do this effectively, you need a “resaw fence”—a tall vertical support that keeps the board upright as you push it through. 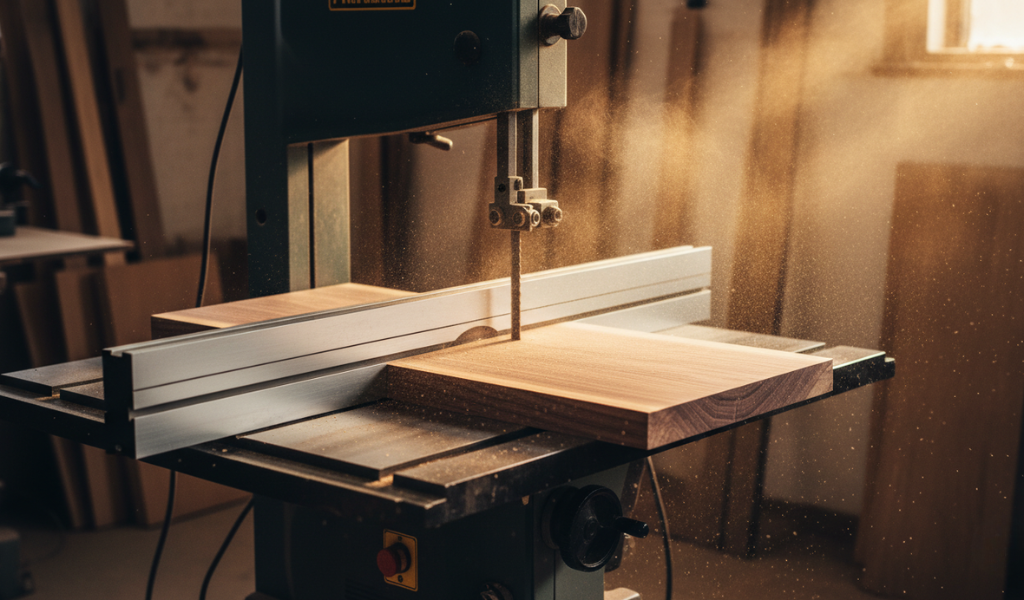 A wide, low-TPI blade is mandatory here to handle the massive amount of sawdust created.
When cutting tight, complex curves, the blade can get “bound” or stuck. To prevent this, make several straight “relief cuts” from the edge of the wood to your curved line. As you follow the curve, the waste pieces will fall away in small chunks, giving the blade room to breathe.
A well-maintained band saw can literally last a lifetime. Here is how to keep yours in peak condition:
Vacuum the Internals: Sawdust buildup is the #1 killer of band saws. It clogs the bearings and wears down the tires. Use a shop vac to clear the internal cabinets after every use.
Tire Care: Check the rubber tires for “grooves” or cracks. You can clean them with a stiff brush to remove packed-in sawdust.
Blade Storage: If you aren’t going to use the saw for a few weeks, release the tension. Keeping a blade under high tension for long periods can cause the tires to develop “flat spots.”
Rust Prevention: Most tables are cast iron. Apply a coat of ‘paste wax’ to the table surface every month. This prevents rust and makes the wood slide much more easily.
Once you have mastered how to use a band saw, the possibilities are endless.
A band saw is one of the most practical cutting tools for both beginners and experienced craftsmen. Its ability to create curved cuts, resaw thick boards, and handle detailed shaping tasks makes it valuable in almost every workshop. By understanding blade types, machine setup, and proper safety techniques, you can improve both cutting accuracy and overall efficiency.
Whether you are building furniture, cutting custom shapes, or handling DIY woodworking projects, learning how to use a band saw properly will help you achieve cleaner and more professional results.
Frequently Asked Questions
Only if the saw has a variable speed motor. Wood saws run at roughly 3,000 feet per minute (FPM), while metal requires 100–300 FPM. Running a wood saw on steel will melt the blade.
Blade drift is usually caused by a dull blade or uneven tooth set. If the teeth on one side are sharper than the other, the blade will naturally pull in that direction.
Most pros use the “flutter test.” Increase tension until the blade stops fluttering while running. For beginners, use the tension gauge on the back of the machine.
Cool blocks are blade guides made of synthetic material (like graphite) instead of metal bearings. They allow the guides to touch the blade directly, providing more stability for tiny blades.
Blades snap due to metal fatigue (too much tension), heat (dull blade), or trying to turn a curve that is too tight for the blade width.
Yes, for small crafts and model building. However, a 14-inch saw is the “sweet spot” for general furniture making.
Always unplug the machine. Wear a long-sleeved shirt to protect your arms from the “spring” of the blade when you release the tension.