Physical Address
304 North Cardinal St.
Dorchester Center, MA 02124
Physical Address
304 North Cardinal St.
Dorchester Center, MA 02124
If you have ever spent a Saturday afternoon wrestling with a 16-foot pressure-treated board balanced precariously on two wobbly sawhorses, you know the struggle. You line up your cut, pull the trigger on your circular saw, and halfway through, the board sags, pinching your blade and sending a kickback shudder through your arm. It is frustrating, it is inaccurate, and frankly, it is a bit dangerous.
Back in the day, miter saws were rare, and many carpenters relied solely on their trusty circular saw for everything from framing to extensive fence repairs. But cutting long stock on the fly was always one part carpentry and one part wrestling match.
Many DIYers underestimate how much proper support affects cut precision, especially when working with long and heavy boards. The solution to this age-old problem is a dedicated jig that provides continuous backing for your material. In this comprehensive guide, we will explore exactly how to build a crosscut support for a circular saw using simple materials you likely already have in your garage. That’s why learning how to build a crosscut support for a circular saw is essential for improving both accuracy and safety.
To build a crosscut support for a circular saw, create two parallel support platforms using plywood, leave a 3-inch gap in the center for the blade path, attach the structure to sturdy two-by-fours for support, and add a backstop to ensure straight and accurate cuts.
When we use a circular saw we must know about how to use it properly, the standard approach is to support the “keeper” piece and let the “waste” piece fall. However, when dealing with long lumber, the weight of the overhanging end causes the wood to ”bend at the cut”. This creates a “pinch” on the saw blade. Not only does this burn the wood, but it can also cause the saw to kick back toward the operator.
Unlike a basic setup using sawhorses alone, this crosscut support provides far better stability than a typical miter saw extension for long boards.
A crosscut support acts like a long miter saw station. It supports the lumber on both sides of the blade as it moves through. This provides several immediate benefits:
To appreciate the design of this jig, one must understand the physics of a mid-air cut. When a board is supported only by two sawhorses at its ends, the center of the board is under tension at the top and compression at the bottom. As the circular saw removes material, gravity forces the two sides of the cut to collapse inward toward each other.
This “collapse” is what seizes the spinning blade. By providing a solid bed directly beneath the path of the saw, you eliminate the gravitational pull that causes the pinch. You are essentially creating a portable “table” for your handheld tool.
Before you start driving screws, let’s look at the design logic. To successfully learn how to build a crosscut support for a circular saw, you need to understand the “trough” concept.
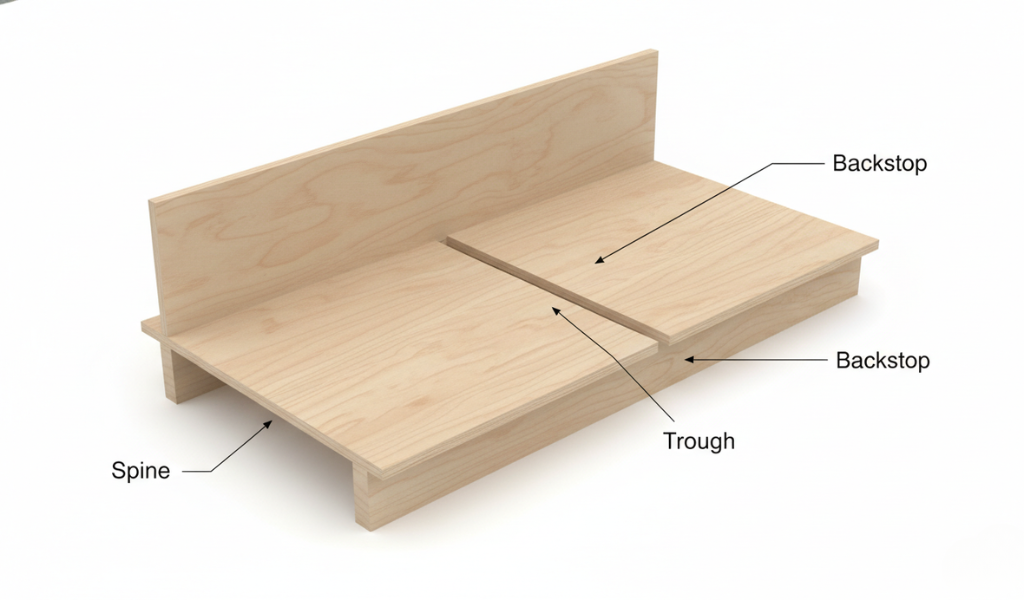
The jig consists of two “box” sections or platforms separated by a small gap. This gap is the ”blade travel path”. Beneath these platforms are stiffeners, usually long two-by-fours that keep the whole rig from bowing under the weight of heavy lumber. Finally, a backstop (or fence) runs along the rear, giving you a solid surface to push your lumber against to ensure a 90-degree cut.
One of the best things about this project is that it is a “scrap bin” build. You don’t need expensive hardwoods; you just need stable material.
Follow these detailed steps to turn your pile of scrap wood into a professional-grade cutting station.
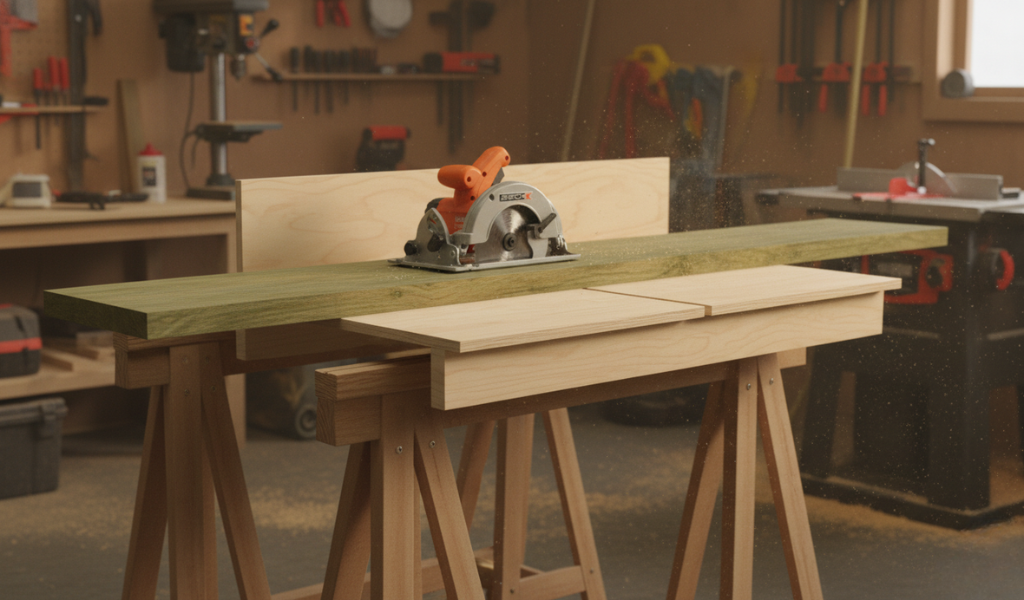
Take your two 8-foot two-by-fours. These act as the foundation. Lay them parallel on your sawhorses. If your lumber is particularly “unwieldy,” you may want to use longer two-by-fours, but 8 feet is a standard, manageable length.
Think of the top of the jig as two separate platforms. You can use plywood of varying widths, as long as they are consistent in thickness. Use a mix of 11-inch and 6-inch plywood to create his surface.
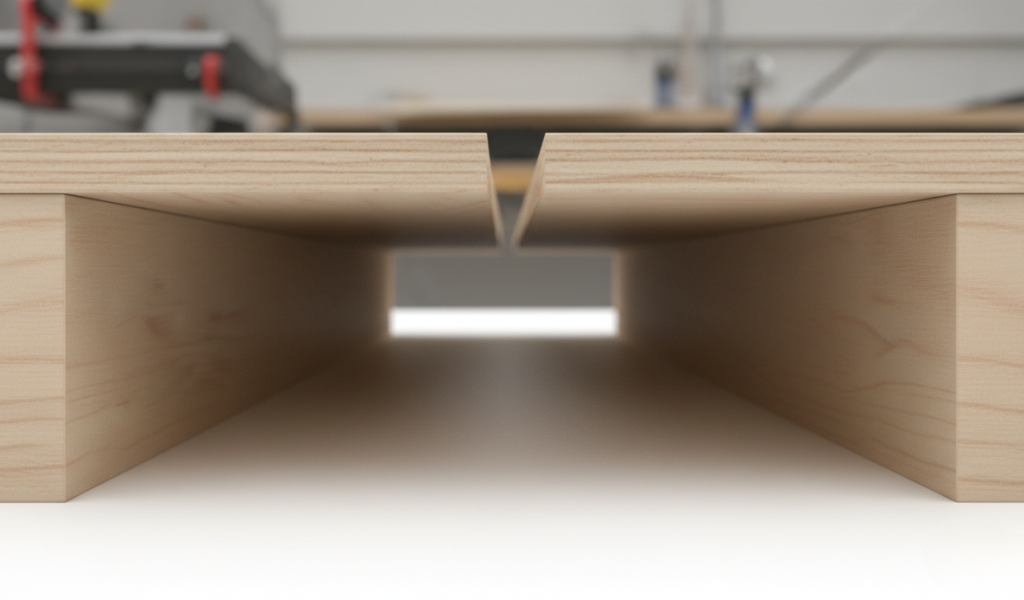
This is the most critical part of learning how to build a crosscut support for a circular saw. You must leave a ”3-inch gap” between the two platform sections. This space forms the trough through which the saw blade passes. This depth ensures the blade never strikes the structural two-by-fours below.
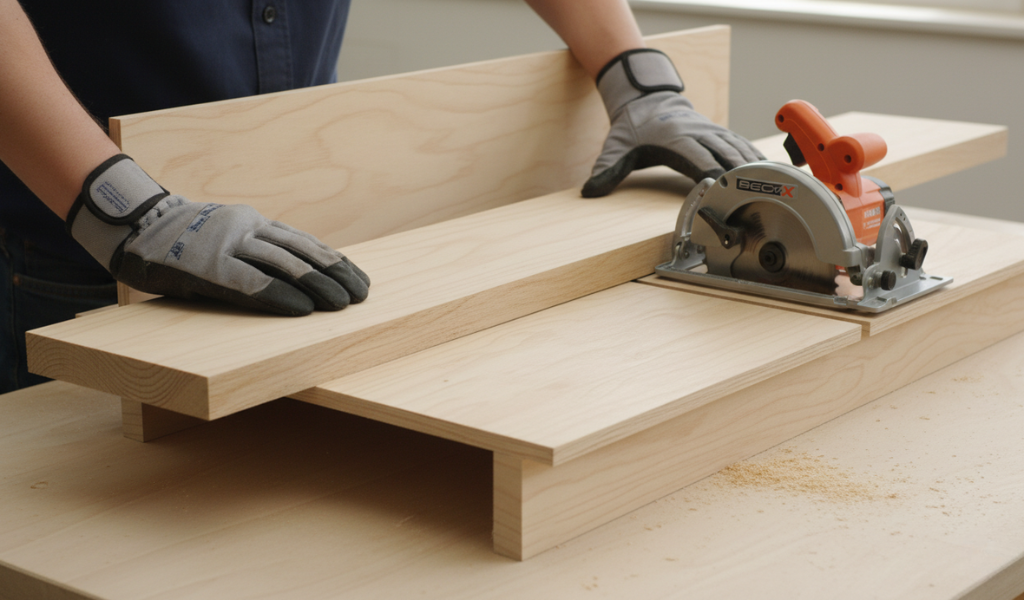
Drive your screws through the plywood and into the two-by-fours. Because this is often made from scrap, your screws might be mismatched—that’s fine, as long as they are secure. Fastening the two 8-foot two-by-fours along the bottom ensures the rig won’t flex when you drop a heavy beam onto it.
Fasten your 4¾-inch-wide plywood strips along the back edge of the jig. These strips should project above the work surface, forming a ¾-inch-high backstop. This backstop allows you to ”hold the lumber firmly” as you run the saw straight across.
Building a crosscut support typically takes 1 to 2 hours depending on your materials and experience level. If you already understand how to build a crosscut support for a circular saw, the process becomes even faster with pre-cut materials. If you are using pre-cut plywood and standard two-by-fours, assembly is quick and straightforward.
While the basic “first draft” is a success, you can refine the design.
This setup works far better than standard sawhorses when cutting long lumber with a circular saw, especially for repeated crosscuts.
Safety doesn’t end once you have a better support system.
Conclusion
Mastering how to build a crosscut support for a circular saw allows you to work more efficiently, safely, and accurately in your workshop. By creating a stable cutting platform, you eliminate blade pinching, improve precision, and make handling long lumber significantly easier.
Whether you are repairing a mile of wood fence or building your first deck, this support jig turns your handheld saw into a precision instrument. Don’t wait three decades to build yours—grab those scraps and get started today!
Yes, any circular saw will work with this jig, provided the blade depth is accounted for in the center trough gap.
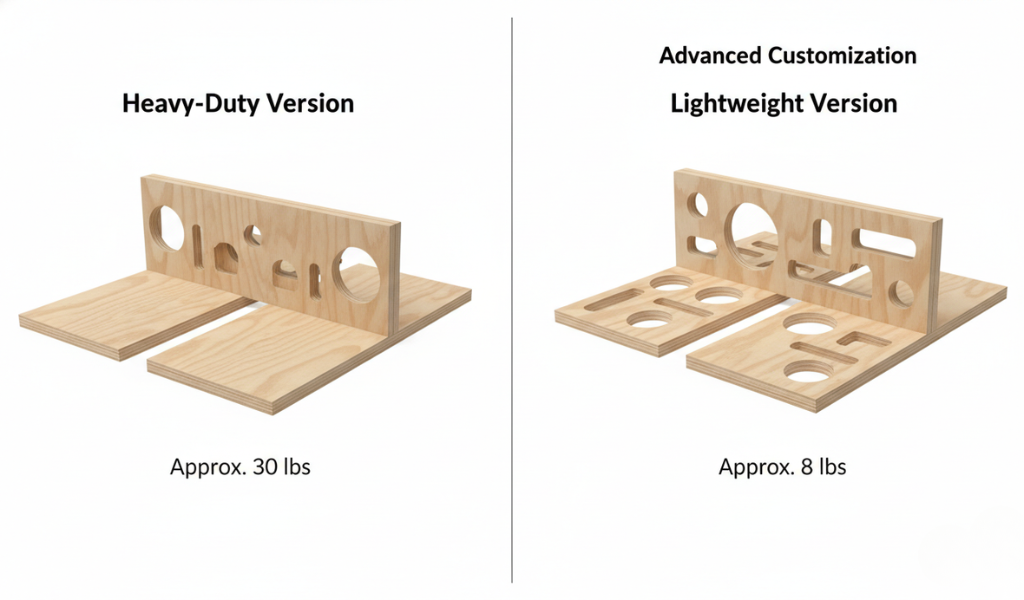
The prototype weighed about 30 pounds. You can make a lighter version using fewer or thinner plywood strips for the base.
You can “scarf” or butt-joint shorter pieces together, provided the two-by-four stiffeners underneath are continuous 8-foot lengths to provide the necessary rigidity.
Absolutely. The backstop provides the resistance needed to keep the lumber from sliding backward during the cut and ensures your cut remains 90 degrees.
This specific design is for 90-degree crosscuts. However, you can use a speed square in conjunction with the backstop to guide your saw at common angles.
For many tasks, yes. It is especially useful for very long or heavy lumber that is difficult to balance on a standard miter saw table.
The friction against the backstop is usually enough, but you can always use a small spring clamp to lock the lumber against the backstop for extra security.