Physical Address
304 North Cardinal St.
Dorchester Center, MA 02124
Physical Address
304 North Cardinal St.
Dorchester Center, MA 02124

What is sanding? Curious about this essential woodworking technique? Get ready to uncover the secrets of achieving smooth, flawless surfaces. From the art of refining finishes to the different sanding techniques, we’ve got you covered. Let’s dive into the world of sanding and discover how to take your projects to the next level. Get your sandpaper ready and let’s sand our way to perfection!
Key Summary: What is Sanding?
Sanding is a vital woodworking technique that smoothens surfaces, removing imperfections and preparing them for finishing. It involves rubbing abrasive materials on wood to create a polished and even texture, enhancing the overall aesthetics and durability of the project. Happy sanding!
[amazon_auto_links id=”11426″]
Sanding is a fundamental surface preparation technique used across various industries and DIY projects. It involves rubbing or scraping abrasive materials against a surface to achieve a smoother, refined finish. This versatile process finds applications in woodworking, home renovation, automotive refinishing, metalworking, and DIY crafting.
In woodworking, sanding is vital for transforming raw lumber into finely crafted furniture and structures. It smooths rough edges, eliminates imperfections, and prepares wood for finishing, enhancing its natural beauty. In home renovation, sanding rejuvenates old furniture and worn-out hardwood floors, restoring their original appeal.
The automotive industry relies on sanding for prepping surfaces before painting or welding, ensuring a flawless finish. In metalworking, sanding prepares metal surfaces for painting and welding while removing sharp edges and burrs.
Artists and craftsmen in DIY crafting benefit from sanding to refine their creations, adding finesse and detail to their works of art. Different sanders cater to specific tasks, such as belt sanders for material removal, orbital sanders for smooth finishes, and detail sanders for intricate areas.
Sanding is a versatile surface preparation technique with a wide range of applications in various industries and everyday projects. Its ability to refine surfaces, eliminate imperfections, and create a polished finish makes it an indispensable skill for professionals and DIY enthusiasts alike. Let’s explore some of the key uses of sanding in different fields:
In the realm of woodworking, sanding is a cornerstone process. From raw lumber to intricately designed furniture, sanding plays a vital role in smoothing rough edges, removing saw marks, and achieving a smooth surface. It is instrumental in preparing wood for staining, painting, or applying a clear finish, enhancing the natural grain and aesthetics of the wood.
Sanding finds ample use in home renovation projects. Whether it’s restoring an antique piece of furniture or refinishing a wooden floor, sanding can breathe new life into worn-out surfaces. By removing scratches, dents, and stains, sanding revitalizes furniture and floors, transforming them into beautiful and elegant features of any interior.
The automotive industry relies on sanding to achieve flawless finishes on vehicles. From bodywork repairs to painting, sanding ensures a smooth surface free from imperfections. It helps create an even canvas for fresh paint, restoring the original shine and luster of automobiles.
Sanding is not limited to wood; it plays a crucial role in metalworking as well. When working with metal, sanding helps in smoothing weld seams, removing rust or paint, and refining surfaces for welding or painting. It ensures the metal components meet quality standards and possess a clean, polished appearance.
In the world of DIY crafting and artistic projects, sanding is an invaluable tool. From intricate wooden sculptures to handmade gifts, sanding refines the details and textures, making the final product more visually appealing and professional.
Beyond specialized industries, sanding is a go-to solution for various home improvement tasks. It aids in preparing surfaces before painting or wallpapering, making them smoother and more suitable for the application of finishes. Sanding also plays a role in repairs, allowing homeowners to fix minor surface damages without having to replace entire components.
When working with metal or wood, achieving a smooth and polished finish is essential. Sanding is the key to achieving such results, creating surfaces that are visually pleasing and ready for additional treatments like staining, varnishing, or painting.

Sanders come in various types, each designed to address specific sanding tasks and surface materials. Understanding the different types of sanders available empowers craftsmen and DIY enthusiasts to choose the most suitable tool for their projects. Let’s explore some popular types of sanders and their respective strengths:
Belt sanders are workhorses known for their efficiency in material removal. They feature a continuous loop of sandpaper wrapped around two drums, creating a powerful sanding motion. Ideal for leveling surfaces and removing significant amounts of material quickly, belt sanders excel in rough shaping and preparing large wooden or metal surfaces.
Orbital sanders, also known as finishing sanders, are versatile tools designed for fine sanding and achieving a smooth, swirl-free finish. Their sanding pad moves in small circular or elliptical orbits, minimizing the risk of leaving visible sanding marks on the material. These sanders are perfect for achieving a refined surface and are widely used for general sanding tasks.
Random orbital sanders combine the best of both worlds from belt sanders and orbital sanders. They have a circular sanding pad that moves in both an orbital and rotary motion. This dual-action motion ensures an even finish without swirl marks, making random orbital sanders ideal for a variety of tasks, including smoothing surfaces and removing paint or varnish.
Detail sanders, also known as corner sanders or mouse sanders, are specialized tools designed for sanding intricate and hard-to-reach areas. Their triangular-shaped sanding pads allow craftsmen to access corners and edges with precision, making them perfect for refinishing furniture, moldings, and other detailed woodworking projects.
Drum sanders are robust machines used primarily in industrial settings and large-scale woodworking projects. They feature a rotating drum covered in sandpaper, allowing for aggressive material removal. Drum sanders are commonly employed in sanding wide panels, flooring, and other surfaces that require rapid and substantial sanding.
Disc sanders, as the name suggests, use circular sanding discs to accomplish various sanding tasks. They are available in both handheld and stationary models. Handheld disc sanders are perfect for shaping, smoothing, and finishing curved or contoured surfaces. Stationary disc sanders, often found in woodworking shops, are efficient for precise and consistent sanding on flat surfaces.
Spindle sanders are specialized sanding machines with a vertical sanding drum. They are commonly used to sand curved surfaces, edges, and contours, such as those found in chair legs, table edges, or other rounded woodworking elements. The oscillating motion of the spindle ensures smooth and even sanding, resulting in finely detailed work.
Combination belt and disc sanders provide the convenience of two sanding tools in one machine. These versatile units feature a sanding belt for larger surface areas and a sanding disc for more intricate work. They are often utilized in woodworking and metalworking shops for a wide range of sanding tasks.

The sanding process is a systematic approach that involves several steps to achieve a smooth and flawless surface. Whether you are working with wood, metal, or any other material, following these steps will ensure you attain the desired finish for your project:
Before starting the sanding process, ensure that your work area is clean, well-lit, and well-ventilated. Remove any obstacles or debris that may hinder your movements during sanding. Use drop cloths or masking tape to protect adjacent surfaces or items from dust and debris generated during sanding.
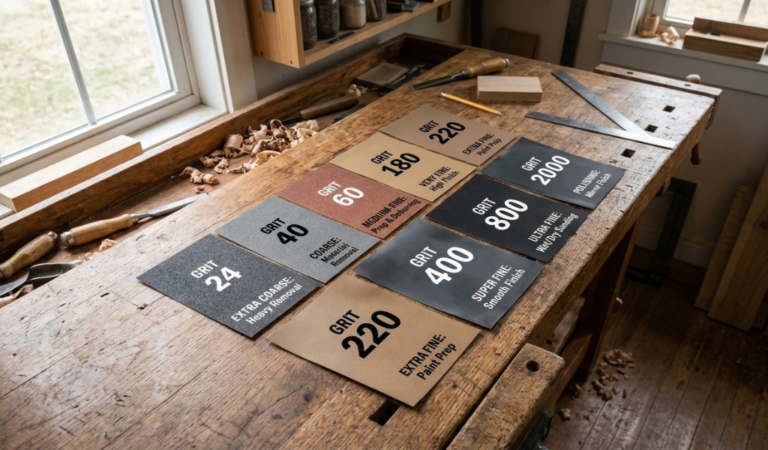
Choosing the appropriate sandpaper grit is crucial for achieving the desired finish. Coarse grits, such as 60 or 80, are suitable for initial material removal or leveling uneven surfaces. Medium grits, like 120 or 150, are ideal for general sanding and smoothing out imperfections. Fine grits, such as 220 or higher, are used for achieving a polished and smooth surface.
Securely attach the selected sandpaper to your chosen sander, ensuring it is properly aligned and taut. Power up the sander, and if you are using an electric sander, ensure that the power cord is safely out of the way to prevent accidental damage.
For wooden surfaces, always sand in the direction of the grain to avoid leaving unsightly scratches. Sanding against the grain can cause damage and mar the appearance of the material. For other materials, follow the manufacturer’s recommendations or sand in a circular motion to achieve a uniform finish.
If you need to achieve an even smoother surface, gradually switch to finer grits as you progress through the sanding process. This step is essential for removing scratches left by coarser grits and obtaining a flawless finish.
As you sand, periodically run your hand over the surface to detect any irregularities or rough spots. Continuously inspect the surface to ensure that the sanding is uniform and consistent across the entire area.
Once you have completed the sanding process, turn off the sander and carefully clean the work area from dust and debris. Inspect the surface for any remaining imperfections or areas that may require additional sanding.
After achieving the desired level of smoothness, you can proceed with applying your chosen finish, paint, stain, or sealant to protect and enhance the surface. Properly finished surfaces add a professional touch to your projects and extend the longevity of the materials.
Inspect the finished surface once the applied finish or paint has dried. If you notice any blemishes or uneven areas, use a fine grit sandpaper or sanding sponge to make slight adjustments and ensure a flawless final result.

Sanding is an essential technique in various projects, but safety is paramount. Explore crucial safety precautions for a worry-free and productive sanding experience.
Sanding generates a significant amount of airborne dust and debris that can pose a threat to your eyes. Always wear safety goggles or a full-face shield to protect your eyes from flying particles. Ensure that the eyewear provides a snug fit and is ANSI Z87.1 certified for impact resistance.
Inhaling dust particles during sanding can be harmful to your respiratory system. Wear a properly fitted dust mask or respirator to filter out airborne particles and reduce the risk of respiratory issues. Look for masks rated N95 or higher for effective filtration.
Power sanders can produce high levels of noise that may lead to hearing damage over time. Safeguard your hearing by wearing earmuffs or disposable earplugs with a high Noise Reduction Rating (NRR) when operating loud sanding equipment.
Avoid direct skin contact with the sanding surface and abrasive materials. Wear long-sleeved shirts and long pants to protect your arms and legs from potential scratches or irritation. Additionally, consider wearing work gloves to shield your hands from rough surfaces and splinters.
Sanding generates airborne dust that can lead to poor air quality in the work area. Work in a well-ventilated space with open windows or use a dust extraction system to remove dust and maintain a cleaner environment. Proper ventilation helps reduce the risk of respiratory issues and improves overall comfort during sanding.
Before using any sanding equipment, read and understand the manufacturer’s instructions and safety guidelines. Ensure that the power tools are in good working condition, with safety guards and features intact. Avoid placing your hands near moving parts, and never leave a powered sander unattended.
Avoid wearing loose-fitting clothing, jewelry, or accessories that could get entangled in the sanding equipment. Loose items can be caught in rotating parts, leading to accidents or injuries. Opt for fitted clothing and tie back long hair to prevent potential hazards.
Clear the work area of any clutter, obstacles, or tripping hazards before starting the sanding process. Secure the workpiece firmly in place using clamps or a suitable holding system to prevent it from moving during sanding.
Take breaks as needed during prolonged sanding sessions to prevent fatigue and maintain focus. Rushing through the process can lead to errors and increase the risk of accidents.
Keep a first aid kit readily available in the workspace. In case of minor injuries, promptly address wounds or cuts to prevent infection.
Sanding, while necessary for achieving smooth surfaces, can have environmental implications due to the generation of dust and waste materials. To minimize the impact on the environment, consider the following points:
Sanding creates airborne dust particles that can spread beyond the immediate work area. Implement dust containment measures, such as using a dust collection system or a shop vacuum with a HEPA filter, to capture and contain the dust. This prevents it from dispersing into the surrounding environment and ensures easier cleanup.
Opt for eco-conscious sanding products made from recycled or sustainably sourced materials. Some sandpaper brands offer environmentally friendly options with reduced environmental footprints. These choices contribute to conservation efforts while maintaining high-quality sanding performance.
Dispose of used sandpaper, dust, and waste materials responsibly. Avoid simply throwing them in the trash, as some of these materials may be harmful to the environment. Check local waste management regulations for guidelines on proper disposal methods, recycling options, or hazardous waste collection centers.
Sanding indoors without proper ventilation can impact indoor air quality, leading to health issues and environmental concerns. Whenever possible, sand in a well-ventilated area with open windows or use exhaust fans to promote air circulation. Conducting sanding outdoors further reduces the buildup of airborne particles inside enclosed spaces.
Practice efficient sanding techniques to minimize material waste. Avoid over-sanding or unnecessarily removing excessive material. Using the appropriate grits and sanding sequence helps achieve desired results while conserving resources.
Consider the energy consumption of electric sanders. Opt for sanders with energy-efficient features, or use manual sanding methods for smaller projects. Reducing energy usage contributes to overall environmental conservation.
Explore opportunities to repurpose or recycle sanding waste whenever possible. Wooden dust and shavings, for instance, can be used as mulch or compost for gardening projects. Recycling materials helps reduce landfill waste and promotes a more sustainable approach to sanding.
Encourage awareness among fellow craftsmen, DIYers, and enthusiasts about the environmental impact of sanding. Share eco-friendly sanding practices and discuss the importance of responsible waste management in the sanding community.
Sanding is a fundamental and versatile technique that offers numerous advantages across various industries and projects. From woodworking to metalworking, mastering the art of sanding brings forth a host of benefits:
One of the primary benefits of sanding is its ability to create smooth and refined surfaces. By eliminating rough spots, imperfections, and unevenness, sanding enhances the overall appearance of the material. It lays the foundation for flawless finishes, whether you’re painting, staining, or applying a clear coat.
In woodworking and metalworking, sanding is a critical step in material preparation. It readies the surfaces by removing excess material, leveling edges, and ensuring precise dimensions. Properly prepared materials result in accurately crafted and aesthetically pleasing projects.
Sanding is a powerful tool for restoration and refinishing projects. When rejuvenating old furniture or worn-out wooden floors, sanding removes scratches, stains, and old finishes, restoring their original charm. It breathes new life into aging surfaces, saving both money and resources compared to replacement.
Sanding allows craftsmen and DIY enthusiasts to unleash their creativity by customizing and personalizing their projects. By varying the sanding technique and pressure, unique textures and patterns can be achieved, adding character and uniqueness to the final product.
Power sanders, such as belt sanders, excel at material removal, making them highly efficient for large-scale projects. They save time and effort by swiftly leveling surfaces and removing excess material, streamlining the crafting process.
Sanding plays a crucial role in ensuring proper adhesion of coatings, paints, and adhesives. By providing a clean and smooth surface, sanding enhances the bonding capacity of finishes and adhesives, leading to more durable and long-lasting results.
In woodworking, sanding accentuates the natural beauty of wood grain and character. It highlights unique patterns and textures, making each piece stand out as a work of art. Proper sanding enhances the visual appeal of wooden projects, making them truly eye-catching.
Sanding is a beginner-friendly technique that introduces novice craftsmen to the world of DIY projects. With basic sanding skills, aspiring artisans can transform raw materials into refined creations, fostering a sense of accomplishment and confidence in their abilities.
For woodworking joinery, sanding ensures seamless connections between pieces. By creating even surfaces, sanding facilitates tight and secure fits, leading to stronger and sturdier joints.
To achieve the best results and ensure a successful sanding process, avoid these common pitfalls and adopt best practices:
Excessive sanding can lead to the removal of more material than necessary, resulting in thin or weakened surfaces. Avoid aggressive sanding beyond what is needed to achieve the desired smoothness. Exercise patience and restraint when sanding to preserve the integrity of the material.
Progress through the sandpaper grits gradually, starting with coarser grits and working your way up to finer ones. Skipping grits can leave visible scratches or marks on the surface that become difficult to remove in later stages. Each grit level plays a crucial role in refining the previous sanding marks and achieving a smooth finish.
Failing to control the dust generated during sanding can lead to messy work areas and potential health hazards. Dust can accumulate on surrounding surfaces and equipment, interfering with the sanding process and affecting the quality of finishes. Utilize dust collection systems, exhaust fans, or portable dust extractors to keep the workspace clean and maintain air quality.
When sanding wood, always follow the direction of the grain to avoid causing tear-out or creating visible scratches. Sanding against the grain can mar the surface and require extra effort to correct. Understanding the grain direction is essential to achieve a polished and professional result.
Prioritize safety during the entire sanding process. Wear appropriate personal protective equipment, such as safety goggles, a dust mask, and ear protection, to safeguard against potential hazards. Familiarize yourself with the proper use of sanding tools and adhere to safety guidelines provided by the manufacturer.
Inspect the condition of the sandpaper regularly. Worn-out or clogged sandpaper may become less effective and lead to uneven sanding results. Replace sandpaper when it shows signs of wear, tears, or significant clogging to maintain optimal sanding performance.
Sanding requires attention to detail and patience. Rushing through the process can lead to uneven sanding and unsatisfactory outcomes. Take your time, work methodically, and inspect the surface regularly to ensure consistent results.
Establish a consistent sanding pattern, such as sanding in straight lines or in a circular motion, depending on the surface and tool used. Random sanding patterns can create uneven finishes and visible swirl marks.
Keep your hands away from moving parts and rotating sanding discs. Improper hand placement can lead to accidents and injuries. Maintain a secure grip on the tool, following the manufacturer’s guidelines for safe operation.
After completing the sanding process, clean the workspace and remove any residual dust and debris. Proper aftercare ensures a clean environment and prevents contamination of finished surfaces.
In conclusion, sanding is a fundamental technique that brings a multitude of benefits to various projects. By prioritizing safety, embracing eco-friendly practices, and avoiding common mistakes, you can achieve flawless surfaces and elevate the quality of your craftsmanship. With the art of sanding at your disposal, your creative endeavors will shine with smoothness and refinement, leaving a lasting impression on every finished project.
Sanding is the process of smoothing a surface using abrasives. In woodworking, it is crucial for achieving a polished finish and preparing surfaces for staining or painting. Sanding removes imperfections and enhances the aesthetics of the final product.
Sanding works by using abrasives to wear down rough spots and uneven areas on a surface. The abrasive particles gradually refine the surface, resulting in a smoother texture and a more uniform appearance.
There are various sanding techniques, including hand sanding, power sanding with orbital sanders, belt sanders, and drum sanders. Each method is suitable for specific tasks and projects, providing different levels of material removal and surface smoothness.
Sanding is not limited to wood; it can be applied to various materials like metal, plastic, and even drywall. Different materials may require specific abrasives and sanding techniques for optimal results.
Safety is paramount in sanding. Wear eye protection, dust masks, and hearing protection. Keep hands away from moving parts, use adequate ventilation, and follow the manufacturer’s guidelines for the safe operation of sanding tools.
Select sandpaper grit based on the project’s requirements. Coarse grits (40-60) are suitable for material removal, while medium (80-120) and fine (150-180) grits are used for smoothing and finishing.
Yes, hand sanding is a viable option for smaller projects and intricate areas. It allows for more precise control but can be time-consuming for larger surfaces.
To avoid sanding marks, use a consistent sanding pattern, follow the wood grain, and do not apply excessive pressure. Gradually progress through sandpaper grits to achieve a smooth finish.
Sanding generates dust and waste materials. To minimize the environmental impact, use dust collection systems, opt for eco-friendly sanding products, and dispose of waste responsibly.
Yes, sanding is the process of smoothing surfaces, while refinishing involves removing old finishes and applying new coatings to rejuvenate a surface. Refinishing often includes sanding as a preparatory step.