Physical Address
304 North Cardinal St.
Dorchester Center, MA 02124
Physical Address
304 North Cardinal St.
Dorchester Center, MA 02124

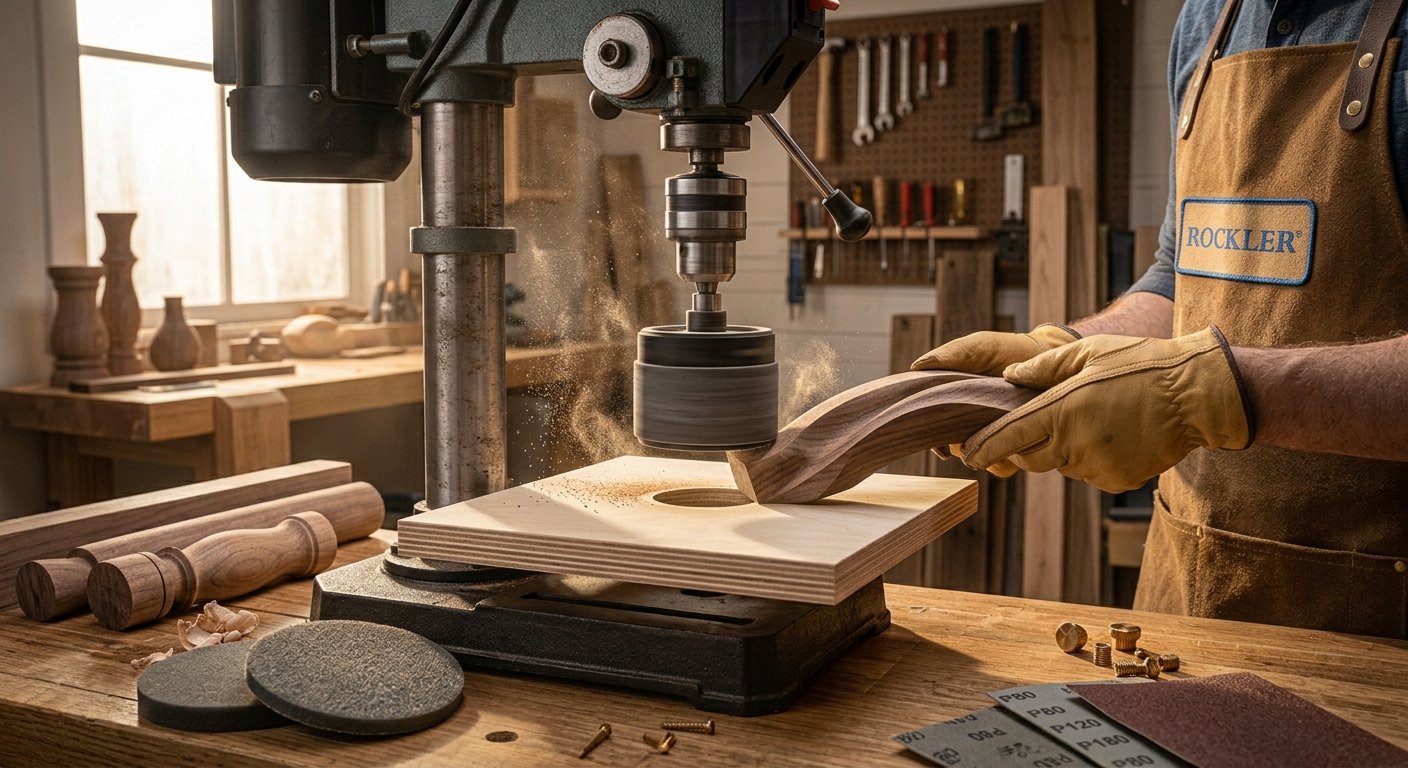
You have a drill press sitting in the corner of your shop, and it spends most of its day drilling holes. Meanwhile, you have a pile of curved cutouts that need smoothing, and you do not own a dedicated sanding machine. Here is a secret many woodworkers learn sooner or later: your drill press can double as a drill press sander for just a few dollars. With the right drum and sleeve, it sands curves, rounded edges, and tight inside cuts surprisingly well.
This guide shows you how the setup works, which accessories to buy, and how to sand safely and cleanly. If you later decide you want a machine built for this job, take a look at our Oscillating Spindle Sander: Smooth Curves and Clean Edges article to see how the two compare. For now, let’s turn that drill press into a useful sanding station.
A drill press sander is not a separate machine. It is a regular drill press fitted with a sanding drum, or a sleeve on a mandrel, in place of a drill bit. The chuck holds the drum, the motor spins it, and the table supports your wood. Together they act like a simple spindle sander that you build yourself in a couple of minutes.
The idea is popular because it costs so little. A good sanding kit runs about the price of a pizza, and it works with almost any drill press, whether you own a small benchtop model or a big floor standing one. If you already have the press, you only pay for the drum, the sleeves, and maybe a custom table insert.
It works best for curved edges. Think about the inside of a heart shape, the round corner of a small box, or the scoop of a chair seat. Hand sanding these takes forever, and a belt sander cannot reach into tight spots. A spinning drum slips right in. You can also use it on small parts that are hard to hold on other machines, such as toy wheels, coasters, and craft pieces.
There is one big difference from a true spindle sander. A drill press spins the drum, but it does not move it up and down. That means the same strip of sandpaper does all the work, so it wears and heats faster. You can fix this by moving the drum up and down by hand, which we will cover below. It is a small tradeoff for a very cheap tool.
The principle is easy to grasp. When you chuck a sanding drum into the drill press, the motor spins it at a steady speed. The wood stays flat on the table, and you push the edge against the spinning sleeve. The sleeve is covered in grit, and it grinds away tiny bits of wood with each turn.
The quill, which is the part that moves up and down when you pull the handle, lets you raise and lower the drum. You can set it so the sleeve sits just above the table, then lock it in place. With the depth lock tight, the drum stays at the same height while you work. If you want to spread the wear, you can loosen the lock and move the quill a little during sanding. It is not as smooth as the built in motion of a real oscillating machine, but it helps a lot.
Speed matters here. Most drill presses have a belt and pulley system that lets you pick from several speeds. For sanding, a slower to medium speed works best. Fast speeds make the sleeve heat up, burn the wood, and clog the grit with resin. As a rule of thumb, start around 1,000 to 1,500 RPM for most hardwoods and softwoods, and slow it down for sticky or oily woods. If your machine has a variable speed dial, even better.
The direction of spin is always clockwise when you look down from above. This is a key detail for safety. You push the wood against the rotation, so the drum holds the piece down against the table instead of throwing it away. We will return to this in the safety section, because it is the most important habit to learn.
Finally, the table height and the gap around the drum also matter. A smaller gap keeps thin pieces from catching. A tall table lets you work with deep stock. Because you can adjust both, the setup handles a wide range of jobs.
The biggest benefit is cost. A dedicated spindle sander can cost several hundred dollars, and a small shop may not have room or money for one. A drum kit costs a tiny fraction of that. If you already own a drill press, you get a working sanding station almost for free.
You also save space. Shops are crowded, and every new machine needs a spot. This setup uses a tool you already have. When you finish sanding, you swap the drum for a drill bit and go back to drilling. Nothing new takes up bench room.
Another plus is control. A drill press is very stable. It stands straight, the drum runs true, and the table holds your wood level. That gives you a clean, square edge that is hard to get by hand or with a handheld sander. Because the drum stays vertical, your edges come out at a true 90 degrees to the face.
You also get a wide choice of sizes. Drum kits usually come with several diameters, from half an inch up to three inches. A small drum reaches tight inside curves, and a big one gives gentle outside arcs. This flexibility lets you match the shape without buying extra machines.
It also helps with repeatability. Once you set the table and the depth, you can sand a dozen identical parts and get matching results. That is a big help for makers who sell small items like signs, trays, or toys.
Finally, you learn a lot. Using the drill press this way teaches you how drums, grits, and feed direction work. Those skills carry over to any other sanding machine you buy later.
You do not need a lot to start. A few small items will get you going, and most of them are cheap. Pick them up at a hardware store or online, and keep them in a small box near your drill press.
Start with a sanding drum kit. This usually includes several rubber drums, matching sleeves, and a metal mandrel that fits in your chuck. Look for a mandrel with a tight, straight shaft, because a bent one will wobble and ruin your work. A good kit also has a washer and nut set to hold everything in place.
You will also want a few extras. A shop vacuum with a small hose helps capture dust, and a dust mask or respirator protects your lungs. Safety glasses are a must. A set of clamps or a simple jig can hold small parts so your fingers stay safe. Some woodworkers also keep a rubber cleaning stick nearby to wipe resin off the sleeves.
If you plan to sand often, build a sacrificial table insert. This is a flat piece of plywood or MDF with a hole just a little bigger than the drum. You clamp it to your drill press table, and it fills the gap around the drum. This stops thin pieces from falling into the opening, and it protects your metal table from damage.
A sanding drum is a round piece of rubber that fits over a metal mandrel. When you tighten the nut at the top, the rubber squeezes and swells outward. That swelling grips the sleeve and holds it firmly in place. When you loosen the nut, the rubber relaxes, and the sleeve slides off.
Drums come in many sizes. Common diameters are half an inch, three quarters of an inch, one inch, one and a half inches, and two inches. Larger drums give smooth, wide curves. Smaller ones fit inside tight shapes. Most kits include at least four or five sizes, which is plenty for beginners.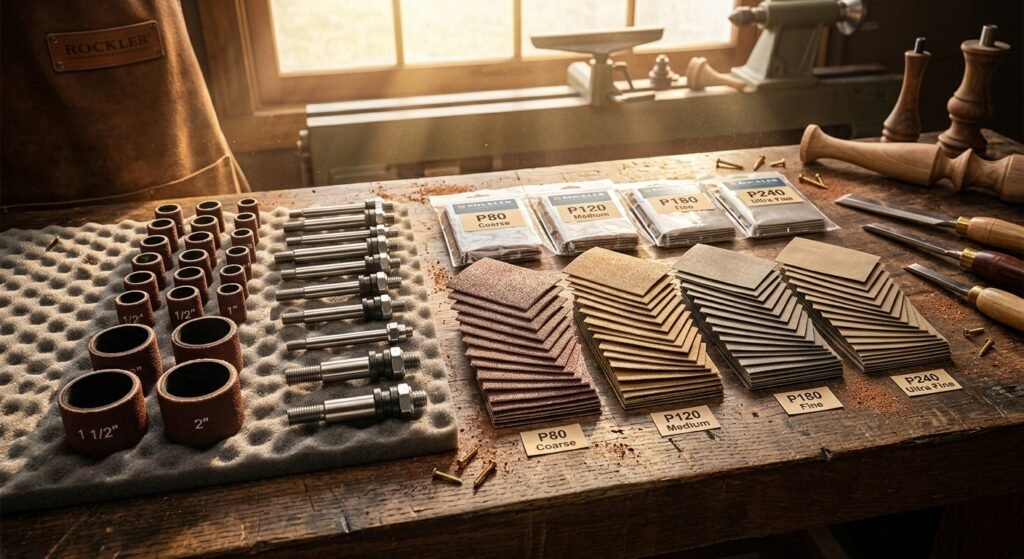
Choose a drum that is smaller than the tightest inside curve you plan to sand. If the curve is smaller than the drum, the drum will flatten it. For outside curves, any size works, so pick the one that feels comfortable. Taller drums, about three inches long, give you more sanding surface, which helps spread wear on the sleeve.
Check your drums for damage before each use. Cracks, cuts, or dried out rubber can cause the drum to wobble or even fail. Replace any that look worn. A good drum will last for years with normal care.
Also check the shaft size. Most mandrels have a quarter inch or half inch shaft, and your chuck must be able to grip it firmly. A loose fit is dangerous, so choose a mandrel that matches your chuck size.
Sanding sleeves are the actual abrasive. They are small tubes of sandpaper that slide over the rubber drum like a sock. Each sleeve is made for one drum size, so you must match them carefully. A loose sleeve will slip and tear, and a tight one is hard to install.
Grits range from very coarse to fine. A coarse sleeve around 60 or 80 grit removes wood quickly and is great for cleaning up saw marks. A medium sleeve around 120 grit smooths the surface. A fine sleeve around 180 or 220 grit gives a nearly finished edge. Plan to work through at least two or three grits for each project.
Sleeves wear out faster on a drill press than on a real spindle sander, since the drum does not oscillate. To get the most life from each one, move your workpiece up and down the sleeve as you sand. You can also loosen the quill lock and raise or lower the drum a little between passes. Use a rubber cleaning stick when the sleeve gets gummy, and swap it out when it stops cutting well.
For real life use, imagine making a small wooden tray. You cut the curved sides on a band saw, then sand them with an 80 grit sleeve to remove marks. You move up to 120, then 180, and the edges end up smooth and even. A job that would take half an hour by hand takes just a few minutes.
Aluminum oxide is the most common abrasive and works well on wood. Silicon carbide is better for plastics and softer materials. Buy a mixed pack if you are not sure, and test them on scrap pieces.
A good setup makes the work smoother and safer. Take your time here, because a few extra minutes now will save you trouble later. Always unplug the machine before you start.
First, remove any drill bit from the chuck. Open the jaws all the way, and slide the mandrel shaft in as far as it will go. Tighten the chuck firmly with the key, and check each hole in the chuck to be sure the grip is even. A loose mandrel can wobble or fly out.
Next, install the drum and sleeve. Slide the rubber drum onto the mandrel, then add the sleeve over it. Tighten the nut at the top until the sleeve feels solid. If you can twist the sleeve with your hand, tighten it a little more, but do not overdo it. The rubber should swell just enough to grip.
Now lower the drum toward the table. Set the quill so the bottom of the drum sits just above the table surface, about an eighth of an inch. This gap keeps the abrasive from scraping the table. Lock the depth stop so the drum stays at that height.
Install your table insert or a sacrificial board. Cut a hole in a piece of plywood that is a bit larger than the drum, and clamp it to the table. Line the hole up so the drum spins freely in the center without touching the sides. The smaller the gap, the less chance of thin pieces slipping down.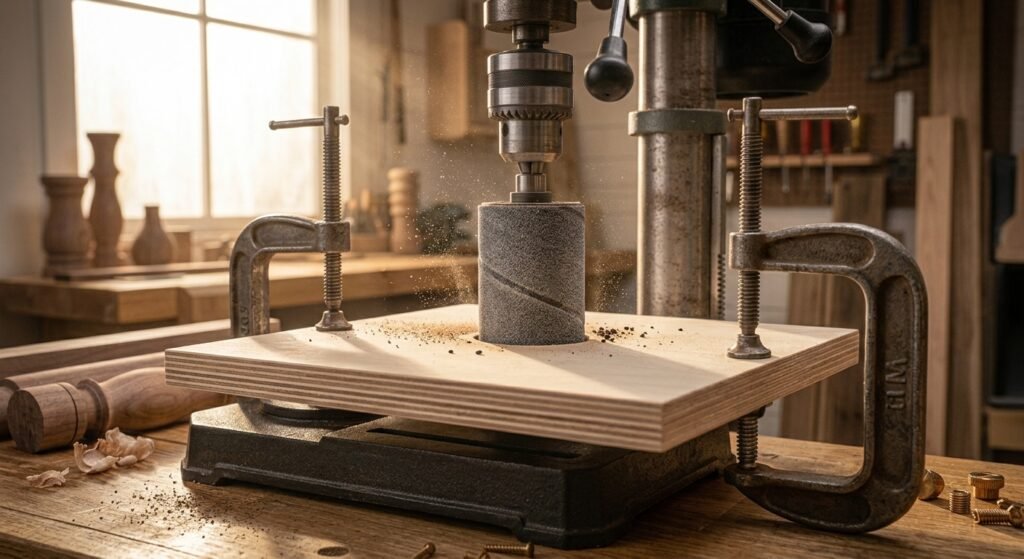
Set the speed next. Open the belt cover, and move the belt to a slow or medium pulley setting. Close the cover again, and make sure it is latched. Never run the machine with the cover open.
Do a dry run before you start. Plug in the machine, and turn it on for a moment with nothing touching the drum. Watch for wobble, vibration, or strange noises. If the drum looks like it is dancing, stop at once, unplug the machine, and check the mandrel and chuck. A true drum runs smooth and quiet.
Finally, connect a shop vacuum if you can. Place the hose close to the drum, just below the table. It will not catch every bit of dust, but it makes a big difference. 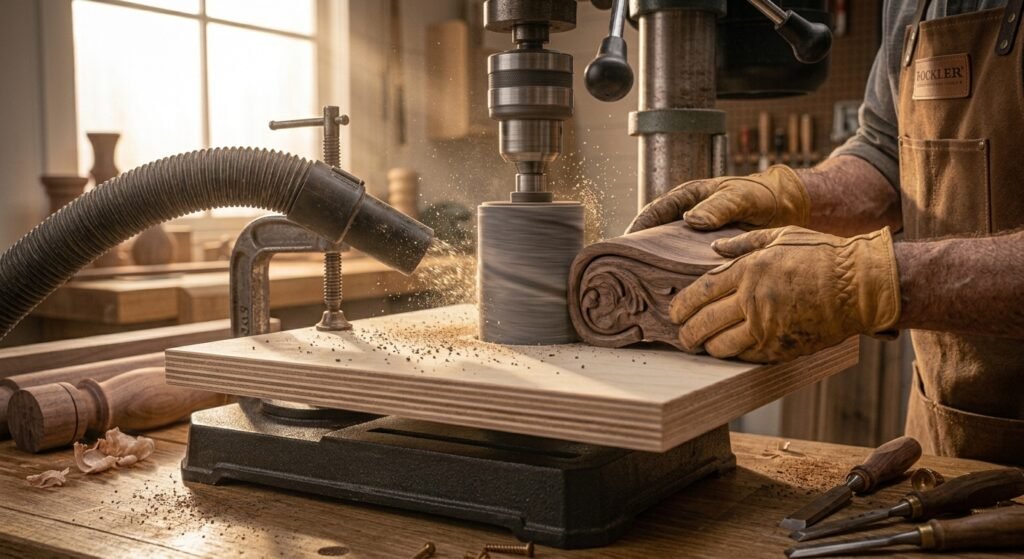 Dust control is good for your lungs and for the life of your sleeves.
Once your setup is ready, sanding itself is simple. The key is to work slowly and steadily. Try your first few passes on scrap wood before you move on to a real project.
Begin by marking your cut line on the workpiece. Cut the shape as close to the line as you can with a band saw, jigsaw, or scroll saw. The closer you cut, the less sanding you need. The drum is for smoothing, not for removing big chunks of wood.
Turn on the drill press and let it reach full speed. Hold the piece flat on the table with both hands. Keep your fingers well away from the drum. Gently touch the edge to the sleeve, and feed it against the direction of rotation. As we said earlier, the drum spins clockwise, so the wood should move from right to left in front of it when you stand at the front of the machine. This way, the drum pulls the work down onto the table instead of pushing it away.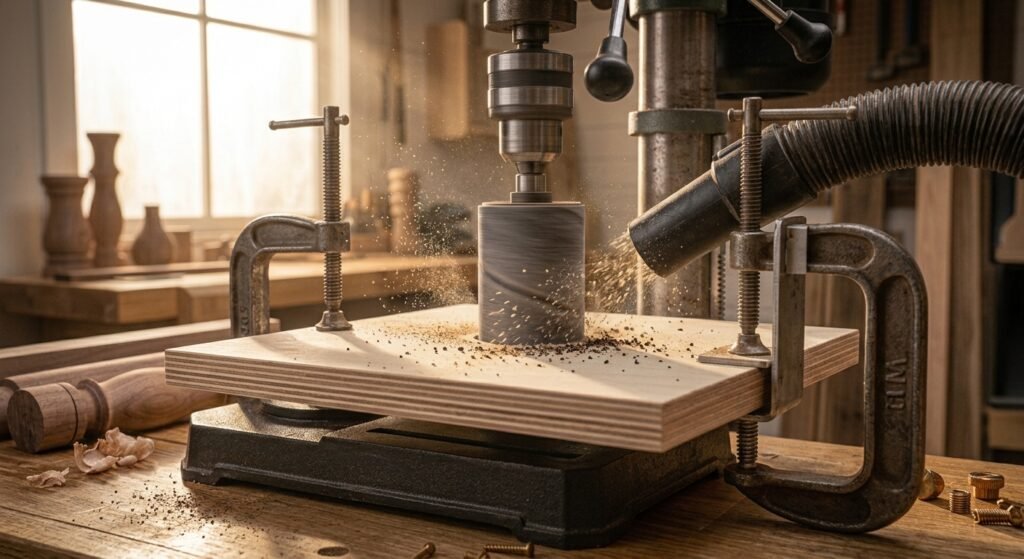
Move the wood steadily along the sleeve. Do not hold it still, since that will cause burn marks and flat spots. If you are sanding a curve, rotate the piece slowly so the curve follows the drum. Light pressure works best. Pressing hard slows the motor and leaves a rough finish.
Use the whole height of the sleeve. Slide the workpiece up and down a little as you sand, or adjust the quill depth between passes. This spreads wear across the sleeve and gives it a longer life. It also helps keep the sleeve from clogging with dust.
Check your work often. Turn the machine off, and let the drum stop. Then run your fingers along the edge to feel for flat spots or ridges. If something is off, fix it with a few more careful passes. Take small bites, since you can always remove more wood but you cannot put it back.
When the edge looks even, switch to a finer sleeve. Unplug the machine, swap the sleeve, and repeat the process with lighter pressure. Work through the grits in order. Skipping from 60 to 220 leaves scratches that the fine paper will not remove. A proper sequence gives a smooth, clean edge that needs only a light hand sanding.
For small parts, add a simple jig. A piece of plywood with a handle or a clamp can hold the part while you sand. You can also use a pair of thin rails to guide straight edges. The jig keeps your fingers back and makes repeat cuts easier. Our Oscillating Spindle Sander: Smooth Curves and Clean Edges guide shows more ideas for holding small pieces safely.
When you finish, turn off the machine and wait until the drum stops spinning. Never reach toward it while it is moving. Brush off the table, vacuum the dust, and remove the sleeve to avoid flat spots on the rubber. Store your drums in a drawer or a small box, so they stay clean and ready.
A drill press is made for drilling, not sanding, so you need to take extra care. The setup works well, but it has no built in guards for this kind of use. Good habits are your best protection.
Always wear safety glasses. Dust and small chips can fly toward your face at any moment. Add a dust mask or respirator, since fine wood dust is bad for your lungs. This matters even more with MDF and hardwoods, which create very fine particles. Hearing protection is smart for long sessions.
Dress for the job. Skip loose sleeves, gloves, and jewelry, because any of them can catch in the spinning drum. Tie back long hair, and wear close fitting clothes. It only takes one second for a snag to turn into a serious injury.
Feed the wood against the rotation. This is the golden rule. If you push with the spin, the drum grabs the piece and throws it, or pulls your fingers in. Before you start, check the spin direction, and picture where the wood will go if it slips.
Hold the workpiece firmly, but keep your fingers clear. Never sand tiny pieces by hand. Use a jig, a clamp, or a push block. If the part is too small to hold safely, make a holder for it instead of risking your fingertips.
Keep the chuck key out of the chuck. Always remove it before you turn on the machine, and get in the habit of putting it back in the same spot. A flying chuck key is a real danger. Many shops tie the key to the machine with a cord, so it never gets left behind.
Check the drum and mandrel before each session. Look for cracks, a bent shaft, or loose nuts. A damaged drum can break apart at speed. If anything looks wrong, replace it before you start.
Run the machine at a safe speed. Slower speeds give you more control and less heat. Fast speeds can burn the wood and tear the sleeve. If you smell smoke, stop and let the drum cool.
Unplug the machine whenever you change drums, sleeves, or the belt. It sounds simple, but it prevents accidental starts. Make it a habit every time.
Keep your work area clean. Sawdust builds up quickly, and it can catch fire if it meets a spark. Sweep the floor, empty the vacuum often, and keep the space around the drill press clear so you can move without tripping.
A drill press sander is a smart, low cost way to add a curve sanding station to your shop. With a drum kit, a few sleeves, and a simple table insert, you can smooth curves, clean up saw marks, and shape small parts with real accuracy. It will not replace a true oscillating machine for heavy daily use, but for most hobby projects it does a great job.
To get the best results, choose the right drum size, start with a grit that matches the job, and keep your speed low to medium. Move the wood steadily, use light pressure, and always feed against the rotation. Stay alert, wear your safety gear, and take your time on every pass.
Now it is time to try it. Pick up a small drum kit, set up your drill press, and sand a few scrap pieces to get the feel. Then move on to a real project, like a tray, a toy, or a set of coasters. Share your results with other woodworkers, and keep learning as you go.
Yes. With a sanding drum on a mandrel, a drill press works like a basic spindle sander. It is great for curves and edges, and it costs far less than buying a dedicated machine. Just use slow to medium speeds and take safety seriously.
Start between 1,000 and 1,500 RPM for most woods. Slower speeds give you better control and less heat. If you notice burning or a gummy sleeve, slow the machine down or switch to a fresh sleeve.
A kit with several sizes is the best choice for beginners. Common sizes run from half an inch to two inches. Pick a drum smaller than the tightest curve you want to sand, so it can reach inside without flattening the shape.
Not quite. A true oscillating machine moves the spindle up and down, which spreads wear and gives a smoother finish. A drill press does not do this on its own, but you can copy the effect by moving the workpiece or the quill by hand.
You can sand soft plastics and some soft metals with the right sleeve, such as silicon carbide. Use a low speed to prevent melting, and wear proper eye and lung protection. For metal, use a sleeve made for metal, and keep sparks away from dust.
Burning usually comes from too much speed, too much pressure, or a worn sleeve. Slow the drill press down, ease up on the feed, and keep the wood moving. If the sleeve is clogged or dull, clean it with a rubber stick or replace it.
You do not need one, but a sacrificial insert helps a lot. It fills the gap around the drum, supports thin pieces, and protects your table. A simple piece of plywood with a hole drilled through the center works well.