Physical Address
304 North Cardinal St.
Dorchester Center, MA 02124
Physical Address
304 North Cardinal St.
Dorchester Center, MA 02124

If you enjoy making wooden toys, model cars, or decorative furniture components, you know that cutting the wheels is only half the battle. Whether you use a hole saw, a band saw, or a scroll saw, you are almost always left with a rough, uneven, or slightly charred edge. Trying to sand those small circles by hand is a nightmare, and holding them freehand against a spinning belt usually results in noticeable flat spots. That is why a wheel jig for your drum sander or Router Jig or drill press is a total game-changer. It is one of the easiest and most consistent ways to sand wooden wheels accurately.
In this comprehensive guide, we are going to dive deep into how a drum sanding machine can be transformed into a high-production wheel finisher. We will look at the mechanical principles behind a pivoting jig, provide detailed instructions for building your own, and explore advanced operating techniques to ensure your workpieces are ‘smooth and evenly rounded ’. Whether you are a hobbyist in a home garage or a professional content creator in a woodshop, these insights will help you master the art of the wooden wheel.
What Is a Wheel Jig for a Drum Sander?
A wheel jig for a drum sander is a woodworking accessory that helps sand wooden wheels evenly and accurately. It holds the wheel at a fixed angle and distance from the sanding drum, allowing smooth rotation for perfectly round edges and consistent sizing.
Knowing what is woodworking, consistency is often the difference between a project that looks “homemade” and one that looks “professional.” When you are working on a project that requires dozens of identical wooden wheels—perhaps for a fleet of toy trucks—achieving that consistency by hand is nearly impossible. A wheel jig ensures that every single piece comes out at the exact same diameter with a perfectly square edge.
Using a drum sander without a jig is like trying to draw a perfect circle freehand. You might get close, but the imperfections will show as soon as the toy starts rolling across a flat floor. By creating a pivoting arm system, you turn your sanding machine into a precision tool that mimics the action of a lathe. This method is the easy way to sand the wheels because it removes the variability of human hand pressure and replaces it with a fixed mechanical radius.
We’ve all been there. You cut a beautiful set of cherry or maple wheels using a hole saw. They look great, except for the charred edges and the ridge left by the saw teeth. If you try to press these against a stationary sander, the friction often pulls the wood out of your hand, or worse, you sand too much off one side, creating a “flat” that ruins the rolling action.
A dedicated wheel jig solves the three primary mechanical hurdles of circle sanding:
Before we build the jig, let’s talk about the tool doing the heavy lifting. A drum sanding machine is essentially a motor-driven cylinder covered in sandpaper. While professional shops might use a massive wide-belt drum sander for flattening boards, the specialized task of wheel sanding usually calls for a spindle sander or a drum attachment.
The drum sander is ideal for this task because the curved surface of the drum matches the concave requirement of the jig’s movement. If you used a flat belt sander, the contact point would be much smaller and harder to control. Furthermore, many modern sanding machine units feature an oscillating action. This means the drum moves up and down while spinning. This is vital because it prevents the sandpaper from clogging with resin and dust, and it leaves a much smoother finish without the “linear” scratch marks often left by stationary sanders.
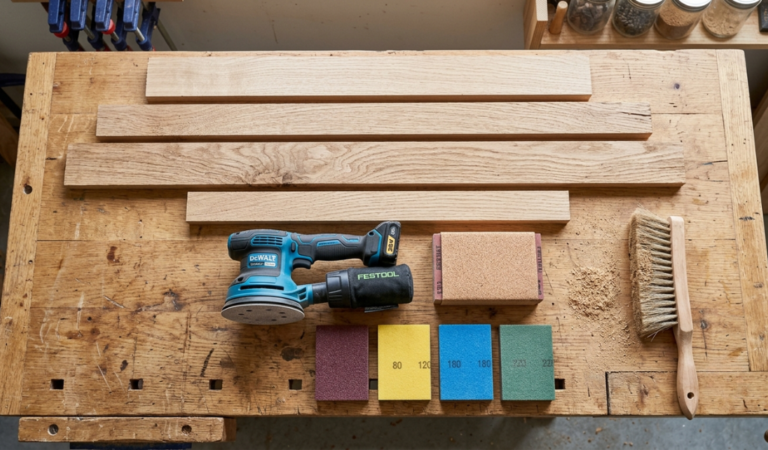
You don’t need expensive materials to build a high-functioning wheel jig. In fact, the beauty of this shop fixture is that it can be made entirely from high-quality scraps.
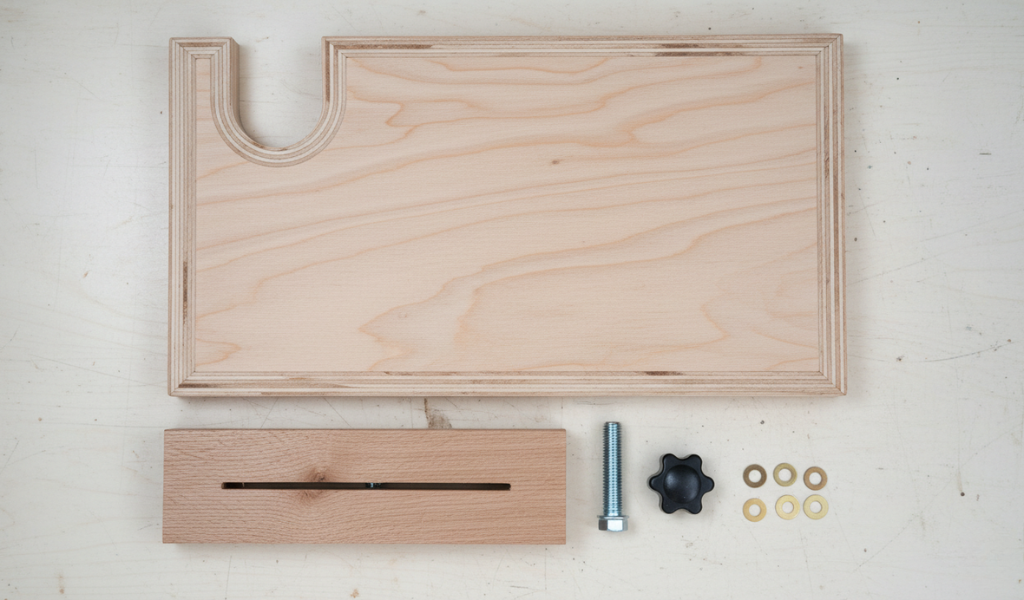
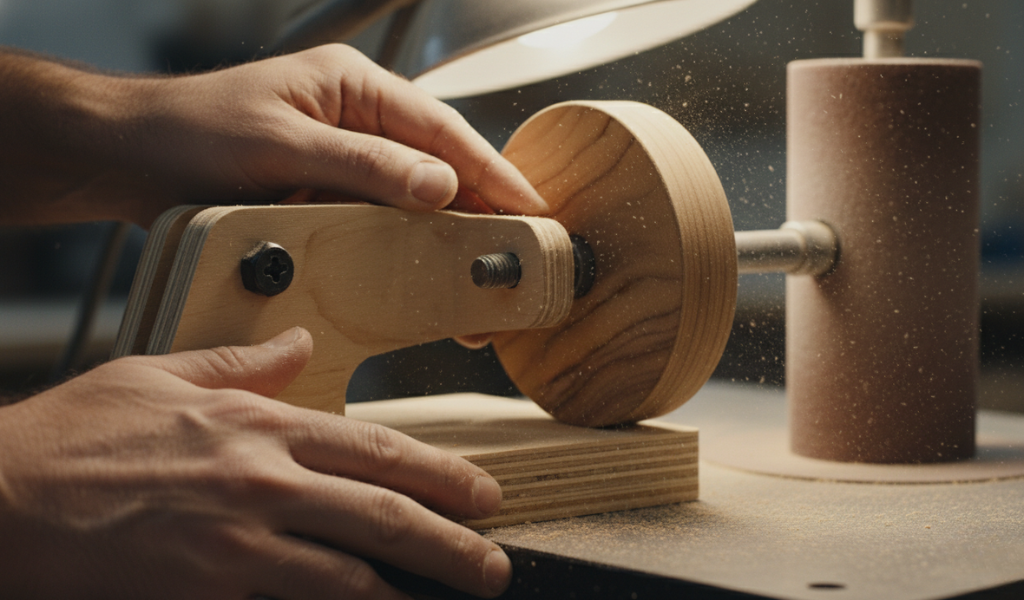
The base is the foundation. It must be perfectly flat. Start by cutting a “throat” or a U-shaped notch in the plywood so it can slide around your drum sander spindle. This allows the base to sit flush on the sander’s table, providing a larger surface area for your jig to operate.
The arm acts as the radius of your circle. On one end, drill a hole for the pivot pin. On the other, drill a hole for the carriage bolt that will hold the wheel.
Insert the carriage bolt through the bottom of the arm. It’s helpful to countersink the head of the bolt so the arm stays flat against the base. Place your wooden wheel onto the bolt, add a washer, and thread on the star knob. The wheel should be able to spin like a ‘propeller’ without any side-to-side play.
Calibration is the difference between a jig that works and a jig that frustrates. With the sanding machine turned off, place your jig on the table.
Use a machinist’s square to ensure your drum sander is exactly 90 degrees to the jig base. If it’s off by even a fraction of a degree, your wheels will be tapered (cone-shaped). Then clamp the base to the sander table. The distance from the pivot pin to the sanding drum determines the final size of the wheel. Swing the arm toward the drum. The wheel should make contact with the drum exactly at the “apex” of the swing.
Now we reach the core of the process. Operating a wheel jig requires a bit of “finesse” and a steady rhythm. If you simply jam the wheel into the drum sanding machine, you will get burns and gouges.
Start with the pivoting arm swung away from the drum. Turn on the sanding machine and let it reach full speed. Slowly swing the arm toward the drum until you hear the first faint “hiss” of sandpaper hitting wood. This is your starting point.
A flat spot occurs the instant the wheel stops rotating while in contact with the drum. To prevent this:
If you are sanding resinous woods like pine or oily woods like teak, heat is your enemy. Friction will melt the resin, which then “loads” the sandpaper, leading to black burn marks on your wheels.
Many woodworkers start by using a sanding machine attachment on a drill press before investing in a dedicated spindle sander. Both have their place, but they behave very differently.
Using a drum sander kit in a drill press is an affordable entry point. It turns a vertical boring machine into a functional sander.
Pros: Cost-effective; most shops already have a drill press; adjustable speeds.
Cons: Drill presses are designed for axial loads (up and down), not radial loads (side-to-side). Excessive pressure can damage the bearings or cause the chuck to fall off.
The Solution: When using a wheel jig on a drill press, always use a “lower bearing” support if possible, or keep your passes extremely light to protect the machine.
A dedicated drum sanding machine is a superior choice for production work.
Pros: The oscillation (up-and-down movement) ensures that you aren’t using just one narrow strip of sandpaper. This keeps the abrasive sharp for longer and prevents the “heat concentration” that causes wood burning.
Cons: It is a single-purpose tool that takes up extra floor or bench space.
The Easy Way to Sand the Wheels: If you find yourself making more than 50 wheels a year, the dedicated machine pays for itself in saved sandpaper and reduced “re-work” time.
You wouldn’t use a sledgehammer to hang a picture frame, and you shouldn’t use 60-grit paper to finish a delicate toy wheel.
Bulk Removal (60–80 Grit): Use this only if your wheels are severely out of round or have heavy “saw teeth” marks. Be careful, as this grit removes material incredibly fast.
The “Sweet Spot” (100–120 Grit): This is where most wheel sanding happens. It is aggressive enough to remove burns but fine enough to leave a surface that is nearly ready for paint or oil.
Final Polishing (180–220 Grit): For high-end models, a final pass with 220 grit while using the wheel jig will produce a smooth finish suitable for painting or sealing.
Safety is often overlooked in sanding because there are no “teeth” like a saw blade, but a drum sanding machine can still cause painful injuries.
A well-maintained tool is a safe and accurate tool. Your sanding machine and your custom jigs require regular attention to stay in top shape.
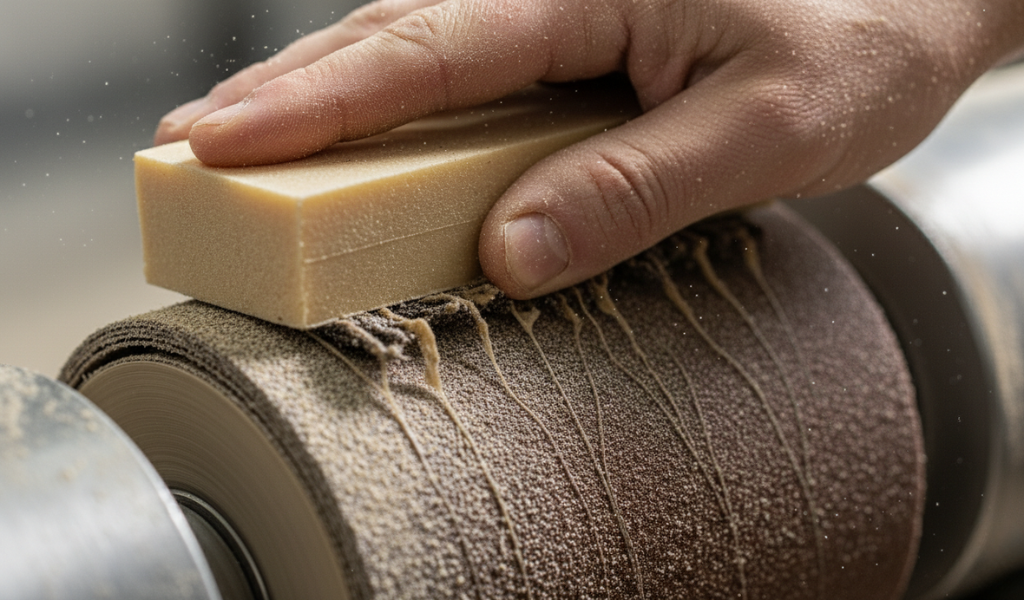
Over time, wood fibers and pitch will clog the “valleys” between the grit on your sandpaper.
Check your wheel jig for wear every time you start a new session.
Periodically check the table of your drum sanding machine for flatness. If the table is bowed, your jig will rock, leading to inconsistent cuts. Use a straightedge and a feeler gauge to verify that everything is “completely flat.”
Issue: The wheel has a slight taper.
Issue: Deep “chatter” marks on the edge.
Issue: The sandpaper keeps slipping off the drum.
Learning to use a wheel jig with a drum sander can greatly improve consistency in woodworking projects. It represents a shift from “eyeballing it” to “engineering it.” By taking the time to build a solid auxiliary base and a precise pivoting arm, you unlock the ability to create professional-grade components with ease.
Remember, the easy way to sand the wheels isn’t about rushing the job; it’s about setting up a system that does the hard work for you. Whether you are using an oscillating sanding machine or a modified drill press, the principles of constant rotation, light pressure, and clean abrasives remain the same.
So, head out to your shop, grab some birch plywood scraps, and build yourself a jig. This setup can help improve both sanding accuracy and overall safety.
The pivot point is the most important part of the jig.If the pivot is loose or off-center, the wheel will never be truly round. Using a metal pin or a bushing in your wheel jig ensures long-term accuracy.
Sanding wheels without a center hole requires a “friction-fit” jig. Instead of a bolt, the jig uses two rubber-faced pads that “sandwich” the wheel. This is much more complex and usually requires a lathe or a specialized clamping jig.
Not with a standard single-pivot wheel jig. Ovals require a dual-axis jig (often called a “trammel of Archimedes”). However, for 99% of woodworking projects, a perfect circle is what you need.
If you use a cleaning stick regularly and avoid “forcing” the wood into the drum, a single sleeve can last through several hundred wheels. However, if you burn the paper once, that spot becomes useless.
While possible, a disc sander is much more aggressive and difficult to control for small rounds. The linear speed of a disc increases as you move toward the outer edge, which makes it very easy to over-sand one side of your wheel.
For tiny wheels (under 1/2 inch), you can use a finishing nail as a pivot pin. Just be sure to pre-drill the hole in your wheel jig arm so the nail stays perfectly vertical.
Always sand first. The drum sander will strip away any paint or oil instantly. Once the wheel is sanded to its final grit (usually 220), remove it from the jig, wipe off the dust, and apply your finish.