Physical Address
304 North Cardinal St.
Dorchester Center, MA 02124
Physical Address
304 North Cardinal St.
Dorchester Center, MA 02124
If you’ve ever stared at a pile of tiles wondering how to make those tricky cuts around pipes, corners, or outlets, you’re not alone. Learning how to cut tiles with a grinder is one of the most useful skills any DIYer can pick up. An angle grinder is affordable, flexible, and surprisingly easy to handle once you know the basics.
In this guide, you’ll learn exactly how to cut ceramic tile (and other types) using an angle grinder. We’ll cover the materials needed for grinding tiles, the right blades to use, step-by-step instructions, and a few pro tips to keep your edges clean and your fingers safe. Whether you’re tiling a bathroom floor or fixing a backsplash, this guide has you covered.
To cut tiles with a grinder, mark the cutting line, secure the tile firmly, fit a diamond blade to the angle grinder, and make several shallow passes instead of one deep cut. Finish by smoothing the edges with a rubbing stone or sandpaper for a clean professional result.
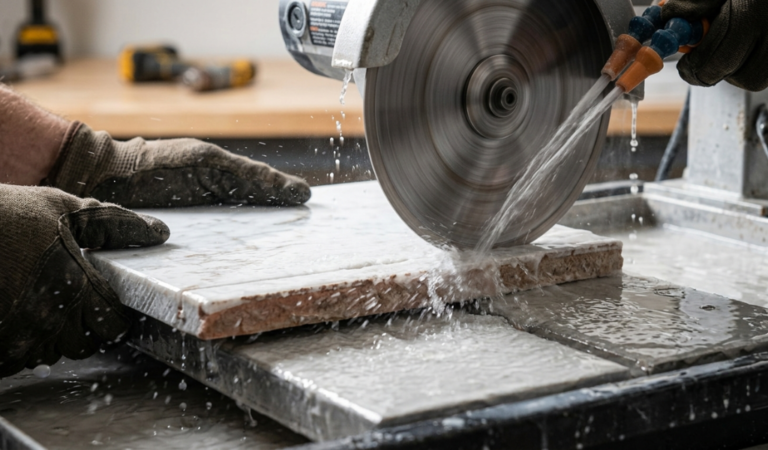
An angle grinder is the go-to tool when you need flexibility. Unlike a snap cutter that only handles straight lines, a grinder can make L-shaped cuts, curves, circles, and square notches. That makes it perfect for fitting tiles around doorways, heater vents, and toilet pipes.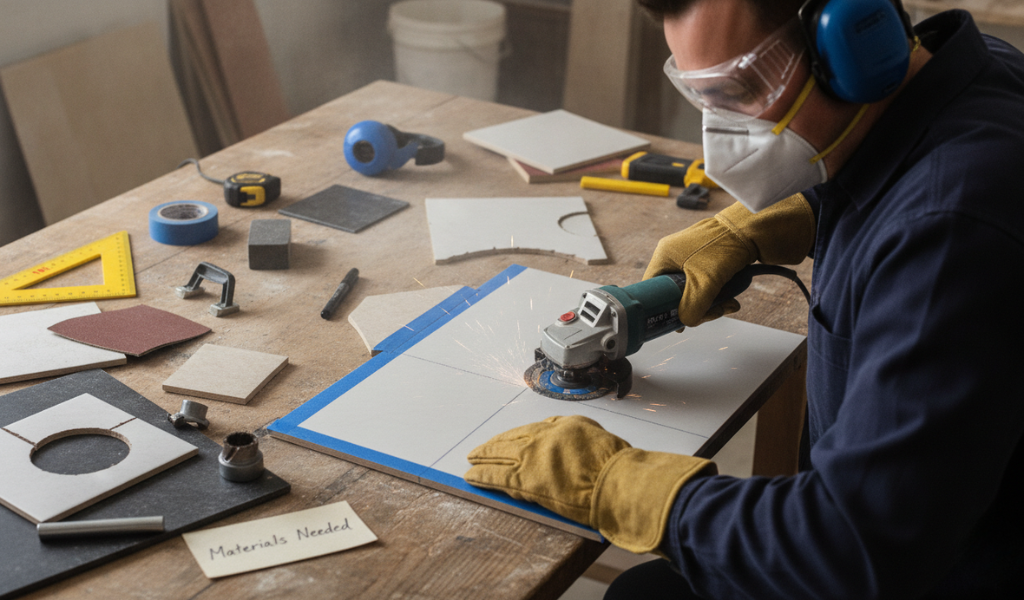
The cuts may not be as flawless as those from a wet saw, but here’s the trade-off: a grinder is cheaper, more portable, and forgiving for beginners. You don’t need a lot of finesse to get a solid result. For most home projects, that balance of price and power is hard to beat.
Basic angle grinders start at around $30, which makes them an easy buy for first-time tilers. They work on ceramic, porcelain, stone, marble, and even glass tiles, as long as you pair them with the right blade.
Before we dig into the grinder, it helps to know where it fits among other tools. So, what is a tile cutter? In simple terms, it’s any tool designed to cut tiles cleanly to size. Some are manual hand tools, while others run on electricity or water.
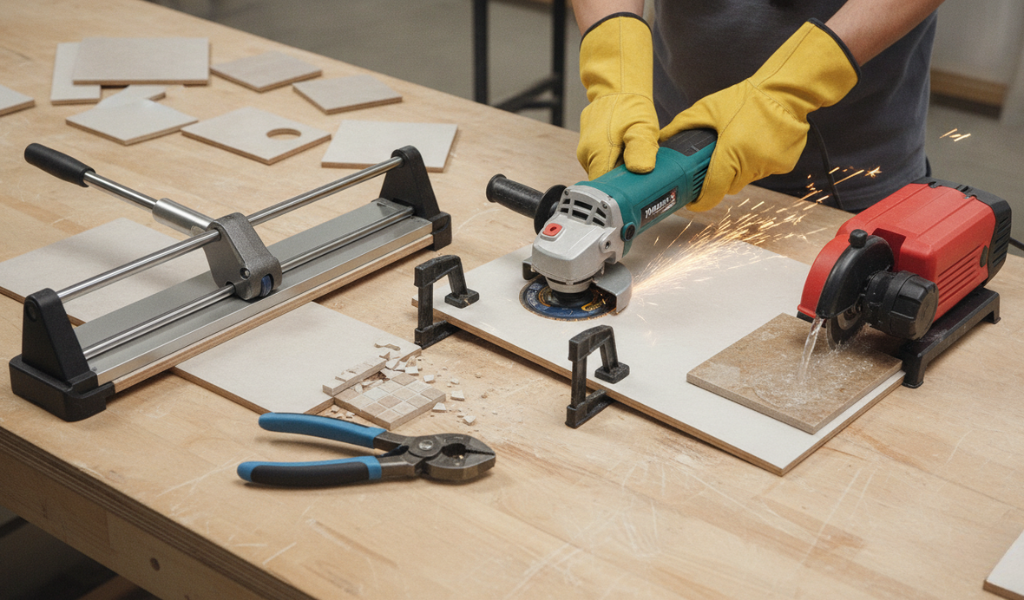
The most common tile cutting tools include:
Each tool has its strengths. The best choice depends on the type of tile, the kind of cuts you need, and how many tiles you plan to cut. An angle grinder sits comfortably in the middle, offering more freedom than a snap cutter without the cost of a wet saw.
When people compare types of tile cutter, the biggest divide is manual vs electrical tile cutter options. Both have a place in any toolbox, so let’s break them down.
A manual tile cutter (the snap cutter) works without electricity or water. You score the tile with a carbide wheel, then snap it along the line. It’s quiet, cheap, and safe, which makes it a favorite for small ceramic tile jobs. The downside? It only makes straight cuts and struggles with thick tiles, natural stone, or large formats.
An electrical tile cutter covers tools like the angle grinder and the wet saw. These power tools handle tougher materials and trickier shapes. An angle grinder, in particular, gives you the freedom to cut curves and holes that a manual cutter simply can’t manage. The trade-off is more noise, dust, and a slightly steeper learning curve.
So which should you choose? If you only need a handful of straight cuts on thin ceramic tile, a manual cutter does the job fine. But if your project involves curves, notches, or harder materials, an electrical option like the grinder is the smarter pick.
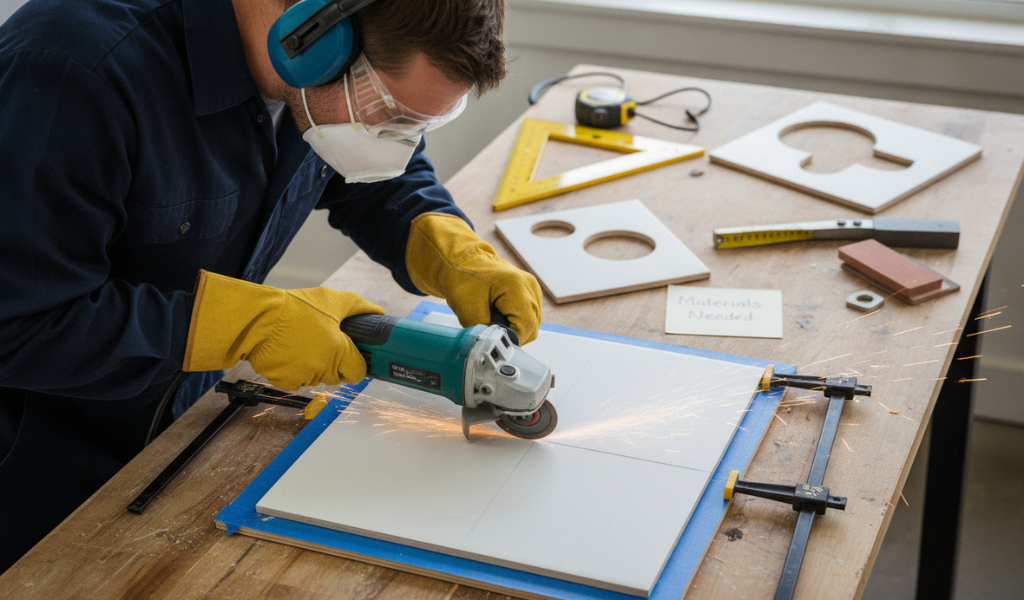
Before you start, gather your gear. Having the right materials needed for grinding tiles ready will make the whole process smoother and safer. Here’s your checklist:
Lay everything out on a flat, stable surface before you begin. Trust me, fumbling for tape mid-cut is a quick way to ruin a tile.
The blade matters just as much as the grinder itself. Using the wrong one leads to chips, cracks, and a lot of frustration. As a rule, you’ll want a diamond blade, but the style varies by material:
Always check that your blade is sharp and fresh before starting. A worn blade forces you to push harder, and pushing harder is exactly how tiles break.
Now for the main event. Here’s how to cut tiles with a grinder in five simple steps. Take your time, especially on your first few cuts.
Measure carefully, then mark your cut line on the tile with a pencil or marker. For shaped cuts, draw the outline on both sides of the tile so you can follow it from either angle. Remember the golden rule: you can never “uncut” a tile, so double-check your measurements.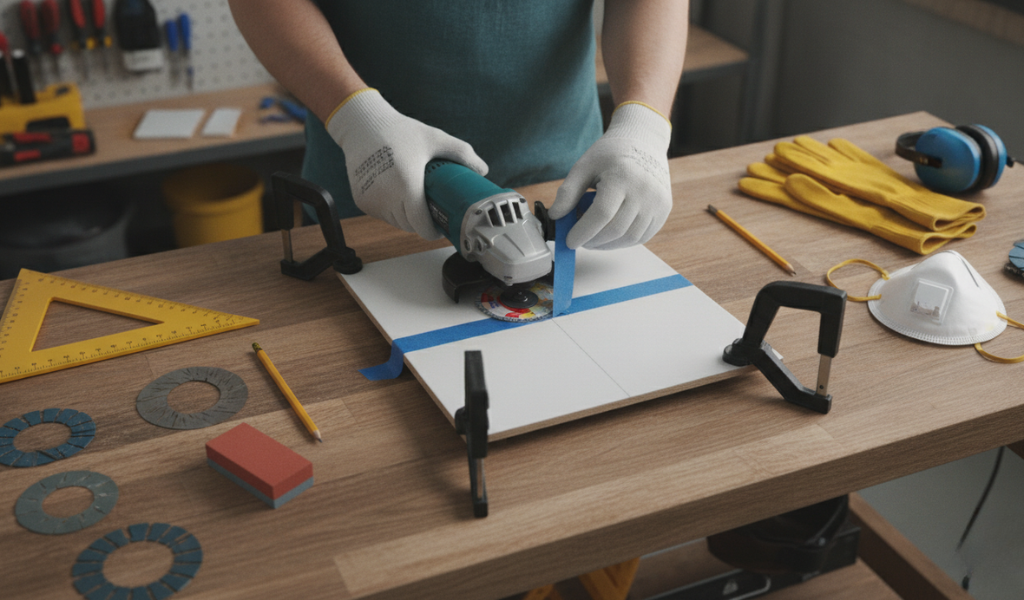
Place the tile on a flat surface and apply masking tape along the cut line. The tape helps stop the glaze from chipping. Clamp the tile down firmly so it won’t shift while you cut. A moving tile is dangerous and messy.
Switch on the grinder and let it reach full speed before touching the tile. Run the blade gently along your marked line to create a shallow groove first. Then make a few more passes, going slightly deeper each time. Don’t try to cut all the way through in one go. For straight cuts, hold the blade vertically. To make curves or circles, angle the blade as needed and follow the line slowly.
Cut edges are sharp and often a little rough. Use the flat side of the blade, a rubbing stone, or sandpaper to smooth them out. Pay extra attention to edges that will sit against fixtures like drains or outlets.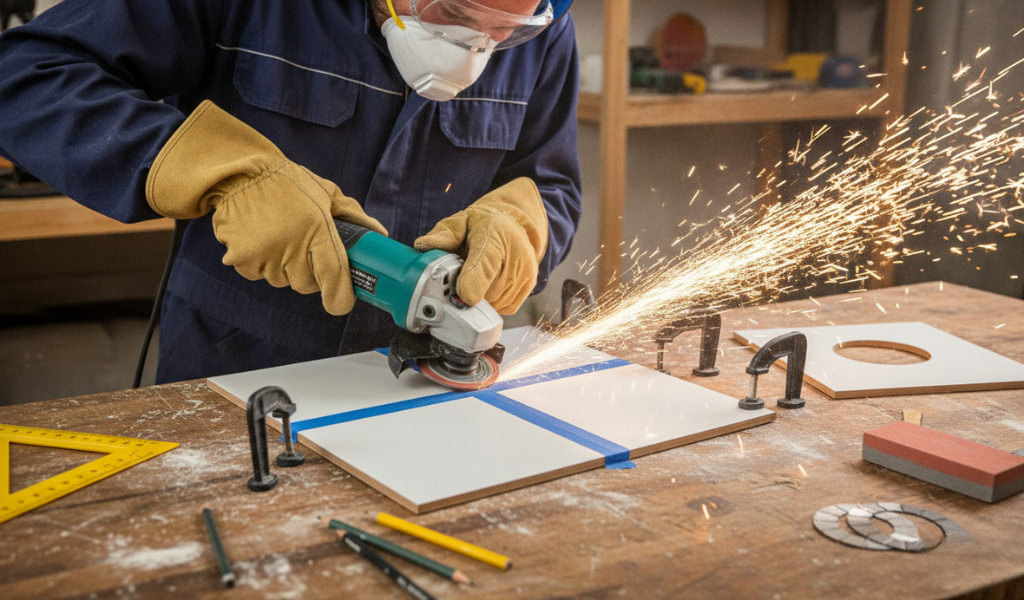
Before moving on, test the tile in its spot. Small adjustments are easy now but impossible after the adhesive goes down. If it fits, you’re done. If not, a quick pass with the grinder usually solves it.
One of the best things about a grinder is its range. Here’s how to tackle the trickier cuts.
L-shaped cuts: These are common around corners and outlets. Cut along one line, then the other, meeting at the corner. Go slow at the junction to avoid overcutting.
Curves: Mark your curve, then make several straight relief cuts up to the line. Carefully grind away the small sections until you reach a smooth curve.
Holes for pipes: While a grinder can rough out a hole, a tool with a diamond bit (like a drill or rotary tool) often gives cleaner results for round holes. For a quick hole with a grinder, cut a square or rough circle and smooth the edges afterward.
Real-life example: when fitting tile around a toilet pipe, many tilers cut the tile into two pieces, grind a half-circle into each edge, then join them around the pipe. It’s faster and looks neat once grouted.
Chipping is the most common complaint when learning how to cut ceramic tile with a grinder. These simple habits make a big difference:
A little practice helps too. Grab a spare tile and make a few test cuts before working on the real thing. You’ll get a feel for the grinder’s speed and weight in no time.
Grinders spin fast and throw out dust and debris, so safety isn’t optional. Always wear protective eye gear to guard against flying chips. A dust mask keeps fine tile particles out of your lungs, and thick gloves protect your hands from sharp edges.
Ear protection is wise too, since grinders are loud. Work in a well-ventilated area, keep your cord clear of the blade, and never rush. A steady, careful approach keeps both you and your tiles in one piece.
Cutting tiles with a grinder is far less intimidating than it first seems. With the right blade, a bit of tape, and a slow, steady hand, you can make clean cuts around almost any obstacle. The angle grinder gives you the freedom to shape ceramic tile, porcelain, stone, and more, all without spending big on a wet saw.
Remember the basics: choose the correct blade, mark your lines carefully, cut shallow and slow, and always wear your safety gear. Your first cut or two might not be perfect, and that’s completely normal. With a little practice, you’ll be trimming tiles like a pro.
Ready to start your project? Grab your grinder, gather your materials, and put these tips to work. And if you hit a snag, drop your question in the comments. We’re always happy to help fellow DIYers get the job done right.
Yes, you can easily cut ceramic tile with an angle grinder. Just fit it with a diamond-tipped, smooth-edge blade, mark your line, and make shallow passes. It’s one of the most versatile ways to cut ceramic tile, especially for curves and corner notches.
Use a diamond blade matched to your tile. A smooth-edge diamond blade suits ceramic tile, a notched blade works for porcelain, and a serrated blade is better for natural stone and marble. Always make sure the blade is sharp before you start.
It depends on the job. In the manual vs electrical tile cutter debate, a manual cutter is best for quick straight cuts on thin ceramic tile. A grinder wins when you need curves, holes, L-shapes, or want to cut tougher materials like stone.
Apply masking tape along the cut line, use a fresh diamond blade, and make several shallow passes instead of one deep cut. Keep your pressure light and even, and cut slowly. These steps greatly reduce chipping.
Most angle grinders are used dry, unlike a wet saw. However, dry cutting creates dust, so always wear a mask and work in a ventilated space. Some grinders support wet cutting attachments, which reduce dust and help keep the blade cool.
A basic angle grinder starts at around $30. Higher-priced models offer more power and accessories, which can be worth it for larger or repeat projects. For most one-time DIY jobs, an affordable model does the trick.
A tile cutter is any tool used to cut tiles to size during installation. Options range from manual snap cutters and tile nippers to electrical tools like angle grinders and wet saws. The right choice depends on your tile type and the cuts you need.