Physical Address
304 North Cardinal St.
Dorchester Center, MA 02124
Physical Address
304 North Cardinal St.
Dorchester Center, MA 02124

How to Sand Resinous Wood: The Complete Guide to Sanding Pine and Pitch-Heavy Timber
Sanding a piece of pine should be simple. Yet many woodworkers find their abrasive disc gummed up within minutes, leaving streaks of sticky residue instead of a smooth finish. This happens because resinous wood behaves differently to hardwood or MDF, and treating it the same way leads to clogged sandpaper, uneven surfaces, and hours of wasted effort.
Resinous timber, particularly pine, fir, and other softwoods with visible pitch pockets, contains natural sap that softens under friction and heat. As you sand, this sap doesn’t disappear, it smears across the surface, clogs your grit paper, and eventually burns onto the wood grain. The result is a patchy, glazed finish that no amount of extra sanding will fix unless you change your approach entirely.
This guide walks you through everything you need to know to sand resinous wood cleanly, from understanding why pitch causes so much trouble to the exact grit progression, tools, and sealing techniques that stop it from ruining your project. Whether you’re prepping a pine tabletop for varnish or working through pitch pockets on a reclaimed timber slab, these steps will help you achieve a dust-free, perfectly flat surface every time.
We’ll also cover a common point of confusion for many woodworkers: how sanding resinous wood compares to sanding epoxy resin. These are two different materials with different rules, and mixing up the techniques is one of the fastest ways to ruin a project.
Before picking up a sanding block or random orbital sander, it helps to understand what you’re actually dealing with. Resinous wood isn’t just “sticky pine”, it’s wood with natural chemical compounds that react to heat, pressure, and friction in ways that standard hardwoods simply don’t.
Wood resin is a natural, sticky substance produced by softwood trees like pine, spruce, and fir as part of their defence system against insects and decay. It collects in pitch pockets, small pockets within the grain where sap has concentrated, often near knots or areas of past injury to the tree.
When you sand wood containing these pitch pockets, the friction generates heat. That heat softens the resin, turning it from a semi-solid gum into a sticky liquid that spreads across the surface and clogs your abrasive almost instantly. This is why a sanding disc that glides smoothly across clear pine will suddenly grab and skip the moment it hits a pitch pocket.
The higher the ambient temperature in your workshop, the worse this problem becomes. Sanding resinous timber in a hot shed in summer will clog paper far faster than the same task on a cool winter morning, so factor in your workshop conditions before you start.
It’s easy to assume that sanding epoxy resin and sanding resinous wood follow the same rules. They don’t. Epoxy is a synthetic, fully cured coating often poured over tabletops, river tables, or as a protective layer over wood grain. Once cured, sanding epoxy resin is closer to sanding hard plastic than sanding timber.
Sanding wood with natural pitch means managing a soft, heat-sensitive substance still embedded in living wood fibres. Sanding cured epoxy, by contrast, involves working through a hard, glassy coating to level uneven surfaces or remove imperfections like bubbles and drips. Epoxy dust is also a different hazard entirely, fine, uncured epoxy dust can be an irritant, so a dust extractor and proper mask are non-negotiable when working with it.
If you’re wet sanding an epoxy tabletop to a glass-like shine, you’ll typically progress through much higher grits, sometimes up to 3000, for that polishing effect. Resinous wood, on the other hand, rarely needs to go beyond 220 grit, and going higher can actually cause problems, which we’ll cover shortly.
Having the right tools before you start sanding will save you from the frustration of constantly stopping to clean or replace clogged abrasives.
Sandpaper comes in two main types: closed-coat, where abrasive grains cover the entire surface, and open-coat, where grains are spaced further apart, leaving room for debris to escape. For resinous wood, open-coat sandpaper is essential. The gaps between grains prevent sticky pitch from packing the paper solid, extending the usable life of each sheet significantly.
Closed-coat paper might work fine on clear, resin-free sections, but the moment it hits a pitch pocket, it clogs almost immediately. If you’re a woodworker who regularly works with pine or other softwoods, stocking open-coat grit paper in a range of grades is one of the simplest ways to reduce frustration.
Even open-coat sandpaper will eventually pick up some residue. A natural rubber abrasive cleaning stick, sometimes called a crepe rubber stick, is designed to clean sanding discs and belts without damaging the abrasive grit. Simply run the stick lightly across a spinning or stationary disc, and the rubber lifts away built-up gum and dust.
Keep one within arm’s reach whenever you’re sanding resinous timber. A quick clean every few minutes is far more efficient than pushing through with a clogged disc and hoping for the best.
Before sanding, it often helps to wipe down the surface with a solvent to dissolve any surface-level gum. Mineral spirits are the gentler option, effective at softening sap without aggressively affecting the surrounding wood grain, and are the safer default for most projects. Acetone works faster and cuts through heavier pitch deposits, but it’s harsher, more flammable, and can dry out the wood surface if overused.
For most resinous wood projects, mineral spirits applied with a clean cloth will handle the job. Reserve acetone for particularly stubborn, crystallised pitch pockets that mineral spirits struggle to soften.
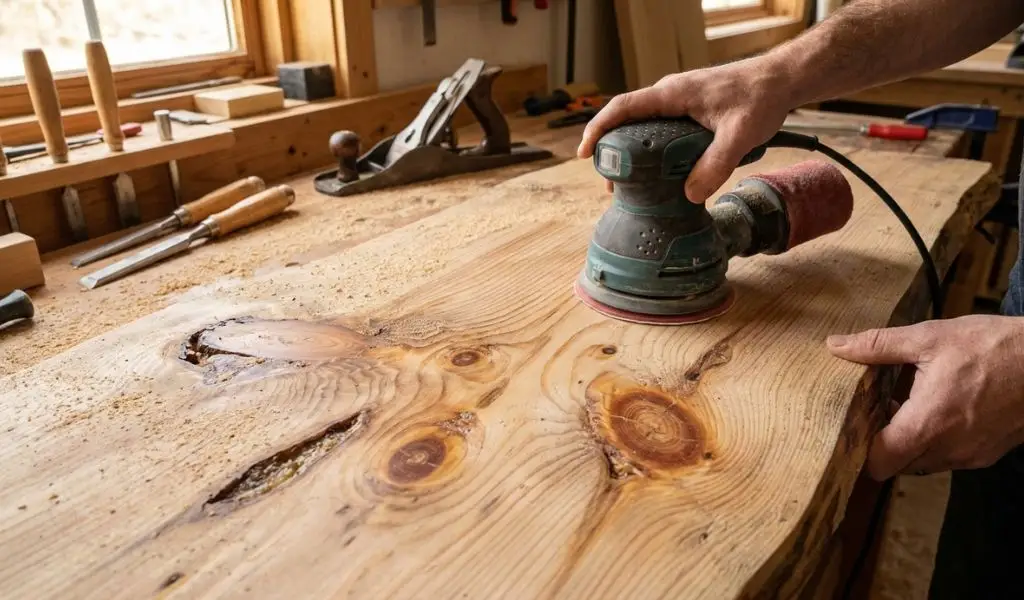
A random orbital sander with variable speed control gives you far more command over heat generation than a fixed-speed model. Lower speeds reduce friction, which means less resin softening and fewer clogs. Pairing your sander with a shop vac or dedicated dust extractor also keeps the work area dust free and stops fine particles from resettling on your sticky surface, where they’d otherwise bind to the pitch and create new imperfections.
Avoid reaching for belt sanders on resinous wood unless you’re removing a significant amount of material quickly. Their aggressive, high-heat action makes pitch problems worse, not better, and they’re far harder to control with even pressure across delicate areas like knots.
With your tools ready, follow this sequence to sand resinous wood without constant clogging or damage to the surface.
Before any sanding begins, inspect the entire surface for visible pitch pockets, hardened sap, or crystalline deposits. A sharp scraper can lift away the worst of this hardened gum before it ever touches your abrasive. This single step prevents the majority of early clogging, since you’re removing bulk resin mechanically rather than relying on sandpaper to grind through it.
Once loose material is scraped away, wipe down the surface with mineral spirits on a clean cloth. Work in the direction of the wood grain, allowing the solvent to dissolve any remaining sticky film. Let the surface dry completely before moving on. Sanding a surface that’s still damp with solvent will only smear the softened resin further into the grain.
Start with a coarser sandpaper, typically 80 grit or 100 grit, to remove milling marks and level uneven surfaces. From there, progress through medium grit stages, such as 120 and 150, before finishing at 180 grit. Each grit should remove the deeper scratches left by the one before it. Skipping stages leaves visible scratches that no final coating will hide.
Unlike hardwood, where you might go higher for a glass-smooth feel, resinous softwood rarely benefits from finer grit beyond 180. The wood fibres are soft enough that additional sanding starts to cause more harm than good, a point we’ll return to shortly.
Use even pressure and let the sander float across the surface rather than pressing down hard. Excess pressure generates the exact heat and friction that softens resin and clogs your disc. Lower the RPM on your sander if it has variable speed, and take slightly longer passes rather than rushing with high speed and heavy pressure.
Hand sanding with a sanding block over particularly resinous patches, like around a knot, gives you more tactile control than a power tool and reduces the risk of localised overheating.
Don’t wait until your disc is completely clogged. Clean it with your rubber abrasive stick every few minutes, or whenever you notice the sanding action becoming less effective. This habit alone can double the usable life of each sheet or disc and keeps your finish consistent across the entire surface.
Sanding resinous wood well is only half the job. Without proper sealing, sub-surface pitch can bleed through your finish months or even years later.
Standard oil finishes and some varnishes aren’t designed to block resin migration. Pine knots, in particular, remain resin-rich even after sanding, and oils applied directly over them often result in a tacky, discoloured patch appearing weeks after application as sap continues to work its way to the surface, sometimes even after the coating is fully cured.
Dewaxed shellac is the standard solution among woodworkers for sealing resinous knots and pitch-prone areas. Apply one or two thin coats directly over sanded knots before any other finish. Shellac dries quickly, forms a waterproof barrier against migrating resin, and provides a stable base for oil, lacquer, or varnish applied afterwards. Skipping this step is one of the most common reasons finishes fail on pine furniture and tabletops.
Even experienced woodworkers fall into a few predictable traps when sanding resinous timber. Here’s what to watch for.
Heavy pressure feels productive, but it’s counterproductive on resinous wood. It generates heat, softens pitch faster than it can be cleared, and glazes the abrasive surface until it stops cutting altogether. Let the tool do the work, and rely on grit progression rather than brute force.
It’s tempting to go higher for an ultra-smooth feel, but pushing resinous softwood past 220 grit often burnishes the fibres instead of cutting them. The surface starts to feel soft and slightly shiny rather than clean and receptive to finish, and coatings struggle to adhere properly to a burnished surface. If you want a smoother feel, achieve it with a light hand-sanding pass at 220, not by chasing ever finer grit paper.
Jumping straight into sanding without a solvent wipe-down is one of the fastest ways to spread sticky pine tar across the entire surface rather than removing it. What starts as a contained pitch pocket becomes a smeared streak across clean wood grain, requiring far more sanding to correct than the wipe-down would have taken in the first place.
Open-coat sandpaper is the best choice for resinous wood. The spaced-out grit paper allows sticky debris to escape rather than clogging the surface, which is essential when working through pitch pockets in pine or other softwood.
Scrape away hardened, crystalline sap with a sharp scraper first, then wipe down the surface with mineral spirits to dissolve remaining sticky residue. This two-step approach removes the bulk of the resin before sandpaper ever touches the surface.
Dry sanding with proper open-coat abrasive and regular disc cleaning is generally the better approach for resinous wood. Wet sanding is more commonly used for epoxy resin or between finish coats, not for raw timber still containing natural pitch.
Use open-coat paper, keep pressure light to avoid heat build-up, and clean your disc regularly with a natural rubber abrasive stick. Scraping and solvent wiping the surface beforehand also significantly reduces clogging.
It’s generally not recommended. Sanding resinous softwood past 220 grit risks burnishing the wood fibres, leaving a surface that feels soft but doesn’t accept finish well. Stick to a maximum of 220 grit for most pine and softwood projects.
Seal sanded pitch pockets and knots with one or two thin coats of dewaxed shellac before applying your final finish. Shellac creates a waterproof barrier that stops resin from migrating through varnish, lacquer, or oil coatings over time.