Physical Address
304 North Cardinal St.
Dorchester Center, MA 02124
Physical Address
304 North Cardinal St.
Dorchester Center, MA 02124

Every seasoned woodworker knows the truth: a flawless finish is rarely about the stain, the sealer, or the paint. It starts long before any of that—with sanding. Whether you’re restoring a battered tabletop or building a custom cabinet from scratch, the quality of your prep work determines the success of all your wood projects.
This guide to sanding covers the full spectrum of what you need to know. From how sandpaper grit works and which sandpaper materials suit which jobs, to the step-by-step techniques that separate a smooth, professional surface from a scratched, uneven one. You’ll learn which abrasive gear to reach for in different situations, how to avoid the most common (and most costly) mistakes, and how to keep your workspace safe while you work.
Think of this as your sanding 101 masterclass—practical, detailed, and built for DIYers and woodworkers who want results they’re actually proud of.
Sanding is the process of using an smoothing material—typically sandpaper—to smooth, shape, or clean a wooden workpiece by removing small amounts of material through friction. The gritty particles on a piece of sandpaper act like thousands of tiny cutting edges, scraping away rough fibers, mill marks, dried glue, old finishes, or surface imperfections one thin layer at a time.
The purpose of sanding changes depending on where you are in a project. Early in the process, coarse sanding flattens rough surfaces, strips the wood quickly, and eliminates deep surface gouges or planer marks. As you progress to finer grit, the goal shifts toward refining the surface—closing the grain, evening out texture, and preparing wood to accept a stain or topcoat cleanly.
Before diving into the specifics, you can check out our complete guide to wrenches to learn about other essential automotive and hand tools that complement a well-equipped workshop.
At its core, sanding is about control. The grit you choose, the tool you use, and the direction you move all determine whether you end up with a surface that looks polished and intentional—or one that looks rough and rushed.
Stain doesn’t behave the same way on every surface. On a properly sanded piece of wood, the stain penetrates evenly, producing consistent color and a clean appearance. On a surface that hasn’t been properly prepared, the stain soaks in unevenly—pooling in scratches, skating over mill-glazed spots, and highlighting every flaw you hoped it would hide.
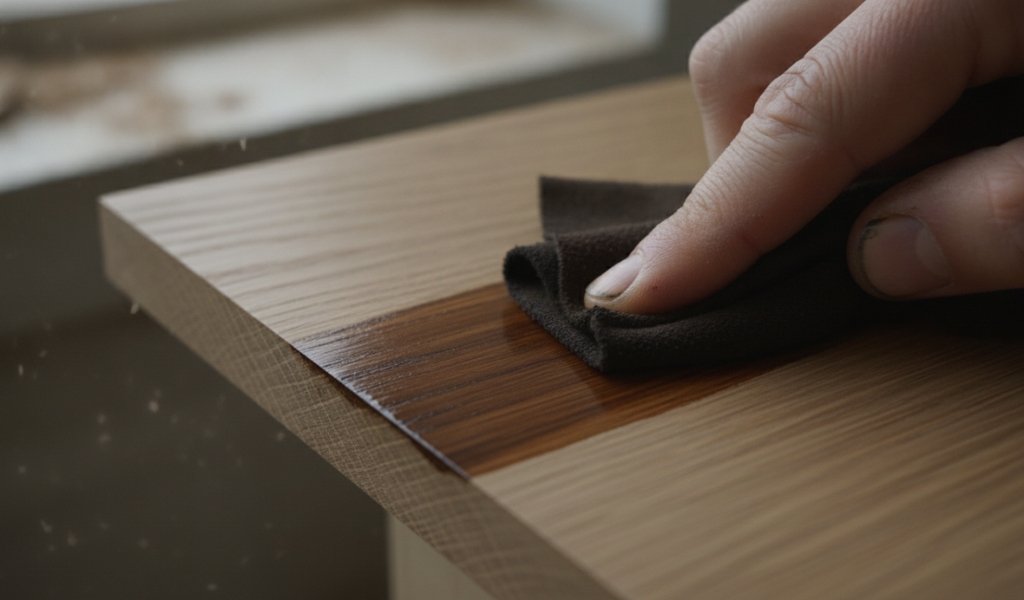
Understanding what sanding wood actually means is the first step toward better finishing results. At a practical level, sanding opens the wood’s pores, removes surface contamination, and creates a uniform texture that lets stain absorb at a consistent rate across the entire surface. Fine sanding—typically finishing with 180–220 grit sandpaper—also removes the raised grain that appears when wood gets wet, which prevents a blotchy or rough texture under the finished coat.
For anyone new to the process, there’s far more to explore in What is Sanding in Woodworking?, which covers the meaning and mechanics of the sanding process in fuller detail.
Wood is not a uniform material. Its fibers run in a specific direction—called the grain—and how you sand relative to that grain determines whether your surface ends up smooth or scarred.
Sanding with the grain means moving your sandpaper parallel to the natural wood grain direction where the fibers run. This keeps the abrasive cutting along the length of the fibers rather than across them, producing fine, nearly invisible micro-grooves that lie flat and blend into the surface.
Sanding across the grain—or at an angle to it—creates deep abrasion marks that cut perpendicular to the wood fibers. These cross-grain blemishes catch light and become glaringly visible once stain or finish is applied, even if they’re invisible on raw wood.
The harder the wood and the coarser the grit, the more pronounced these scratches become.
To avoid them, always orient your strokes along the grain of the wood, especially when practicing sanding by hand or using a pad sander. With a random orbital sander, the circular motion helps minimize directional scratches—but finishing by hand with the grain is still good practice before applying any stain.
Sanding with the grain is one of the most fundamental skills in hand sanding. For those building their skills from scratch, our beginner’s guide on How to Sand Wood by Hand walks through the complete process, including how to read grain direction, maintain consistent pressure, and transition between grits safely.
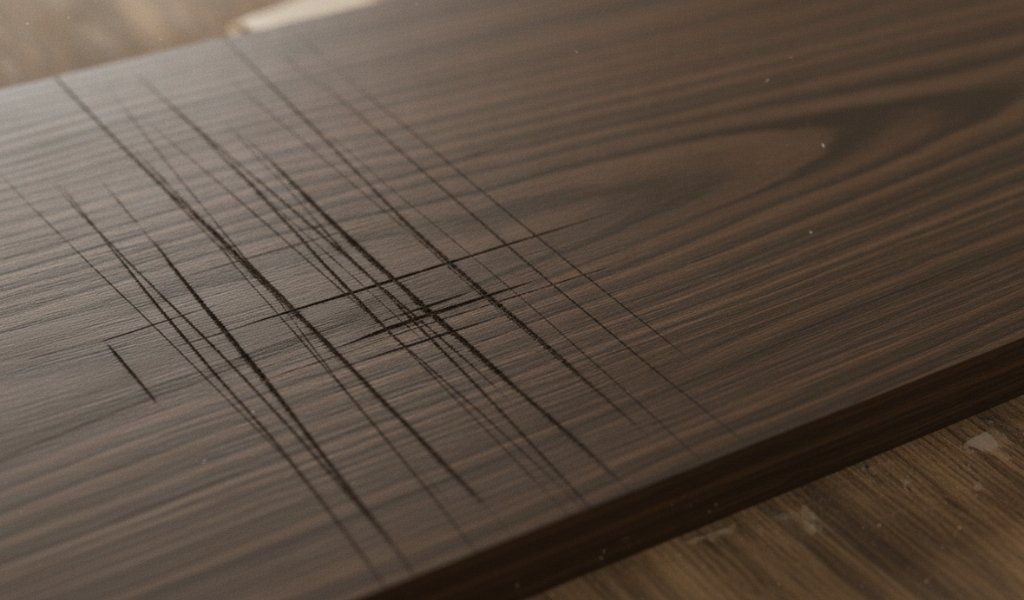
Here’s a simple trick that takes seconds and saves a lot of guesswork: before you start sanding, draw a light, wavy pencil line across the entire surface of the wood. As you sand, the pencil mark will gradually disappear. Once it’s completely gone, you’ve sanded the entire surface evenly at that grit—no guessing, no missed spots. It’s a small habit that makes a noticeable difference in the quality of your results.
Not all sandpaper is created equal. The material it’s made from, how the abrasive is bonded to the backing, and the grit number printed on the back all affect how it performs on different lumber profiles and at different stages of a project.
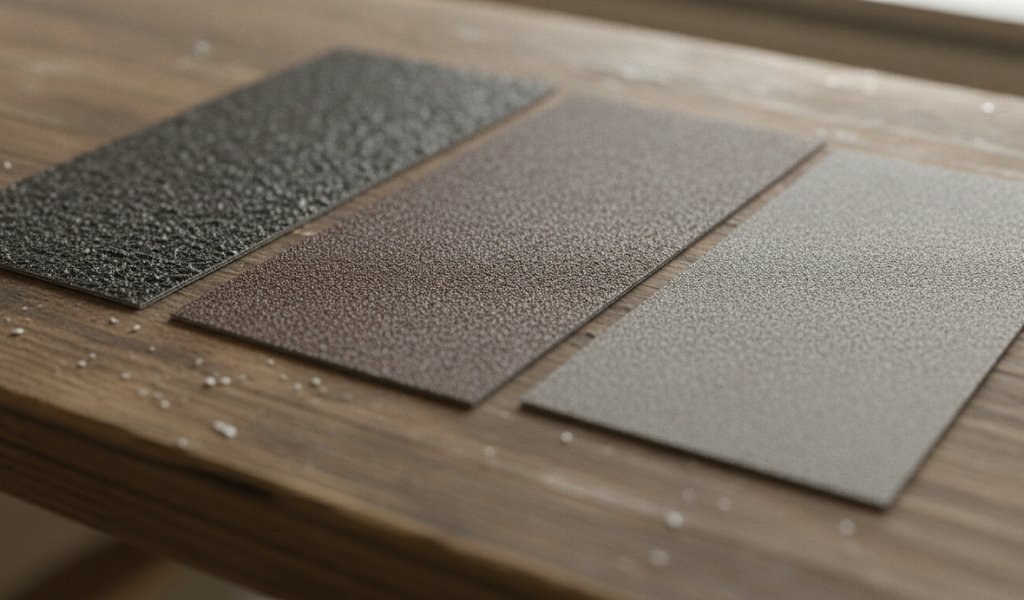
The three most common abrasive materials you’ll encounter are fused synthetic crystals, silicon carbide, and garnet—each with a different profile of hardness, durability, and best use case.
Aluminum oxide sandpaper: The most widely used type of sandpaper for wood. This synthetic abrasive is hard, durable, and self-sharpening—meaning the particles fracture during use to expose fresh cutting edges. It works well across all grit ranges and is the best sandpaper choice for most general woodworking and DIY projects.
Silicon carbide: Harder and sharper than this synthetic grain, but more brittle. Silicon carbide excels at wet sanding between coats of finish and at cutting hard materials like metal or ceramic. On bare wood, it cuts aggressively and wears faster than standard brown sandpapers.
Garnet: A natural mineral that’s softer than either of the above. Garnet sandpaper doesn’t last as long, but it produces a finer, more polished finish pattern that many woodworkers prefer for final hand-sanding before staining.
Choosing the right type of sandpaper matters—not just for performance, but for how long your sheets of sandpaper hold up before they need replacing.
The grit number on a piece of sandpaper indicates the size of its gritty particles. Specifically, it refers to the number of holes per square inch in the mesh used to sort the particles during manufacturing. A low grit number (like 40 or 60) means fewer, larger particles—which cut aggressively but leave deep swirl marks. A high grit number (like 220 or 320) means more, smaller particles—which cut gently and produce a finer, smoother surface.
In practical terms, understanding how each specific grit sand particles down ensures you balance aggressive cutting with a fine finish. Lower = more aggressive. Higher = finer.
Proper sanding follows a deliberate progression from coarse to fine. Skipping grits is a common mistake that leads to deep gaps taking far longer to remove—or never fully disappearing under finish. Here’s how each stage works:
Coarse grit (40–60): Material and rust removal
60 grit sandpaper and below is for heavy-duty work—stripping paint, removing rust, flattening cupped boards, or knocking down high spots left by a planer. Coarse sandpaper removes material fast, but it leaves deep scratches that must be worked out in subsequent stages. Use coarse grit only when the surface genuinely needs it; starting too rough adds unnecessary work.

Medium grit (80–150): Surface leveling
80 grit, 120 grit, and 150 grit sandpaper handle the bulk of surface preparation. After heavy-duty sanding, these grits remove the scratches left behind and begin leveling the raw timber substrate. 120-grit is a reliable starting point for wood that’s already relatively smooth. 150 grit transitions well into fine sanding without leaving deep sanding marks that are hard to remove.
Fine grit (180–320): Pre-stain preparation
This is where a surface begins to feel genuinely smooth. 220 grit is the standard finish-sanding grit before applying stain or a first coat of finish. At this stage, you’re not removing material so much as refining texture—closing the grain and creating the uniform surface that lets stain absorb evenly. A final hand-sanding pass with 220 grit sandpaper, , is standard practice before any finish goes on.
Extra fine to ultra-fine (400–2000): Between coats and wet sanding
These grits are used after the first coat of finish has dried, not on bare wood. Lightly sanding between coats with 400 grit knocks down dust nibs and brush marks, creating a flat base for the next layer. Above 600 grit, you’re typically wet sanding—using water or mineral spirits as a lubricant to cut the surface very gently without marring the finish.
The right sanding equipment depends on the size of the surface, its shape, and how much material you need to remove. Using the wrong tool doesn’t just slow you down—it can damage the wood or produce results that are harder to fix than the original problem.
Hand sanding gives you control that no power sander can fully replicate, particularly on edges, profiles, and detailed surfaces.
A sanding block is the foundation of hand-sanding. Wrapping a piece of sandpaper around a flat wooden or rubber block distributes pressure evenly across the surface, preventing the fingertip-pressure dips that lead to an uneven surface. For flat surfaces, a firm sanding block is almost always preferable to sanding with bare fingers.

Contoured foam pads and sanding blocks take this further by conforming to curved or irregular surfaces. A sanding foam set typically covers a range of grits and flexes around contour sanding grips, coves, and rounded profiles where rigid blocks would leave uneven contact. Sanding pads are reusable and washable, making them cost-effective for detailed work.
For tight concave profiles or custom shapes, a DIY sanding grip can be fashioned from a dowel, a length of hose, or any scrap material that matches the profile of the surface you’re sanding. Wrapping sandpaper around these improvised forms allows precise, consistent contact in areas where standard tools don’t fit.
These tools—from the sanding block to the contoured foam block and flexible sanding pad—form the core of any hand-sanding toolkit. For a deeper look at selecting and using each of these tools effectively, see our dedicated guide on Essential Hand Sanding Tools and Techniques.
Power sanders dramatically reduce time and effort on large, wide boards. Each type has a different motion and a different best use.
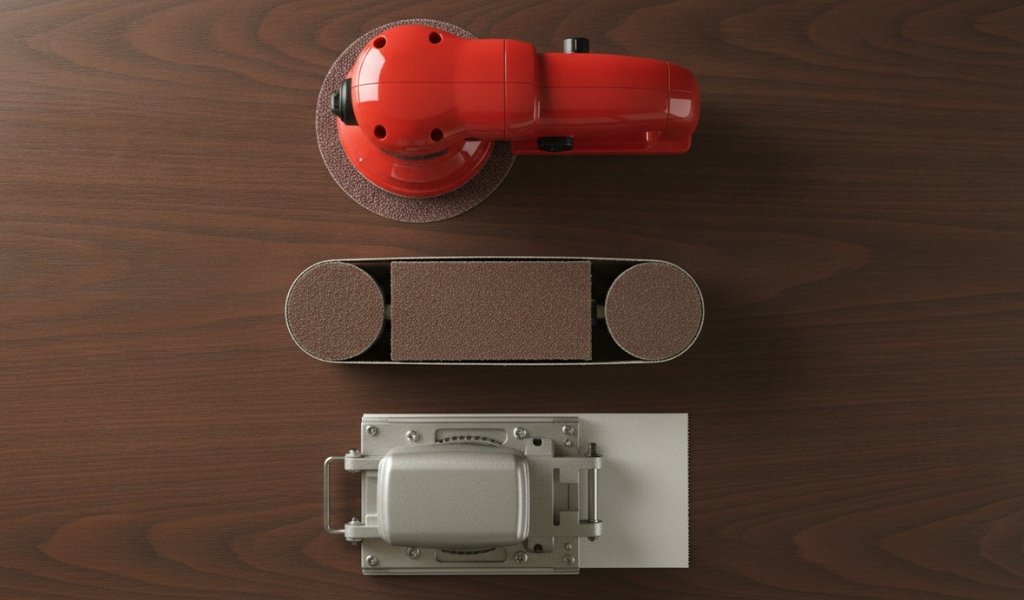
Random orbital sanders are the most versatile electric sander for general woodworking. The disc moves in an elliptical pattern that prevents swirl marks—a problem common with older orbital designs. Random orbital sanders accept disc-shaped sandpaper in a range of grits, attach easily to dust collection systems, and handle both coarse sanding and fine finish work. For most DIY projects, a random orbit sander is the single most option when upgrading your workshop with heavy-duty power tools.
Belt sanders use a continuous loop of sanding belts wrapped around two drums. They’re aggressive, fast, and well-suited for jobs where you need to clear a lot of material—stripping old finishes, flattening wide boards, or leveling joined panels. Belt sanders require a steady hand; tilting or pausing can gouge the surface quickly. Stationary belt sanders are preferred in a workshop setting for consistent, controlled results.
Pad sanders (sometimes called sheet sanders or finish sanders) use flat, rectangular sanding pads that oscillate in small orbits. They’re gentler than belt sanders and well-suited for flat surfaces where you need a fine, even finish. Their rectangular profile makes them effective right up to edges and into corners.
For large floors and decks, an angle grinder fitted with a flap disc or sanding disc can handle aggressive paint removal, stripping old varnish, and surface prep, though it requires experience to use without damaging the substrate.
While general wood sanding techniques work well for most standard projects, some specialized materials and complex forms demand a completely different approach.
Bamboo flooring can be sanded and refinished—but bamboo is not wood. It’s a grass product, and that distinction matters significantly when it comes to how you approach the sanding process.
Unlike solid hardwood, bamboo flooring is manufactured from compressed grass fibers, which gives it a surface that can be harder than many hardwoods but also more prone to splintering and delamination if sanded improperly. The veneer layer on engineered bamboo products is often very thin, meaning aggressive coarse sanding can cut through it quickly.
Start with no coarser than 60 grit—often 80 grit is the safer starting point—and work progressively through the grits rather than spending extra time at a single aggressive grit. Always , keep the sander moving at a steady pace, and check your depth frequently. For anyone considering this project in detail, Can You Sand Bamboo Flooring? covers the specific parameters, tool recommendations, and common pitfalls unique to this grass-based material.
Not every sanding project involves large flat surfaces. Fine-grit work on small, delicate objects—including paper mache crafts, small carvings, or intricate decorative pieces—requires a completely different mindset and toolkit.
For micro-sanding delicate crafts, fine grit sandpaper in the 220–400 range is your primary tool. The goal is not to remove material aggressively, but to smooth surface texture, knock down raised fibers or dried paste, and prepare the surface for paint or sealant. On paper mache specifically, the surface is fragile and inconsistent—built from layers of paper and adhesive that can tear or compress unevenly under heavy pressure.
Use small, folded pieces of fine grit sandpaper or the tip of a sanding foam. Apply only light fingertip pressure and work in small circular motions. Avoid lower grit entirely unless you’re removing a significant surface imperfection—and even then, proceed carefully. For a full hobbyist walkthrough of this technique, How to Sand Paper Mache provides step-by-step guidance specific to the unique texture and fragility of paper mache surfaces.
Even experienced woodworkers fall into these habits. Recognizing them early saves you hours of correction work later.
Mistake #1: Applying too much downward pressure or moving too fast
More pressure doesn’t mean faster results—it means uneven cutting, premature sandpaper wear, and an increased risk of gouging. Let the sandpaper do the work. Apply consistent, moderate pressure and move at a steady, controlled pace. If a surface isn’t cutting fast enough, switch to a coarser grit rather than pressing harder and causing an accidental dent.
Mistake #2: Skipping grits
Jumping from 80 grit directly to 220 grit leaves deep ridges that fine grit sandpaper isn’t designed to remove efficiently. Each grit in the progression is meant to erase the lines left by the one before it. Skip a step and those imperfections survive—invisible on raw wood, unmistakable under stain. Start rough, finish smooth, and don’t shortcut the middle.
Mistake #3: Tilting the power sander
Keeping a random orbital or belt sander flat on the surface is critical. Tilting the disc or pad—even slightly—concentrates pressure on one edge and creates ridges, gouges, or uneven spots that are difficult to sand out without removing significant material. Keep the pad fully flat, maintain even contact, and let the machine’s weight do the cutting.
Mistake #4: Sanding too aggressively on plywood veneers
Plywood surfaces are covered with a thin decorative veneer layer that can be as thin as 1/32 of an inch. Sanding through it exposes the less attractive core layers underneath—and there’s no fixing it short of resurfacing or replacement. Use fine grit only on plywood veneer surfaces, apply minimal pressure, and check your progress frequently. When in doubt, sand less.
Good technique means nothing if you’re working in an unsafe or unprepared environment. Wood dust is a genuine health hazard, and investing a few minutes in proper setup pays off every time.
Wood dust—particularly from hardwoods, treated lumber, and MDF—is classified as a respiratory hazard. Fine particles of sawdust produced during sanding can penetrate deep into the lungs and cause long-term damage with repeated exposure.
At minimum, wear an N95 respirator or a dust mask rated for fine particulates whenever you sand. Safety glasses protect your eyes from airborne particles, and if you’re working with power sanders for extended periods, hearing protection is worth adding as well. These aren’t optional precautions—they’re standard practice.
Most modern power sanders—especially random orbital sanders—include a built-in dust collection port. Connecting your electric sander directly to a shop vacuum dramatically reduces the amount of wood dust that becomes airborne, keeping both your lungs and your workspace cleaner.
For large-scale sanding work, a dedicated dust collector with a fine-particle filter is more effective than a standard shop vacuum. Some woodworkers also use a sander with dust shrouds or attach collection bags directly to the tool. Whatever system you use, don’t skip it—sanding dust accumulates fast and disperses widely.
Once you’ve finished sanding, the surface needs to be completely clean before any finish Even fine dust that’s invisible to the naked eye will embed itself in your finish coat ruining your chances of achieving a flawless, smooth finish.
A tack cloth—a sticky, resin-treated cloth—is the standard tool for this. Wipe it lightly across the entire surface in one direction to pick up fine dust without leaving residue. For water-based finishes, a slightly damp microfiber cloth works well. Avoid blowing dust off with compressed air; it redistributes fine particles into the air rather than removing them.
Start with a medium grit sandpaper—typically 80 or 120 grit—unless the surface has significant damage or an old finish that needs removal. Always sand with the grain of the wood, keep your pressure even, and use a sanding block on flat surfaces to avoid uneven contact. Work through the grits progressively (80 → 120 → 150 → 180 → 220) without skipping steps.
The pencil line trick is the most reliable method: draw a wavy line across the surface before each grit stage and sand until it’s completely gone. At the final grit stage, run your hand across the surface—it should feel uniformly smooth with no rough patches or ridges. Under raking light (a light held at a low angle to the surface), you should see no visible lines or mill marks.
Yes, light sanding between coats is standard practice. After the first coat of finish dries, sand lightly with 320–400 grit to knock down dust nibs, brush marks, or raised grain. Wipe clean with a tack cloth before applying the next coat. Do not sand after the final coat unless you’re planning to buff or polish the finish.
Wet sanding uses water, mineral spirits, or a dedicated lubricant between the sandpaper and the surface to reduce friction, prevent clogging, and produce an ultra-smooth finish. It’s used primarily on cured finish coats—not bare wood—at very fine grits (600–2000). The lubricant floats away the abraded material rather than allowing it to pack into the sandpaper, resulting in a finer, more polished surface than dry sanding at the same grit.
For tight corners, folded pieces of sandpaper or a profile sander work well. Sanding molds conform naturally to inside curves and concave profiles. For outside edges, a sanding block keeps pressure consistent and prevents rounding the edge unevenly. On very tight or intricate areas, wrapping sandpaper around a dowel or pencil gives you precise control without damaging adjacent surfaces.