Physical Address
304 North Cardinal St.
Dorchester Center, MA 02124
Physical Address
304 North Cardinal St.
Dorchester Center, MA 02124

When it comes to heavy lifting, securing loads, or creating reliable loops in steel cables, there is one small piece of hardware that plays a massive role: the wire rope clamp. Often referred to by pros as a wire rope clip or cable clamp, these simple mechanical devices are the backbone of temporary rigging, marine towing, fencing, and structural suspension systems.
Understanding the basics of wire rope clamps is not just about knowing how to thread a bolt; it is a fundamental safety requirement. Using the wrong type of clamp, or installing it incorrectly, can reduce the load-bearing capacity of your cable system by more than 50%, leading to catastrophic failures.
Whether you are an engineer managing an industrial site, a purchasing manager sourcing rigging hardware, or a DIY enthusiast setting up a backyard zipline, this comprehensive guide will walk you through the types, selection criteria, installation rules, and import secrets of these vital tools.
Wire rope clamps are metal fastening devices used to secure the loose end of a wire rope to create loops, eyes, or temporary cable terminations. They are commonly used in rigging, lifting, marine, fencing, and industrial cable applications.
Before diving into the mechanical technicalities, let’s break down exactly what this hardware is. A wire rope clamp is a mechanical fitting used to fix the loose end of a wire cable back onto the main body (the ‘standing part’) to form a secure loop or eye termination.
While heavy industrial setups often rely on permanent swaged sleeves (where a metal collar is permanently crushed over the rope using a hydraulic press), ‘rope clamps’ offer a massive advantage: they are completely removable and reusable.
To understand how they work, you need to look at their anatomy. A standard U-bolt style clamp consists of three simple but perfectly engineered parts:
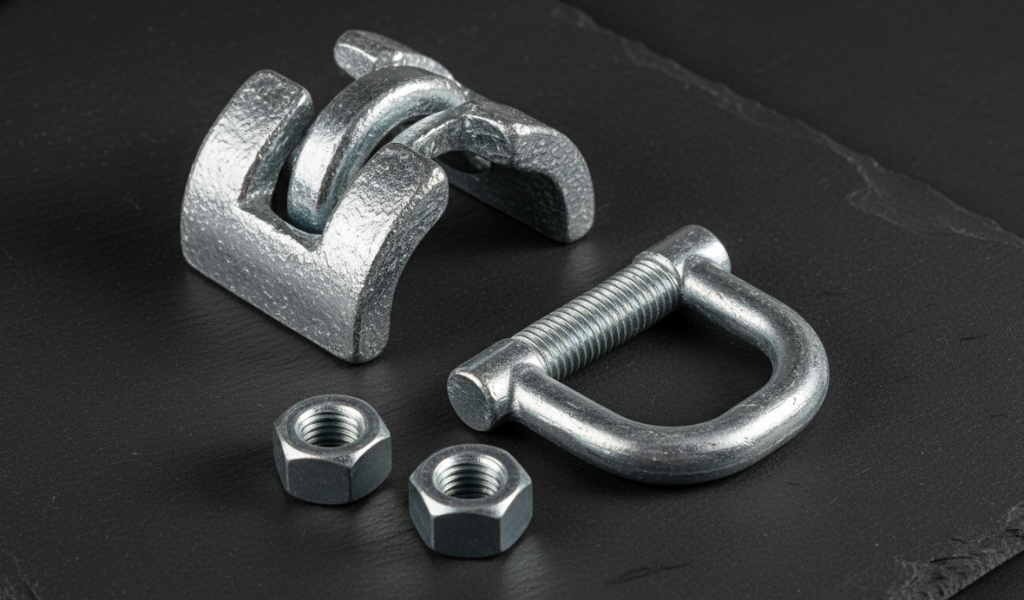
By tightening the nuts, the clamp forces the two sections of the cable together, creating enough frictional resistance to hold heavy loads. However, the simplicity of this design can be deceptive. If you mix up which way the saddle faces, the entire system can fail under tension.
Not all ‘wire clamps’ are created equal. Depending on where you live, your industry, and the weight of the load you are supporting, you will need to choose a specific design style. Using a light-duty retail clamp on an industrial crane line is a recipe for disaster.
Let’s look at the four major architectural types found in global supply chains today.
This is the gold standard for heavy-duty rigging and critical applications. The saddles of these ‘clamps’ are forged from hot carbon steel, which refines the internal grain structure of the metal and makes it incredibly strong, resilient, and resistant to sudden impact forces.
Best For: Overhead suspension, heavy industrial rigging, crane operations, and loads where safety is paramount.
Surface Treatment: Typically hot-dip galvanized (HDG), giving them a thick layer of zinc that protects against rust in harsh outdoor environments.
Visually similar to the forged type, malleable clamps feature a base made from cast malleable iron rather than forged steel. While they are highly functional, malleable iron is more brittle than forged steel and cannot handle the same dynamic stress.
Best For: Light-duty applications, temporary tie-downs, stationary fencing, and non-critical agricultural uses.
Warning: Never use malleable clamps for overhead lifting or pulling heavy live loads.
This is the most widely distributed light-duty clamp style across Europe and Asia. Built to the German DIN 741 standard, these feature a slightly rougher, cast malleable body. They are highly economical and come in two distinct variations: with internal grooves inside the saddle or with a smooth, grooved-free base.
Best For: General commercial use, hanging light banners, or securing non-weight-bearing utility lines.
If you are working under European metrics but need something tougher than the DIN 741, the DIN 1142 is the industrial standard. The clamp body is visibly wider, thicker, and designed to handle higher torque loads. Their surfaces are frequently coated in a bright yellow or colored zinc electroplating for rapid identification on work sites.
When assembling a cable terminal loop, there is a fundamental mantra that every rigger, sailor, and construction worker memorizes: “Never saddle a dead horse.”
This simple phrase is the most important rule in the world of rigging. The “saddle” refers to the heavy forge body of the clamp, while the “dead horse” refers to the dead end (the short, cut tail) of the wire rope. The standing part—the long length of rope that connects to the actual load—is the “live horse.”
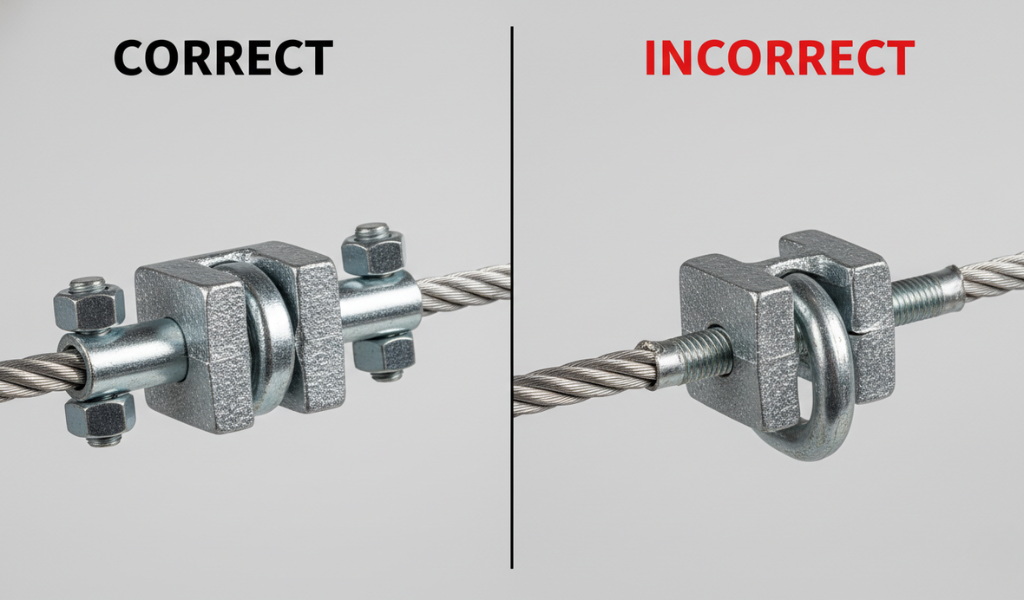
When you install a wire rope clamp, the saddle must always sit flush against the live, load-bearing side of the rope. The U-bolt must wrap around the dead tail. Why? The smooth, wide grooves of the saddle protect the structural integrity of the live rope under tension. If you put the sharp curvature of the U-bolt against the live rope, it will crush and crimp the individual steel wires, creating a high-stress fracture point where the cable will eventually snap.
Turn back the specified amount of wire rope from the end to form your loop. If you want to protect the loop from friction and warping, it is highly recommended to insert a solid steel ‘thimble’ into the eye before applying any clamps.
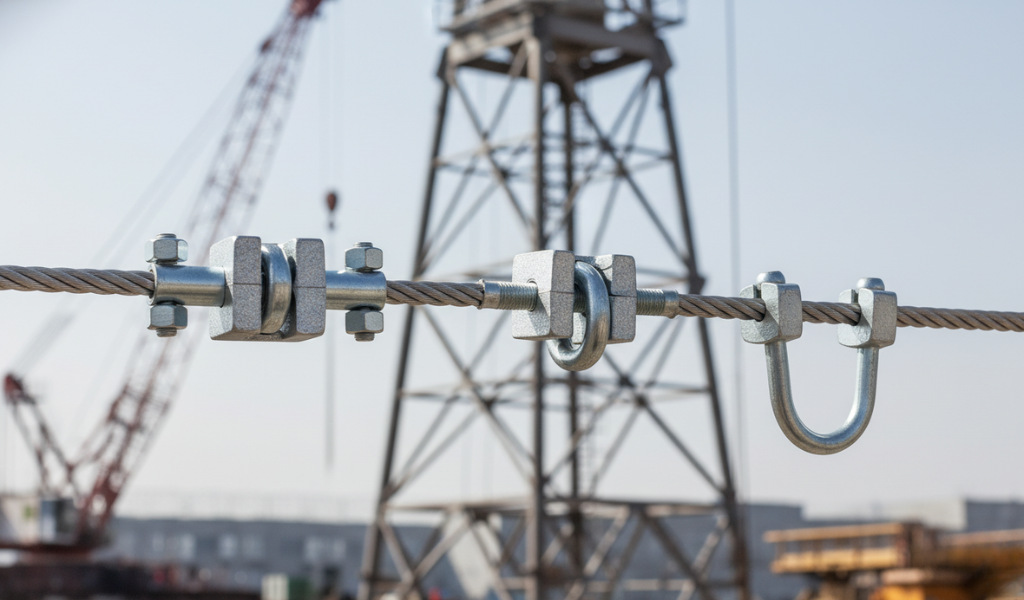
Place the first clamp closest to the dead end of the wire rope, leaving at least a few inches of tail extending past the U-bolt. Ensure the saddle is resting against the live rope. Tighten the nuts alternately and evenly to the manufacturer’s specified torque rating.
If your rope diameter requires a second clamp, place it closest to the loop or thimble. If you need three or more clamps, space them evenly between the first two.
Once all clamps are secure, apply an initial test load to the system. Under tension, the wire rope will compress slightly and its diameter will shrink. Immediately stop, lower the load, and re-tighten the nuts on every single clamp to compensate for this shrinkage.
A common mistake made by inexperienced operators is assuming that one or two clamps are enough for any cable. In reality, the number of rope clamps required is strictly dictated by the total thickness (diameter) of the wire rope you are using.
If you use too few clamps, the rope will slowly slip out under a heavy load. If you place them too close together, they won’t distribute the frictional force effectively.
The general rule of thumb for spacing is simple: the distance between each clamp should be equal to or greater than 6 times the diameter of the wire rope itself. Furthermore, the distance from the very last clamp to the raw, cut end of the dead tail should never be less than 140mm (roughly 5.5 inches) to prevent the wire from unravelling.
To make things easy, here is a quick-reference guide detailing the minimum number of clamps required based on standard cable diameters:
| Wire Rope Diameter (mm) | Minimum Number of Clamps Required | Recommended Spacing Between Clamps |
| Up to 19mm | 3 Pieces | 6x Rope Diameter |
| 19mm to 32mm | 4 Pieces | 6x Rope Diameter |
| 32mm to 38mm | 5 Pieces | 6x Rope Diameter |
| 38mm to 44mm | 6 Pieces | 6x Rope Diameter |
| 44mm to 60mm | 7 Pieces | 6x Rope Diameter |
Note: Always consult the manufacturer’s direct specification sheet for your exact cable type, as high-tensile or specialized synthetic-core ropes may require additional hardware.
Rigging lines can hold thousands of pounds of kinetic energy. If a cable snaps or slips, it can slice through equipment and endanger human lives within fractions of a second. To keep your work environment completely safe, keep these vital technical precautions in mind:
If you run an industrial procurement department, source hardware for a marine supply business, or work as an international trade manager, buying wire rope fittings in bulk requires a distinct set of business insights. Because these are highly commoditized steel products, navigating international trade classifications and quality controls is critical to protecting your margins.
When importing hardware, getting caught with an incorrect Harmonized System (HS) code can lead to customs delays, unexpected tariffs, or audits. For standard steel wire rope clamps, the product globally falls under:
In major manufacturing hubs like China, the standard tariff classification code applied to these card-head rigging components is 7326909000 (“Other non-industrial articles of iron and steel”). Ensure your customs broker reviews the specific regional sub-headings of your destination port, as subtle design changes (such as adding stainless steel finishes) can alter the duty rates.
Here is an industry secret that many rookie procurement managers overlook: unlike lifting hooks, shackles, or turnbuckles, standard wire rope clamps are almost never pull-tested for tensile failure by manufacturers.
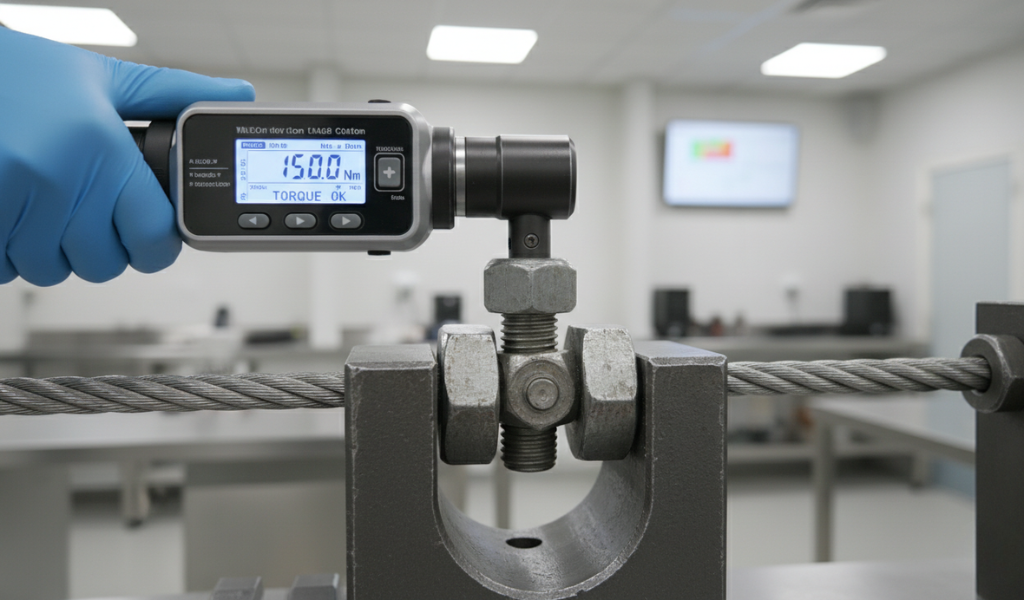
Instead, the industry standard for verifying structural quality is a torque test. This test measures whether the threads on the U-bolt and the structural integrity of the cast or forged saddle can withstand the raw rotational squeezing force required to flatten industrial steel cable without stripping, cracking, or shearing. When auditing a supplier, always ask for their torque testing certifications rather than tensile load readouts.
Because malleable steel clamps offer an exceptional balance of low cost and high functional strength, they are frequently selected for large-scale construction projects. However, they are highly susceptible to moisture damage during transit.
During long sea voyages inside humid shipping containers, standard galvanized layers can oxidize, producing a powdery white film known as “white rust.” While it doesn’t immediately ruin the deep structural integrity of the metal, it destroys the retail appeal of the product.
When purchasing in bulk, always negotiate with your exporter to wrap individual batches in moisture-barrier plastic wrap or inner retail cartons, and request brand-new electroplated finishes rather than components that have been sitting in damp warehouses over a monsoon season. Sourcing from verified manufacturers who use modern automated zinc-plating techniques will drastically extend the shelf-life of your inventory.
At first glance, a wire rope clamp might look like a modest, low-tech piece of hardware. However, as we have explored, it is a critical engineering component that demands respect, precise handling, and high-quality sourcing. In the rigging and industrial world, there is simply no room for guesswork. Skipping a single clamp, guessing the torque, or installing a U-bolt backward can transform a secure system into an immediate safety hazard.
By mastering the basics of wire rope clamps—from remembering to never ‘saddle a dead horse’ to calculating exact spacing and monitoring for micro-slippage—you guarantee the structural integrity of your lines and, most importantly, protect the people working around them.
Take the time to double-check your setups, test your torque, and inspect your hardware regularly. In the world of heavy lifting and securing loads, patience and precision are the ultimate keys to safety.
Generally, no. Most industrial regulatory bodies (such as OSHA or ASME) strongly prohibit the use of field-assembled wire rope clips for critical overhead lifting slings. For cranes and overhead hoists, permanent, factory-pressed swaged sleeves or poured socket terminations are required because they offer a guaranteed 100% efficiency rating and cannot be loosened by vibration. Wire rope clamps are meant for securing loads, suspension lines, stayed rigging, and utility lines.
If you install the clamps backward (with the U-bolt pressing against the live, load-bearing line), you will crimp and crush the primary structural wires of the cable. Under tension, the wire rope’s efficiency drop can easily plummet to below 50%, causing the line to snap unexpectedly at a load well below its rated threshold. Always ensure the saddle rests on the live rope.
Yes, but you must inspect it carefully first. Check the threads of the U-bolt to ensure they aren’t stripped, cross-threaded, or stretched out from over-torqueing. Inspect the saddle body for hairline cracks or severe rust pockmarks. If the clamp is distorted, twisted, or heavily pitted by marine corrosion, discard it immediately and use fresh hardware.
Galvanized steel clamps are made of carbon steel coated with zinc. They are incredibly strong and economical, making them perfect for outdoor heavy construction. Stainless steel clamps (usually Type 304 or 316), offer vastly superior resistance to acid, salt water, and chemical corrosion. They are preferred in high-end marine rigging, architectural installations, and wastewater treatment plants, though they carry a higher unit cost.
Absolutely not. Wire rope clips are explicitly designed to bite into tough steel strands. If you attempt to tighten a metal U-bolt and grooved saddle onto nylon, polypropylene, or Manila fiber ropes, the sharp metal edges will cut, fray, and shred the synthetic fibers almost instantly under load. For fiber ropes, use specialized knots, splices, or plastic thimble clips specifically rated for textiles.