Physical Address
304 North Cardinal St.
Dorchester Center, MA 02124
Physical Address
304 North Cardinal St.
Dorchester Center, MA 02124

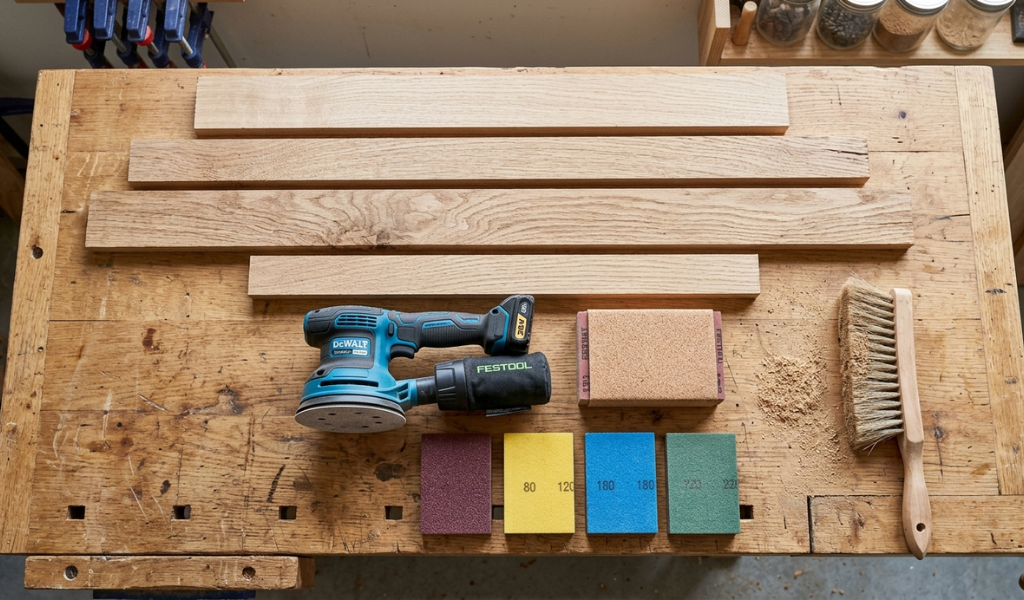
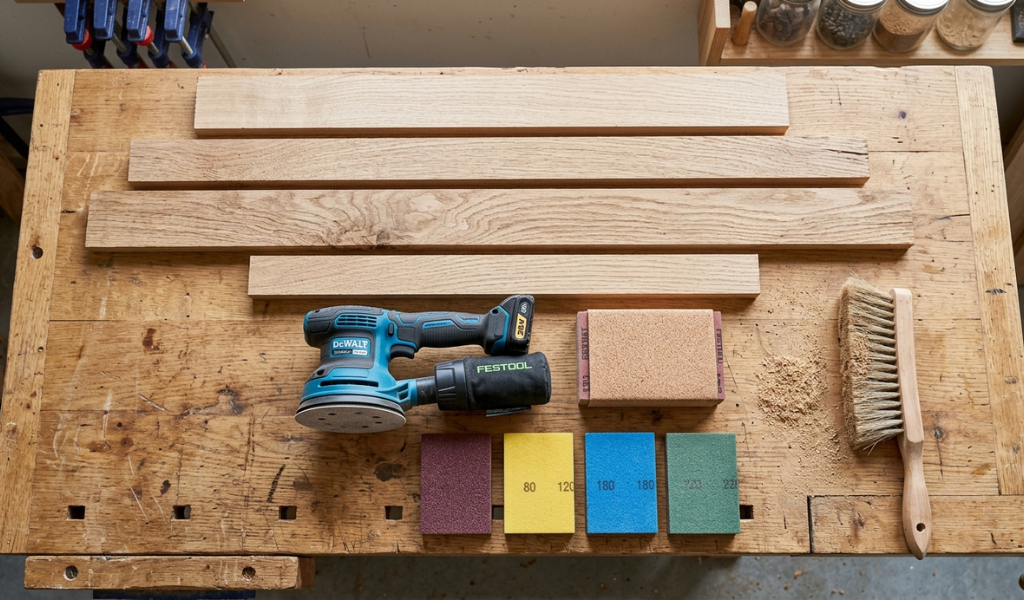
Wood sanding tools range from simple sheets of sandpaper to powerful random orbital sanders and wide belt machines. Choosing the right sanding tool depends on your project type, skill level, and whether you need manual control or machine speed. This guide covers every major option to help you sand smarter.
Getting a smooth, clean surface on wood is one of those skills that separates average woodworking from truly professional results. And at the heart of that skill? The right wood sanding tools. Whether you are refinishing old furniture, building a deck, or working on a fine cabinet, sanding is the step that makes everything look polished and ready for paint or stain.
This guide is written for woodworkers at every level from weekend hobbyists to full-time craftspeople. By the time you finish reading, you will know exactly which sanding tools suit your projects, how to use them properly, and what to watch out for before spending your money.
Sanding tools are devices used to smooth, shape, or clean wood surfaces by rubbing abrasive materials against them. The abrasive does the work — it scratches away tiny amounts of wood, paint, or finish until the surface is even and smooth.
These tools come in many forms. Some are as simple as a sheet of sandpaper wrapped around a block of wood. Others are powerful electric machines that can flatten an entire panel in seconds. What connects them all is the basic principle: abrasion removes material, and controlled abrasion creates a smooth, consistent surface.
Sanding tools are used for several purposes in woodworking. They prepare raw lumber for finishing, remove old paint or stain, level glue joints, and refine curved or flat surfaces before a topcoat is applied. No matter what kind of woodworking you do, sanding is almost always part of the process.
At its core, sanding is about controlled removal. A sanding machine, whether it is a handheld electric sander or a large industrial wide belt sander, uses abrasive material to physically strip tiny layers from a wood surface.
The goal is threefold: smooth out surface irregularities, bring the wood to a consistent thickness, and prepare the surface for a finish like paint, varnish, or oil. A sanding machine simply speeds up this process. What might take hours of hand-sanding can be done in minutes with the right machine.
More advanced machines, like wide belt sanders, use a system of rollers and conveyor belts to pass the workpiece under multiple sanding heads. First, roughing heads with coarse abrasive remove material quickly. Then, finer finishing heads refine the surface texture. An integrated dust collection system pulls sawdust away during the entire process, keeping the surface clean and the air breathable.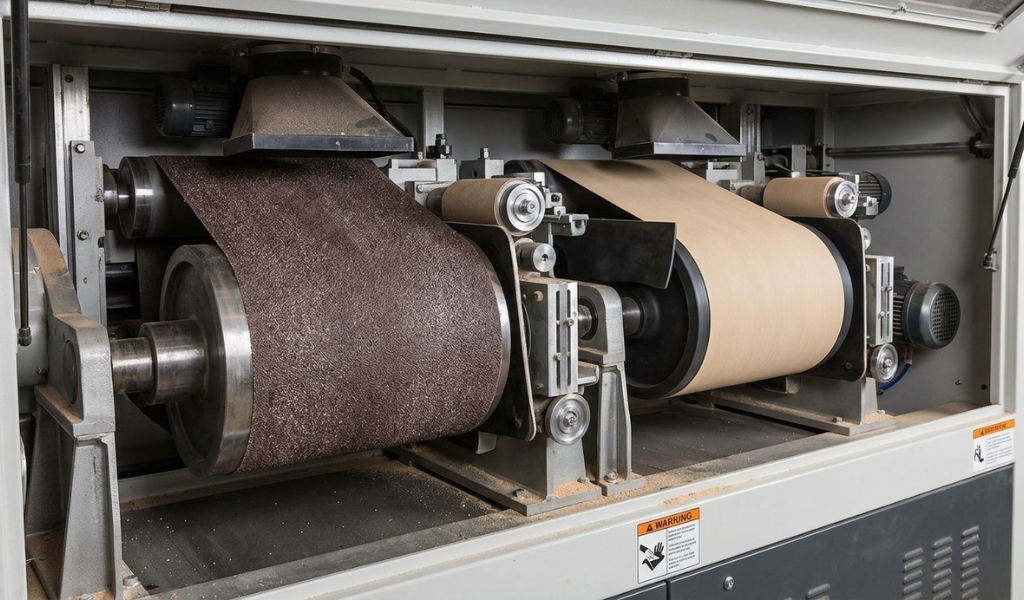
Before adding a new sander to your shop, it pays to think carefully about a few things.
What type of work will you be doing: Flat panels, curved moldings, and fine detail work all require different tools. A random orbital sander that works great on tabletops will not help you much inside a tight corner or along a shaped edge.
How much material do you need to remove: If you are doing light finishing work, a fine-grit orbital sander is plenty. If you are flattening rough lumber or stripping layers of old paint, you need something more aggressive like a belt sander or drum sander.
How often will you use it: Occasional home projects do not require heavy-duty equipment. But if you are running a woodworking shop with daily production, investing in a professional-grade tool will save you time and money in the long run.
What is your budget: Entry-level sanders are affordable and great for beginners. Higher-end models cost more but offer better dust collection, more consistent results, and longer lifespans. Do not buy more tool than you need, but do not cheap out on something you will use constantly.
Grit selection matters: Every sanding job starts with a coarser grit sandpaper to remove material, then steps up to finer grits for a smoother finish. Common grits range from 40 (very coarse) to 400 (very fine). Understanding when to switch grits is just as important as picking the right sander.
Wood sanding tools fall into two broad categories: manual and power. Within those categories, there are several specific types, each built for a different kind of job.
Understanding these types helps you build a well-rounded toolkit without buying things you will never use.
The term “sanding tools” covers everything from a basic sanding block to a multi-head industrial machine. Here is a quick breakdown of the main categories:
Each type has its place. Most woodworkers own at least two or three of these, depending on what they build.
Manual sanding tools are the foundation of every woodworking toolkit. They are affordable, quiet, and give you full control over how much pressure you apply and where.
Sanding blocks are the simplest option. You wrap a sheet of sandpaper around a flat block either a purpose-made rubber or cork block, or just a spare piece of wood — and sand by hand. They work well for flat surfaces and are perfect for final finish passes where you need a light touch.
Sanding sponges are flexible and great for curved or contoured surfaces. They conform to the shape of the wood, making them useful for moldings, rounded edges, and furniture legs.
Detail sanders and files are narrow abrasive tools that fit into crevices and profiles. They are especially helpful on carved surfaces or areas where a larger tool simply cannot reach.
Manual tools require more effort and time than power tools, but they give you precision that machines sometimes cannot match. For final-stage finishing or delicate work, hand sanding often produces the cleanest result.
Power sanding tools dramatically speed up the sanding process. They are a must-have for any serious woodworking project.
The random orbital sander is one of the most popular power sanding tools among woodworkers of all levels. It moves in two ways simultaneously spinning in a circular motion while also orbiting in a random pattern. This dual action prevents circular scratch marks from appearing on the surface, which is a common problem with basic disc sanders.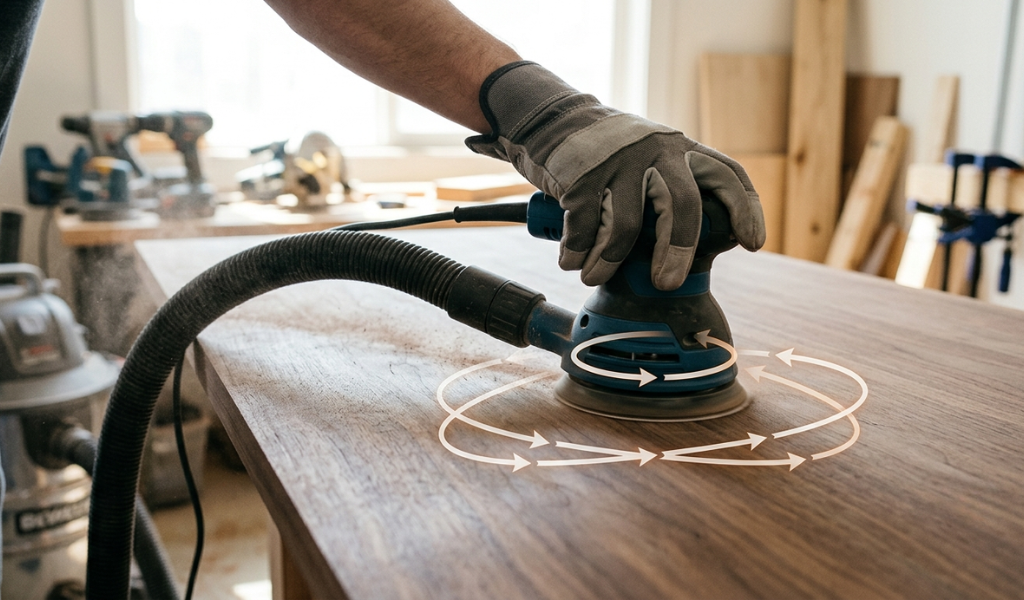
Random orbital sanders accept round sanding discs, usually in 5-inch or 6-inch sizes, and work with hook-and-loop (velcro-style) fasteners for quick disc changes. They are versatile enough to handle rough material removal with coarser grits and fine finishing with finer grits.
A belt sander uses a continuous loop of sandpaper that runs over two rollers. It is fast and aggressive, making it ideal for removing large amounts of material quickly like leveling a glued-up panel or stripping paint from a floor. Because of that power, it takes a bit of practice to control. Too much pressure in one spot can leave gouges or uneven areas.
Also called a finishing sander, the orbital sander uses a quarter- or half-sheet of standard sandpaper and moves in small, tight circles. It is gentler than a belt sander and great for smoothing surfaces before painting. However, it can leave fine swirl marks if not used carefully.
A drum sander is a stationary machine that passes wood under a rotating drum wrapped in abrasive. It excels at achieving consistent thickness across wide panels, something that is hard to do by hand. Drum sanders are a common addition to woodworking shops that produce a lot of glued-up panels or tabletops.
A disc sander mounts abrasive paper on a flat, rotating disc. It is fast and useful for sanding end grain, shaping curved edges, and cleaning up mitered corners. Many disc sanders are sold as combination units paired with a belt sander, giving you two tools in one machine.
Choosing between cordless and corded power sanding tools comes down to where and how you work.
Corded sanders deliver consistent power throughout the entire job. There is no battery to drain, and they are generally more powerful, which matters when you are doing heavy material removal. If you work in a fixed shop environment, corded tools make a lot of sense.
Cordless sanders offer freedom of movement. They are great for jobsite work, outdoor projects, or situations where running a cord is inconvenient or unsafe. Modern lithium-ion battery technology has made cordless sanders surprisingly capable many perform close to their corded counterparts for most finishing tasks.
For most home woodworkers, a cordless random orbital sander handles light-to-medium work comfortably. If you regularly do high-volume or aggressive sanding, a corded belt or drum sander is worth having in your arsenal.
There is no single “best” sanding tool; the right choice depends entirely on what you are making and the stage of work you are in.
That said, if you could only own one power sanding tool, a random orbital sander is the most versatile pick. It handles flat surfaces, works on curved edges, leaves minimal scratch marks, and is easy to control. Most woodworkers start here and build from there.
For a well-rounded toolkit, consider this combination:
That combination covers the majority of woodworking scenarios without breaking the bank.
Starting out with sanding tools can feel overwhelming, but a few good habits make a big difference early on.
Always sand with the grain. Sanding against the wood grain leaves scratches that are visible after finishing. Follow the direction the wood fibers run whenever possible.
Work through the grits progressively. Do not jump straight from 60-grit to 220-grit. Move through intermediate steps (80, 120, 180) to get a truly smooth surface without deep scratches showing through.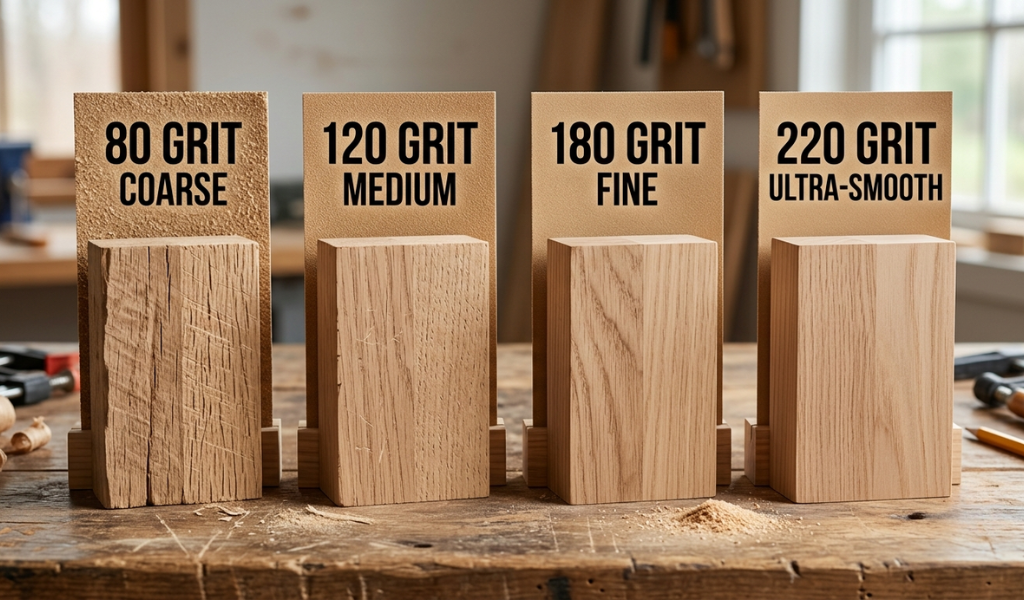
Let the tool do the work. Pressing hard on a sander does not make it sand faster it just wears out the abrasive and can cause uneven results. Apply light, consistent pressure and move at a steady pace.
Dust collection matters. Sawdust clogs sandpaper and reduces its effectiveness quickly. Use a sander with a built-in dust port connected to a shop vacuum or dust collector. Your lungs will thank you too.
Check your surface often. Wipe the wood clean and inspect it under raking light (light hitting the surface at a low angle). This reveals any remaining scratches or uneven spots you might have missed.
Stripping paint from wood requires an aggressive approach. The best tool for this job is a belt sander with coarse-grit sandpaper, typically between 40 and 60 grit. The belt moves fast and removes paint efficiently across flat surfaces like doors, floors, and tabletops.
For smaller areas or more detailed work, a random orbital sander with 60-grit discs also works well and offers more control. It is less likely to gouge the wood surface compared to a belt sander.
If you are removing paint from a piece with curves, profiles, or detail work, a detail sander or even manual scraping followed by hand sanding is often the safest approach. Power tools on detailed profiles can damage edges and corners before you realize it.
Whatever tool you use, always wear a dust mask or respirator when sanding paint especially on older pieces that may contain lead-based paint.
One of the biggest challenges in woodworking is getting a smooth finish in tight corners, inside cabinets, along narrow profiles, and in spots where a large sander simply will not fit.
Several sanding tools are built specifically for these situations.
Detail sanders (also called mouse sanders or corner sanders) have a small, triangular pad that fits into 90-degree corners. They are compact, lightweight, and easy to maneuver in confined spaces.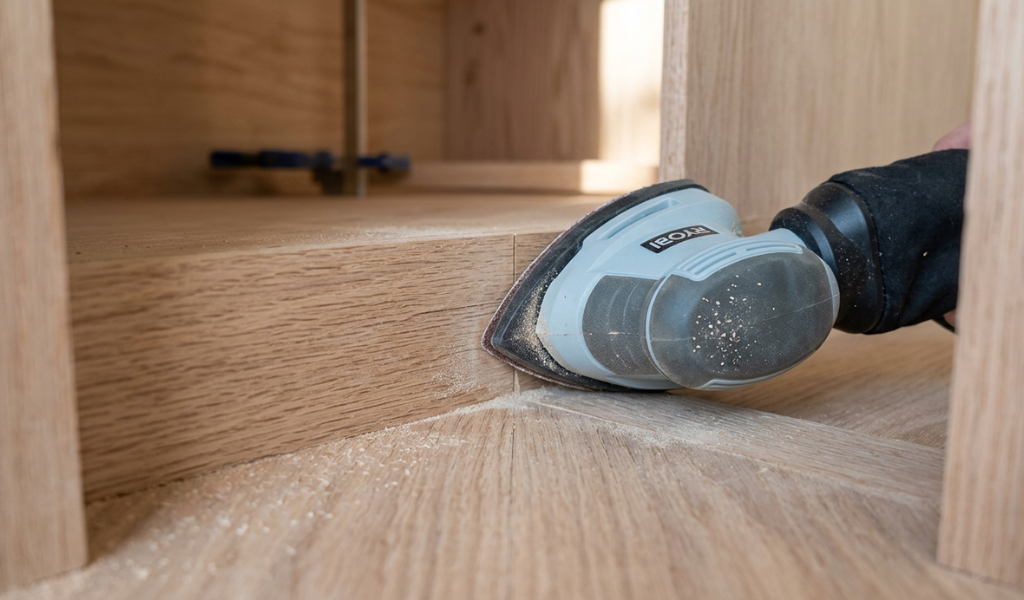
Spindle sanders are stationary machines with a rotating, oscillating drum that moves up and down while spinning. They are ideal for sanding the inside edges of curved cuts like the inside of a routed arch or a curved cabinet door frame.
Sanding sticks and files are narrow, flat, or rounded abrasive tools you use by hand. They slide into tight grooves, narrow gaps, and detailed profiles where no machine can reach.
Folded sandpaper is sometimes all you need. Folding a sheet of sandpaper into a narrow strip or crease and working it into a corner by hand gives you direct control and access in very small spaces.
For professional-level work on profiled moldings and shaped pieces, profile sanders use multiple sanding heads arranged to follow complex contours automating what would otherwise be hours of tedious hand work.
For anyone just starting out in woodworking, the random orbital sander is the best first purchase. Here is why:
It is easy to use. The random orbital motion reduces the risk of leaving visible sanding marks, which is a common frustration for beginners. You do not need to be precise about direction, just keep the tool moving and let it do the work.
It is versatile. One random orbital sander handles most beginner-level projects, from sanding furniture to prepping wood for painting.
It is affordable. Good-quality random orbital sanders are available at a wide price range. Brands like Makita, Bosch, and DeWalt offer reliable models for under $100, with professional options available for those who want to invest more.
Once you are comfortable with a random orbital sander, adding a belt sander for heavier material removal is a logical next step. From there, a detail sander for tight corners rounds out a solid beginner toolkit.
Wood sanding tools are not glamorous, but they are what stand between a rough piece of lumber and a finished product you are proud to show off. Picking the right sanding tool and learning to use it properly is one of the most valuable skills you can develop as a woodworker.
Start simple. A random orbital sander and a quality set of sandpaper in multiple grits will carry you through most projects. As your work becomes more varied and demanding, add tools that solve specific problems: a belt sander for speed, a detail sander for tight corners, a drum sander for wide panels.
Take your time with each grit, sand with the grain, and always collect your dust. The difference between a mediocre finish and a truly professional one often comes down to how well you sand — not how expensive your other tools are.
What grit sandpaper should I start with?
Start with a coarser grit to remove material and work your way up. For rough lumber, begin around 60 to 80 grit. For already smooth surfaces that just need refinement, starting at 120 grit is usually fine. Finish with 180 or 220 grit for a smooth, paint-ready surface.
Can I use the same sander for wood and metal?
Some sanders — particularly belt and random orbital models can handle both wood and metal with the right abrasive. However, metal sanding requires specific abrasive materials and generates heat and sparks, so always check the tool’s specifications before switching materials.
How do I know when to change my sandpaper?
When the paper stops cutting efficiently and you have to press harder to get results, it is time to change it. Clogged or worn sandpaper damages surfaces and wastes your time. Fresh abrasive always works faster and cleaner.
Is a random orbital sander the same as an orbital sander?
No. A random orbital sander moves in two simultaneous motions spinning and orbiting which virtually eliminates visible swirl marks. A standard orbital sander moves in a fixed circular pattern, which can leave fine circular scratches on the surface. For most woodworking applications, the random orbital version produces a better result.
Do I really need dust collection when sanding?
Yes. Sawdust is not just messy fine wood dust is a respiratory hazard with prolonged exposure. Most power sanders include a dust bag or dust port. Connecting your sander to a shop vacuum or dedicated dust collector dramatically improves air quality and keeps your abrasive working longer.
What is the difference between a drum sander and a belt sander?
A belt sander is a handheld or benchtop tool for fast surface material removal on flat pieces. A drum sander is a stationary machine designed for precision thickness sanding on wide panels. Drum sanders feed the workpiece through automatically and are better suited to consistent, repeatable results across large flat surfaces.
How do I prevent sanding marks from showing after I apply a finish?
Sand progressively through grits without skipping steps, and always do a final pass by hand with the grain using 220-grit sandpaper. Wipe the surface with a tack cloth or damp rag and let it dry before applying any finish. Any remaining scratches will become visible under a coat of oil, varnish, or paint — so take your time with that final grit.